ClioSport.net

Register a free account today to become a member!
Once signed in, you'll be able to participate on this site by adding your own topics and posts, as well as connect with other members through your own private inbox!

  • When you purchase through links on our site, we may earn an affiliate commission. Read more here.

PH1 172 - project


scotiamr2t

ClioSport Club Member
  Mazda 2, Ph1 172
Well after a rather lengthy search for a PH1 172, and going to see a few supposed "mint" examples which in reality turned out to be absolute dogs! I came to the conclusion that in order to get what I was after in the budget I had allowed myself I was going to have to travel a fair old distance!

So I widened my search and finally found what appeared to be from speaking to the seller and looking at photos etc a genuine unmolested 172, problem being it was 7hrs away! A lot of thought went into whether I should risk such a journey after having a few horrors with false descriptions in the past.

Decided to bite the bullet and commit to a provisional sale permitting the description and condition was as described. Date was arranged for viewing/collection, on the day I set off at 6am after an all day wedding the day before!! Luckily Dan the seller couldn't have been more honest about the car after viewing, top bloke. So the cash was handed over and all other formalities put in place and then I was the happy owner of my first PH1. All that was left to do was drive 7hrs back up to central Scotland.

Picture of the car after the long 7hr drive home, arrived back at 10pm so in essence a 16hr day after 3 hours sleep! (excuse the blurry photos im no photographer)
P1010862.jpg

P1010861.jpg


Drove flawlessly all the way home which was a relief as the day was long enough. Theres a few bits im going to tidy up/fix as im not too happy with them, typical headlights need restored so 3M kit has already been ordered. door handles and trim around the mirror/window buttons needs removed and replaced or restored. Drivers side wing mirror needs to be sprayed as its got too many scratches for my liking, most of the bits are due to age but there cheap fixes that will tidy it up so why not.

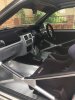
few photos from the day after
P1010865.jpg

P1010874.jpg

P1010868.jpg

P1010866.jpg

P1010872.jpg

P1010870.jpg


Pretty clean and tidy for its age, other than the tidying up bits mentioned before larger plans are

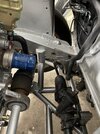
AST's and whiteline ARB
Flock the top half of the dash (although the blue is growing on me)
Retrim the steering wheel
Refurb wheels
More than likely new exhaust as the current system is a bit too loud for me
Brembos
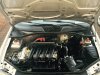
General tidy up of the engine bay.
Possibly polybush throughout (not decided yet)
Also may fit bucket seats as not a fan of how high you sit in the car


most of the above should happen over winter all going to plan, other than that it'll be drive and enjoy
 

scotiamr2t

ClioSport Club Member
  Mazda 2, Ph1 172
christ this needs an up-date! what started off as resto project quickly became a track project! Its now full stripped, AST's, weld in cage etc

really should up date with current pictures
 

scotiamr2t

ClioSport Club Member
  Mazda 2, Ph1 172
@Coops Turbo 100% agree. To a point i still regret it to this day, wish i had kept it super clean an bought a rougher one to track.

I still keep it clean an it doesn't want for anything. Was just too much fun on track
 

Coops Mk1

ClioSport Club Member
  Lots of Scrap...
@scotiamr2t I've got no room to talk anyway, my clio history has some harrowing regrets in it!

and the current 1993 MK1 is a caged and stripped track car also..............oops!
 

scotiamr2t

ClioSport Club Member
  Mazda 2, Ph1 172
Cheers guys, its a track car but i try and keep it tidy and looking half decent. Exterior is pretty much standard except lower on AST's an a few quick release fittings for the bumper. waiting on the pro 1.2's being delivered from rimstock
 

scotiamr2t

ClioSport Club Member
  Mazda 2, Ph1 172
Pulled it out the garage for a quick check over before it goes to be corner weighted an re-aligned. Gave the engine bay a quick clean an rolled it back in the garage. Will change after wheel alignment as going epas, deleting hids and a few other bits
 

Attachments

  • IMG_1643.JPG
    IMG_1643.JPG
    358.9 KB · Views: 57
Last edited:

scotiamr2t

ClioSport Club Member
  Mazda 2, Ph1 172
Christ i forgot I had this thread! Safe to say it is well out of date.

after years of reliable track and road miles, in winter 2019 i decided I fancied a change or rather hangs if engine. So the F4R was removed and sold, next up……..K20 of course!

base engine was purchased from stuart Robertson.
0D491E24-4E5B-4568-906E-8F5059B11EC4.jpeg


It quickly became apparent the engine, well didn’t fit. This resulted in some cutting of the passenger chassis leg to clear the gearbox, not ideal but with the metal added back in I didn’t see it being an issue
52C76082-B291-4542-8331-9779853686B5.jpeg

9905CD3E-0E39-4DBE-B3FA-3ED3E1C33C06.jpeg


i then had to make mounts, if I was to do it again I would change how I done the drivers side mount. But it works so it will do for now
A28D9E0F-43A6-4A8A-991A-C6BF88A62154.jpeg

1AC9E4B8-6F71-4011-BBEE-FF776C94803B.jpeg
D2467CB8-C35F-42AB-9188-A22441C38CD4.jpeg


Now with the mounts mocked up on the chassis legs it was time to mount engine and make sure my maths and templates were correct.

Thankfully they were!

Upon refitting the subframe or rather attempting to refit. It became apparent it would need quite a bit of work given how low o had mounted the engine. So subframe was sold and the decision was made to fabricate a tubular subframe

jig was made for the rear mounting points and rack mounts. Which resulted in the below, not finished here but gives a good idea.
E0FAF345-ACFF-4D4F-8F9F-F42D5D0996A3.jpeg


The Clio then took. Back seat whilst a rewired and rebuilt the engine of one of my other projects

61B31C3C-44CF-41BE-8456-0A137DB77859.jpeg


more to follow on both later
 

scotiamr2t

ClioSport Club Member
  Mazda 2, Ph1 172
After some mechanical and wiring work on the Healey in the form of changing from dynamo to alternator and a few other modern improvements for European road trips.
IMG_8662.JPG

IMG_8672.JPG


The Healey was put back in the garage until covid allowed a Euro trip! so it was back to the clio, first steps were to rebuild the gearbox and engine.

Gearbox part way thought stripping for rebuild
IMG_8604.JPG


Gearbox was completely stripped, casings vapour blasted ready for painting before rebuilding the box. Decision was made to fit an M-Factory diff at the same time and keep the standard EP3 type R final drive although most said i should fit a shorter FD. So time will tell if i made the correct decision or not!

IMG_8698.JPG


Once the gearbox was done the same process was carried out on the engine, stripped, cleaned all new bearings etc. Didn't take many pictures of the process unfortunately! Too busy measuring clearances etc to take pictures. End result i was happy with

IMG_8651.JPG


Once the engine and box were done the floorpan of the car started to annoy me as it was a little too dirty for me! So the decision was made to take the floorpan back to bare metal, a decision i lived to regret but also glad i done it. It seemed to take an age to strip the floor, sort the little rust there was, prep, seal, stonechip, overpaint and clearcoat.

After stonechip was applied
IMG_8913.JPG


Once painted
IMG_8951.JPG
 

scotiamr2t

ClioSport Club Member
  Mazda 2, Ph1 172
As i had gone to the effort of making the shell, engine and gearbox pretty clean and replaced all the bolts or had the old ones stripped and plated. I couldn't have put the old crusty rear beam etc back on so i had the rest of the bolts stripped and plated. The rear beam and other components were blasted and instead of powdercoating again i thought i would try cerakote. I was impressed with the results.

Part way through rebuild (scabby old discs as new ones hadn't arrived)
IMG_8953.JPG


front subframe as powdercoted along with the tubular lower arms.
IMG_8955.JPG


Not long after this the car had all the suspension refitted and was removed from the jig to refit the engine and a few other components.
LRZO1933.JPG


As the engine wasnt very easy to remove, i decided to make a dolly for the engine to ease removal. This was mocked up on a spare engine
IMG_8322.JPG


so that i could then use this to remove the engine the front crossmember was cut off and a removable frame made, at the same time i had a local company fab up a new radiator to replace the old direnza radiator.
WSQN8788.JPG


A few other aspects of the project ran away with themselves and i decided to ditch the renault servo asssist in favour of a pedal box.
IMG_9660.JPG


More up dates to follow
 

Attachments

  • IMG_9485.JPG
    IMG_9485.JPG
    2 MB · Views: 18

scotiamr2t

ClioSport Club Member
  Mazda 2, Ph1 172
This image shows the sump clearance with the engine mounted,

IMG_9585[1].JPG


early on i knew i wanted to make an engine and chassis loom but the decision on which ecu to go with took a while. I finally after speaking to numerous people, made the decision to go with ECU master. So loom was made to suit this choice. Overhead shot of engine with loom in place, this gives a good indication of where in the bay the engine sits. It also sshow how much space there is behind the engine, most likely will a turbo will go in the future

IMG_9586[1].JPG


IMG_9491[1].JPG


Next up date will be based around the ECU master products and chassis loom.


Top