ClioSport.net

Register a free account today to become a member!
Once signed in, you'll be able to participate on this site by adding your own topics and posts, as well as connect with other members through your own private inbox!

  • When you purchase through links on our site, we may earn an affiliate commission. Read more here.

Relax....it’s a Rover


Gally

Formerly Mashed up egg in a cup
ClioSport Club Member
My new favourite thread! I read the first page thinking this is 2018! No way he went ahead with that work!

Bravo mate! Really impressed!

We just had a customer reshell this one of 2 ever made. MG Rover have a crazy following.
 

Attachments

  • 20200122_134459.jpg
    20200122_134459.jpg
    351.9 KB · Views: 192
  • 20200122_133845.jpg
    20200122_133845.jpg
    329.8 KB · Views: 193

-Simon

ClioSport Club Member
  172-E92 M3-ZT V8
My new favourite thread! I read the first page thinking this is 2018! No way he went ahead with that work!

Bravo mate! Really impressed!

We just had a customer reshell this one of 2 ever made. MG Rover have a crazy following.
Thanks bud. A proper labour of love and most people think i am mad but it will be worth it when its done. Getting some real enjoyment out of doing most of it myself as well.
 
  Swift Sport
Can't remember the last time I read a whole build thread on here, but I've thoroughly enjoyed reading this one!

I'm a fan of Austin/Rover too, albeit only 1% of the enthusiast you are judging from this thread!

I starting driving in a Mini, then an MG Metro. My dad had a fair share of Austin's and Rover's too. Nearly bought a 2.5V6 ZS a few years ago and probably would've if it had been better looked after, because it drove great!

My best mate bought a Metro yesterday, but it's quite a special one...

0a2c2b53-a79c-4252-b14a-69c7be2a9677.jpg
 

-Simon

ClioSport Club Member
  172-E92 M3-ZT V8
Can't remember the last time I read a whole build thread on here, but I've thoroughly enjoyed reading this one!

I'm a fan of Austin/Rover too, albeit only 1% of the enthusiast you are judging from this thread!

I starting driving in a Mini, then an MG Metro. My dad had a fair share of Austin's and Rover's too. Nearly bought a 2.5V6 ZS a few years ago and probably would've if it had been better looked after, because it drove great!

My best mate bought a Metro yesterday, but it's quite a special one...

View attachment 1453940
Thanks mate - means a lot. Need more details on the metro though, can’t just leave a picture hanging there....:)
 
  Swift Sport
Thanks mate - means a lot. Need more details on the metro though, can’t just leave a picture hanging there....:)
It has a 1.8VVC conversion with an LSD. It's running a mix of custom Mini/Metro hydragas suspension. It has a fuel cell in the boot and a full custom cage. It runs on slicks in its class (sprinting). That's all I can remember without texting him for more info.

Has plans are to extract more power from the K-Series and make it road legal again.
 

-Simon

ClioSport Club Member
  172-E92 M3-ZT V8
So....Sunday was the day where i had to pack my spare pair of pants and cut the passenger side arches. My mate lent me 2 of his angle grinders and i double checked all my measurements and began covering up anything in sight with sheets.

Started on the front arch as that is single skin and if i did c**k it up i can easily unbolt the front wing and buy another off Ebay.
65BDCEA2-0DAA-4E0C-95B4-6D66DCB31F51.jpeg

Kept the guard on initially to keep sparks and debris away from the car - anyway front arch went well and will just need tidying up a it with my Drexel next weekend.
36A4B938-EC18-4D8C-BBBD-774B470958C4.jpeg

9545F3EA-EE36-4DBC-BD83-C96F1AF1DD44.jpeg

Have also been debating for ages how i am going to attach the arches to the car without exposed screw heads. After countless weeks research i decided to use a modified version of the fixings that Rover used for fixing the Sportspack arches to the Mini back in the early 2000’s. They will need a bit more “persuading” but will work well. I can bond the brackets to various points across the back of the arch and then drill holes in the wing allowing me to tighten to arch to the body using a stainless nut from inside the arch. This will allow me to remove them if necessary.
97C2F31D-9E40-4222-B5DD-9A5686A1325E.jpeg

After a successful front arch and not setting the garage on fire I started the rear arch. This is slightly more technical as it has a double skin. I cut an inch above the original arch line allowing me to separate the 2 skins with a screwdriver
9329C18D-B85B-4A7A-AAE0-913393848E12.jpeg

I then carefully cut the first skin off another inch up to expose the inner skin. I then used the bigger grinder to make slits in equal lengths
D256AFD2-3A94-4E0F-BABB-E05FBEB27BE7.jpeg

Then used a rubber mallet to bend the metal up being careful not distort the wing - these will then be cut off after using welding putty to bond the 2 pieces together to create a new seal. After sealing i will prime, protect and spray
A0ABB4BC-EFEB-4594-8BBC-04260C0B4F37.jpeg

After that i did my usual and scoured Ebay. Came across a pair of 18 x 9.5J BBS reps for £100 so i can mess about with fitment.
5B3AD0F0-605F-4CDD-AA6B-B496F2188F8B.jpeg

Gonna do a little refurb on them and rattle can them silver whilst looking on tyrestretch.com for the right tyres - decided on 225/40/18 as i love the look of the tyre to wheel stretch in this picture below
E731A93D-52C3-4440-914C-8B5E1345C3DB.jpeg

Order a load of other bits this week ready for another weekend. Continuing to make progress and can really see it starting to take real shape now.
 

-Simon

ClioSport Club Member
  172-E92 M3-ZT V8
I liked everything you were doing up until that last post

Dont stretch your tyres, what a mouthbreathing thing to do after all this hard work
Controversial :LOL:

It will be the very slightest of curves and the if it is good enough for Singer it will be ok for me. At the end the day i am using this for trial fitment. If it looks gash i will change them as agreed really stretched ricer style tyres look shite but a little curve is all i want.


Thanks for the feedback and glad you like the rest of the build. ;)
 

Coops Mk1

ClioSport Club Member
  Lots of Scrap...

-Simon

ClioSport Club Member
  172-E92 M3-ZT V8
Had a couple more weekends on the car. Decided to strip down the ebay wheels and give them a coat of silver:

Paint Stripper applied:
5C2296A4-5233-4B4D-B445-0E4444A9BF2F.jpeg

Left them for 24 hours then attacked them with the wire brush and Drexel to take the curb rash off the edges. Fully Stripped of paint and lightly sanded:
DECD8EB5-B1E9-4A19-8529-CEC4EEB8E57F.jpeg

Gave them a coat of primer and then a couple of layers of Hyper silver. To be honest they pass the 10 yard test but close up they look shocking lol. I will get them professionally powder coated later on as spending hours on them i was a little disappointed at the result:
85ACD6F8-2E13-45BB-AE9A-9780BC9E8F8C.jpeg

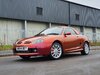
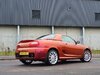
Next up was test fitting them to the car. My mate slapped some part worn 225/40/18 Contis on - which are far too stretched so will be swapping them with 255/40/18 at a later date. This may appease some who don’t like the stance look. Rear on:
D3FACFE1-C275-4D88-B2EB-A311684FC462.jpeg

Placed a spirit level down the arch and it needed a 30mm spacer which i have now got - hubcentric with studs from Direnza which look good quality. Fronts on:
71992FC7-87A1-4813-A17C-C7737F04D168.jpeg

Did the same and decided on full studs with a 12mm spacer on. Got the studs from Garage Midnight which supply a lot of the drift teams as i wanted to make sure they were strong. The wheel was also touching the Caliper though after test fitting again today with the spacer comfortably clears.
C6FFD1F3-AFA7-4F94-AFDF-EAFBF05CA043.jpeg

Dropped it down off the blocks and it sits far too high. Admittedly the car has not been driven since its suspension was rebuilt but even so it will need to be lowered significantly to look decent. No company makes lowering springs off the shelf so it is either custom lowering springs (possibly 40mm) or Coilovers. Again none are manufactured off the shelf for this car but a few people have modified E46 M3 coilovers as it is virtually the same setup. Would just need to adjust the front turrets and modify the top mounts i believe.
Next job of the weekend was starting to fix the front arch to the wing. As stated previously i did not want to have exposed screw heads so opted for some brackets off the old Sportspack Mini Cooper. Drilled holes in the wing and tightened up on a nut inside the arch:
EEFFE174-5AA9-4677-9E2C-FBA1E97AB1F3.jpeg

Kept offering up the arch and then bent the brackets so that they formed to the shape so we could bond them:
BDFFEE0C-8F96-4A2D-803C-6FB666DD86A1.jpeg

Numbered each one and removed them:
2DF95B72-485E-4D00-8320-5FE44F01E943.jpeg

Drew round the inside of the arch and then they were ready to bond and leave overnight. User tiger seal which seems to be great on first use. Next weekend I will use some 3M adhesive strips and form round the outer edge of the arch to provide a weatherproof seal:
4B64E16D-8520-44D3-8EDF-0E8A1A984F99.jpeg


Hopefully by next weekend i should have one side complete. Can then drive it out the garage to have a look at progress in the cold light of day and turn it round to repeat all over again on the other side. Slow progress but still remaining enjoyable.
 

-Simon

ClioSport Club Member
  172-E92 M3-ZT V8
Well lockdown has meant that work on the MG slowed to a crawl due it being at my mum & dads. Using all the social distancing guidelines I decided to do some more work today. Front arch on the passenger side went on first. Good fit but it will need some minor adjustments. Currently 5 M4 nuts and bolts. Will be widening the holes giving me wiggle room. Then will put in rubber grommets to prevent water ingress and put some washers at the back. Front arch on:
E675DF77-3FDC-4DA6-A951-D161590985FB.jpeg

Next came the rear. This wasn’t so easy as the mould is not as good as the fronts. It was fouling the back door so first job was to move that forward enabling it to open and shut without issue. I then pinned the arch to the inner wheel arch by the door in order to position it against the back bumper. Again will need some fettling but fit looks acceptable.
46C886AB-9507-49D3-A7D3-5A36592FA342.jpeg

10D365E3-CE19-4B7D-AD9D-505899B64592.jpeg

Am opting to not put bolts on the back to hold the arch on. 2 reasons: don’t really want to pierce through he second skin of the arch - would mean some inspection holes and potential rust issues down the line. The second is it fits flush with the 2 bolts front and back so will use tiger seal around the top (A la RWB Porsche’s) to create a seal and provide a finish. The rear door spat still needs to be fixed on but wanted to turn it round to begin the other side as that can be done at a later date.
So - put the spacers on the front and rear with the new studs and put the wheels on. Dropped it off its axles stands for the first time in a few months and pushed it out from its dark slumber....
FBA6C005-6581-4CA3-8B3E-FE87D7D8E750.jpeg

71715B75-4E31-473B-BB90-2B50A5ADEEBF.jpeg

BEB4CCF9-5D36-40BC-9C20-3790A6C8DFC6.jpeg

Then jump started it as the battery is beyond dead. Fired into life at the first turn and my god it was good to hear that V8 rumble. Like waking an angry giant from his sleep - he didn’t seem impressed from all of the pops and crackles from the exhaust. Rear sits really nice now with the spacers and once moving dropped down to a good height on its springs. The front is another story. Still far too high so that will need addressing. I got in contact with the original chassis engineer from MG Rover and he has agreed to make me some custom springs. His company is called Vehicle Handling Solutions and they do a lot of old MG stuff.
Then drove it down the drive and turned it round
ED394299-5D98-4925-92A6-EA3D58B83904.jpeg

Now all parked up safe in the garage for me to begin the lovely task of doing exactly the same on the other side. Really was a pivotal moment today, getting it out in the open sat on its four wheels gave me a real impetus to crack on with it and get it finished. Looking at Kenne Bell superchargers is not helping matters either lol. Slowly coming together.
 

BoatNonce

ClioSport Club Member
That really doesn't look like it's *only* on 225s, lol. Even with the stretch!

Looks awesome though. One of the very, very few MGs I like. The other being the Xpower SV.
 

-Simon

ClioSport Club Member
  172-E92 M3-ZT V8
One on my favourite cars on the forum, which is credit to you because I'm not usually a fan of big cars.
Thanks bud - when it came out of the garage today i actually heard myself say wow!! Such an effort to get to this point but well worth it. It is like Tommy Lee Jones in Batman at the moment tho as the other side is still standard ZT. Looks anorexic compared lol
 

-Simon

ClioSport Club Member
  172-E92 M3-ZT V8
That really doesn't look like it's *only* on 225s, lol. Even with the stretch!

Looks awesome though. One of the very, very few MGs I like. The other being the Xpower SV.
Thanks Mate. Keep telling my dad to grab an SV as an investment - he is not convinced however 😆
 
  Swift Sport
Thanks bud - when it came out of the garage today i actually heard myself say wow!! Such an effort to get to this point but well worth it. It is like Tommy Lee Jones in Batman at the moment tho as the other side is still standard ZT. Looks anorexic compared lol

It kinda reminds me of my mate's project. He's got a 3dr Ford Sierra with a Mustang 5.0 engine and wheels from a Noble M12. His is looking quite scabby though, you're doing a much better job!
 

-Simon

ClioSport Club Member
  172-E92 M3-ZT V8
Weekend Update:

Had a good few days on the MG - wanted to get the drivers side arches cut and the fibreglass fettled and try for draft fitment. The drivers side rear arch was always the one i was dreading. Two reasons - the arch mould itself was not great and it took a lot of cutting and sanding with the Dremel before it cleared the fuel filler and back door properly. The other is that i will be using the angle grinder centimetres from the fuel tank which i was not thrilled about.
First i cut the front arch taking a number of key measurements from the passenger side as datum points. I decided i wanted more of a curve so cut slightly different to the other side.
D2B72F46-BC34-4B09-997D-45ACA9421103.jpeg

This gives less of a pronounced edge which would mean less likelihood of the tyre bursting on a hard contact. I then cut the passenger front to match an this looked a lot better.
Next was measuring out the points where the bolts would go - again taking reference points from the other side and drilling 5 x 6mm holes as seen above. It was then a case of screwing up the brackets, offering up the arch and bending and scribing until they were all flush to the fibreglass. After masking the inner area i then pencilled round the brackets, unscrewed them all from the arch and then bonded them in place.
4A22AAF6-0D6F-44DD-B4F3-35A0717DEE77.jpeg

C2BFC2F8-347B-48FA-BEF2-F06D3F1D6E5D.jpeg

These were then left to dry until today. My dad then fitted it today and sent me. Trusty picture. Fitment is bang on as i spent a while dremeling the inner edges to ensure it lined up flush with the side skirt
817801FD-3C65-4BBD-B713-D0943580B67F.jpeg

I then moved onto the rear....got the fire extinguishers, a few bags of sand and made some templates out of proplex to keep the sparks at bay. Again measured the same as the other side and cut both skins as before.
A859F0A7-0009-44A0-B1E0-010446393E7A.jpeg

Again i wasn’t happy with the sharp edge so i cut A smoother line which looked a lot better. Sanded the edges smooth and then filled and bonded the 2 skins together. It is not ready for primer and paint which my dad is doing the week.
F8B868E6-DF63-4BE2-B9C5-0C35A2BD2A1C.jpeg

This week is final fitment of all the arches and starting to clean and build up everything properly. Will start at the front bumper and work my way back. I am now at the point where i will need to bite the bullet and empty my bank account into Rimmer Bros so various plastic fixings...but before then i needed wheels. Been searching for a while for the right wheels and fitment and finally found some on Ebay. Placed the order last week and they are currently on route from America.
FD4A54B5-03AB-45BD-9973-B32B3E3F6E1C.jpeg

Also ordered a few other bits like indicator lenses which i will start to fit up in the evenings back end of the week. Starting to move forward at better pace now. I do however need to stop looking at Superchargers.....but 450bhp is getting more tempting by the week.
 

-Simon

ClioSport Club Member
  172-E92 M3-ZT V8
Small update: Done a few little jobs tonight. Starting to refit the back end of the car. Took off the crash bar and decided it looked a bit shabby so rubbed it down and treated it to a bit of silver paint. Also replaced the rusty bolts with some new black stainless ones. Refitted it all and cleaned up the lower parts with tardis and polished the exhausts up a bit. I know you will never see it but i will know it is there and pretty happy with the results:

C693EAF0-9C6B-46A2-972D-B351F2B2F8B7.jpeg

BB0A57C1-A488-4336-B150-DA8F4974EF6C.jpeg

I also have refitted the parking sensors into the rear bumper and wired them up. Fired up the car, put it into reverse to test them and nothing....upon inspection I discovered the boot wiring was not connected to anything so that will be a voyage of discovery for tomorrow. Bumper fits nicely as it should so will be final fitting that tomorrow.
In other news my present from America arrived a few days ago so i unboxed one....
166443E9-42E8-4606-B0CC-8376E8415840.jpeg

C8C58E62-CA45-412F-8A9B-5162F321E486.jpeg

They say wheels maketh the car and from months agonising over style to buying some cheap versions to try out fitment i finally have the right set of wheels and can’t wait to get them fitted. Have been back and forth with tyre sizes but think some 255/35/18 will be the final choice. Just for clarity these are JNC 18 x 9.5 ET25. I am not going to run the locking centre caps as i prefer the exposed look.
Tomorrow’s job will be final fitting of the rear bumper and then i hope to have all arches bonded by the end of the weekend.... One way to get over not going to Download Festival this year.
 

-Simon

ClioSport Club Member
  172-E92 M3-ZT V8
So a few things been done since my last update. All kit on bar the drivers side rear wheel arch. That will need professional attention as it is past my level of skills as the fibreglass is quite deformed. Wheels are on one side and it now resides waiting patiently for me to start the next phase. It has been dusty feeling sorry for itself for a few moths now while I have concentrated on the house so today I decided to give it a quick wash.

CA38CEB1-6E7D-4596-8C87-40E85934D47E.jpeg
979F658C-E9DA-4D32-91FA-1DE41F007C25.jpeg
649EC22A-F9B8-4EE6-BBE5-CC7CA7824DB4.jpeg
7E417047-F8CA-4632-8677-50115B8D7683.jpeg
E3667285-EE35-4101-BD10-367D3ABB6DF5.jpeg
1EB9E0C6-AC95-4E32-9738-CD26FF62ADAE.jpeg
2B06F21C-6802-41F0-92FE-EA2600D71B9F.jpeg

Still a shitload to do, interior is in bits, rear arch needs sorting and bonnet and front wings need paint. Suspension is another area that I want to spend some time on as it sits far too high at the front. She looked lovely in the sun with the Pearl black glistening. She will get some love before the end of the year......he says
 

-Simon

ClioSport Club Member
  172-E92 M3-ZT V8
Love love love it!! Well done. Going to look amazing when it’s done.
Thanks bud. I looked at it today and thought how glad I was that I saved it from being scrapped - Big plans for it still, just a lot of other shizzle has taken priority this year. A keeper for sure...she was born on my birthday so I believe it was fate...and I don’t believe I any of that s**t normally
 

Coops Mk1

ClioSport Club Member
  Lots of Scrap...
Great progress and love the attention to detail and parts selection, this will be epic when finished.... And supercharged ;)
 

-Simon

ClioSport Club Member
  172-E92 M3-ZT V8
That is a f**king nice driveway.

Wanna boyfriend?
Thank man - It is my parents place about a mile down the road. My garage houses my Clio and my gym so they kindly store it for me there. I will be sure to pass on your kind offer to them tho matey 😁 - my dad is partial to a Cobra... pint of
 

-Simon

ClioSport Club Member
  172-E92 M3-ZT V8
Great progress and love the attention to detail and parts selection, this will be epic when finished.... And supercharged ;)
Yes I am hoping to supercharge it at the end. What this car was meant to be so want to fulfill its rightful powerplant when funds allow. Chassis, brakes etc were always setup for 385bhp and numerous conversions have happened with no issues. KMAP’s who specialise in K series do a map using the Kenne Bell charged which is good for 440 - 450bhp which will be plenty
 

Waitey

ClioSport Club Member
  Alpina D3, AC Cobra
Thank man - It is my parents place about a mile down the road. My garage houses my Clio and my gym so they kindly store it for me there. I will be sure to pass on your kind offer to them tho matey 😁 - my dad is partial to a Cobra... pint of
I look forward to it.

PS lovely car.

Now I’m more clued up on modular V8’s I’d be really tempted to put a Coyote engine in it when you are done. Engine box and ECU’s are like £5k. Would be a right little unit then.
 

Gally

Formerly Mashed up egg in a cup
ClioSport Club Member
Happy to help with the part if you need us? Front end repaints properly aren't cheap right enough! 😂


Top