

ClioSport.net
-
When you purchase through links on our site, we may earn an affiliate commission. Read more here.
You are using an out of date browser. It may not display this or other websites correctly.
You should upgrade or use an alternative browser.
You should upgrade or use an alternative browser.
Mr Underhill
ClioSport Club Member
This 👆🏻You can get a swan neck on them.
Best to ugga ugga dugga the bolt with a screwdriver on the captive cage to rag it out.
Although the nut on mine was so rusty it rounded off and was just spinning. I was hoping to loosen the bolt just enough so I could grind the head off the bolt. No luck in my case. It’s at this point things started to get bodgy. Engine out 🤦🏻♂️
cjgower
ClioSport Club Member
Thanks, everyone, I knew there was a better way!
I will update with some photos later in the week when I get the damn thing off.
I will update with some photos later in the week when I get the damn thing off.
cjgower
ClioSport Club Member
A little bit of progress on the Cup.
Have managed to get the rear beam off and completely dismantled, ready for powder coating.

Was pretty happy with the underside. Only appears to be minimal surface rust.


The plan is to get the rust off and probably use lanoguard to protect it.
Was going to use raptor underseal with a RAL colour match close to mondial blue, however, I’m concerned about locking in rust. With the lanoguard, it dries clear, allowing me to keep an eye on things.
Have managed to get the rear beam off and completely dismantled, ready for powder coating.
Was pretty happy with the underside. Only appears to be minimal surface rust.
The plan is to get the rust off and probably use lanoguard to protect it.
Was going to use raptor underseal with a RAL colour match close to mondial blue, however, I’m concerned about locking in rust. With the lanoguard, it dries clear, allowing me to keep an eye on things.
cjgower
ClioSport Club Member
More bits done. The car is completely free of all subframes now, after a lot of drilling and leverage. Just needs to press the old bushes out and they’ll be ready for powder coating.
Will also be getting all the bolts plated too. Plenty to do still, and lots of prep to do underneath.
Stripping down the subframe was easy enough once it was off the car.

Hub and shock still on this side. Top mount is spinning with the entire shock.

Not sure on how best to do the hubs. Would like them done properly, but new bearings are £80 ish a side.

Turned a section of garden into a cup graveyard.

And taken bits off the engine bay to give it all a good clean up. It’s an excellent base, just needs some TLC. Car will be only used in the summer, so will hopefully stay nice once this all freshened up.

Will also be getting all the bolts plated too. Plenty to do still, and lots of prep to do underneath.
Stripping down the subframe was easy enough once it was off the car.
Hub and shock still on this side. Top mount is spinning with the entire shock.
Not sure on how best to do the hubs. Would like them done properly, but new bearings are £80 ish a side.
Turned a section of garden into a cup graveyard.
And taken bits off the engine bay to give it all a good clean up. It’s an excellent base, just needs some TLC. Car will be only used in the summer, so will hopefully stay nice once this all freshened up.
cjgower
ClioSport Club Member
Slow progress on this, however, the car is now free of all subframes, fuel tank, hubs, lines, all of it.
Really pleased with how it’s looking to be honest. I’ve heard bad things about the area behind the tank, but it looks new.
Next up, I’ll be doing a deep clean before grinding back the surface rust and treating.
It’s currently 92 days till Spa. Feeling hopeful it will be back together by March.


Really pleased with how it’s looking to be honest. I’ve heard bad things about the area behind the tank, but it looks new.
Next up, I’ll be doing a deep clean before grinding back the surface rust and treating.
It’s currently 92 days till Spa. Feeling hopeful it will be back together by March.
Attachments
cjgower
ClioSport Club Member
For what it's worth, I thought I'd post this as it's still part of the project.
cjgower
ClioSport Club Member
One of the Wishbones (drivers side) has been damaged whilst removing the collar for the old bush.
RPD doesn't seem to sell the generic 1*2 wishbones anymore for the PH2, any suggestions?
Bit gutted as they were genuine cup wishbones with the altered castor.
RPD doesn't seem to sell the generic 1*2 wishbones anymore for the PH2, any suggestions?
Bit gutted as they were genuine cup wishbones with the altered castor.
Andyano12
ClioSport Club Member
172 cup + more
I think Ktec do wishbones, not sure on what quality is like but presumably would be better than eBay ones and would have the correct castor etc. Or could try and find a decent set of secondhand ones.One of the Wishbones (drivers side) has been damaged whilst removing the collar for the old bush.
RPD doesn't seem to sell the generic 1*2 wishbones anymore for the PH2, any suggestions?
Bit gutted as they were genuine cup wishbones with the altered castor.
I have been enjoying seeing your progress, this is something which I want to do to mine when time eventually allows.
These are the K-Tec ones, not the best quality but sufficient. The bushes and castor angle are NOT Cup spec as far as I can see.
They are made by Optimal.
Tbh I think the extra castor is a gimmick and that these will work just fine. Just mind the balljoint bolts are 10mm not 12mm, but that also does not make any difference and you can use Scenic ball joints when replacing.
Last edited:
I'd personally find a breaker and get them off that.One of the Wishbones (drivers side) has been damaged whilst removing the collar for the old bush.
RPD doesn't seem to sell the generic 1*2 wishbones anymore for the PH2, any suggestions?
Bit gutted as they were genuine cup wishbones with the altered castor.
cjgower
ClioSport Club Member
Thanks all, I've sourced a genuine cup one from a breaker via Facebook. It's crazy how so many items seem to have disappeared from Renault in the past 12 months or less, or put on back order.
SharpyClio
ClioSport Club Member
I’ve been slowly buying up spares where I can, got a sub frame, hubs, swing arms, rear beam and a few other NLA parts to keep it going. When I spot things close to me and at a good price I just buy them now, that way I always have spares.Thanks all, I've sourced a genuine cup one from a breaker via Facebook. It's crazy how so many items seem to have disappeared from Renault in the past 12 months or less, or put on back order.
cjgower
ClioSport Club Member
Great idea to be fair. The best I've managed so far is a '172 cup' door pillar badge, found it by accident last week.I’ve been slowly buying up spares where I can, got a sub frame, hubs, swing arms, rear beam and a few other NLA parts to keep it going. When I spot things close to me and at a good price I just buy them now, that way I always have spares.
cjgower
ClioSport Club Member
Some more progress on the Cup. What a ball ache to get the underside clean. It’s covered in some sort of rubber in the middle section that responds best to heat.
Ended up with it in my hair which was a pleasant experience. I reckon another day of prep at it will be ready to paint.


Underside wire wheeled back the best I can on just the rusty spots. Treated and sealed with Jenolite Rust converter. Much like hydrate 80 I believe.

More rusty bits treated. The underside is coming up nicely. It’s just very time consuming.

Decided to go all out on the engine bay. Got some MTC hoses coming too. Will retain OEM air box, but give everything else a proper cleanup.

Also gave the fuel tank a bit of a clean. Looking good so far.

Got to get the bolts off to the platers and the subframe components to the powedercoaters next. Brakes are going off for a recon.
Prime the underside, cover in stone chip black and then potentially paint Mondial Blue.

After market bits purchased:
PMS solid top mounts.
Stud and nut conversion kit.
MTC coolant hoses.
Full braided line kit from master cylinder with bias valve.
Other than that, it’s OEM+
Ended up with it in my hair which was a pleasant experience. I reckon another day of prep at it will be ready to paint.
Underside wire wheeled back the best I can on just the rusty spots. Treated and sealed with Jenolite Rust converter. Much like hydrate 80 I believe.
More rusty bits treated. The underside is coming up nicely. It’s just very time consuming.
Decided to go all out on the engine bay. Got some MTC hoses coming too. Will retain OEM air box, but give everything else a proper cleanup.
Also gave the fuel tank a bit of a clean. Looking good so far.
Got to get the bolts off to the platers and the subframe components to the powedercoaters next. Brakes are going off for a recon.
Prime the underside, cover in stone chip black and then potentially paint Mondial Blue.
After market bits purchased:
PMS solid top mounts.
Stud and nut conversion kit.
MTC coolant hoses.
Full braided line kit from master cylinder with bias valve.
Other than that, it’s OEM+
Last edited:
Yarp
ClioSport Club Member
Clio 182
Ended up with it in my hair which was a pleasant experience.
Apart from the username, there are benefits to being a total snookerball heed some days 🤣.
Cracking work though 👍
Awesome work. I'm just starting out on my cup but it will be much slower. I watched your video on refurbing the rear beam about a year and a half ago, it inspired me to do the same, went out and bought a new rear beam and it's sat in my garden ever since 😂
My compensator valve is shot and I was going to replace it asap but I might go down the bias valve like you so I'll be watching this with interest. Where are you thinking of putting the valve in the cabin?
My compensator valve is shot and I was going to replace it asap but I might go down the bias valve like you so I'll be watching this with interest. Where are you thinking of putting the valve in the cabin?
cjgower
ClioSport Club Member
Thanks dude!Awesome work. I'm just starting out on my cup but it will be much slower. I watched your video on refurbing the rear beam about a year and a half ago, it inspired me to do the same, went out and bought a new rear beam and it's sat in my garden ever since 😂
My compensator valve is shot and I was going to replace it asap but I might go down the bias valve like you so I'll be watching this with interest. Where are you thinking of putting the valve in the cabin?
Haha, yes, i've been here before, although this time I am going all out. I've still got a spare beam kicking about from when I did that video haha.
I am not entirely sure yet. We mocked the lines up at the weekend and it looked pretty good. I have a feeling it will end up somewhere near the handbrake/center console. The goal is to make it as neat and OEM-looking as possible. Will post up photos on here when it's done.
cjgower
ClioSport Club Member
Is there a difference between a Cup and a non-cup front subframe?
From research, only the PH1 172 had a slightly different front subframe. There's a bolt stuck in my current one, therefore it may be easier to source another, pending whether they are all the same.
From research, only the PH1 172 had a slightly different front subframe. There's a bolt stuck in my current one, therefore it may be easier to source another, pending whether they are all the same.
SharpyClio
ClioSport Club Member
No there isn’t, they are the same cup and none cup subframes are the same. My cup packed 182 has a none cup packed sub frame on it.Is there a difference between a Cup and a non-cup front subframe?
From research, only the PH1 172 had a slightly different front subframe. There's a bolt stuck in my current one, therefore it may be easier to source another, pending whether they are all the same.
I've looked at this before and found this.
The Cup subframes wishbone hole position, wishbone balljoint position, and wheel offset were all different from the other 172's out the factory. As far as I knew the 182 cup and full fat shared the 172 cups setup but I don't know about a normal 182.
The Cup subframes wishbone hole position, wishbone balljoint position, and wheel offset were all different from the other 172's out the factory. As far as I knew the 182 cup and full fat shared the 172 cups setup but I don't know about a normal 182.
cjgower
ClioSport Club Member
More updates on just parts because it's easier to take photos than it is to actually fit them. Getting on with the cleaning of the underside is proving time-consuming. Hoping to start painting the underside this weekend. Took some shiny part photos whilst filming a vid for YouTube.
Various bits including the fully braided lines. Also, paint for the underside. Planning on D43 mondial blue with 2K lacquer on top.

Powerflex, everything.

Opted for PMS solid top mounts to replace the knackered OEM ones.

New front/rear subframe bolts and nuts.

Also, refurbed/exchanged front and rear brakes turned up from SSL Autoparts. I am super happy with these.

Various bits including the fully braided lines. Also, paint for the underside. Planning on D43 mondial blue with 2K lacquer on top.
Powerflex, everything.
Opted for PMS solid top mounts to replace the knackered OEM ones.
New front/rear subframe bolts and nuts.
Also, refurbed/exchanged front and rear brakes turned up from SSL Autoparts. I am super happy with these.
Mr Underhill
ClioSport Club Member
I have a feeling this one's going to be a minter. Great to see.
cjgower
ClioSport Club Member
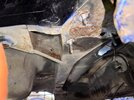
More progress today. I’ve treated the final parts of the rust around the fuel filler cap (what a god awful design that is).
With the help of some friends I’ve also mounted the braided lines in the car and drilled the holes necessary through the bulkhead and rear arches.
This needed to be done first before I could spray the underside properly.
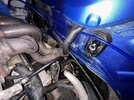
Used degreaser on the head and in the engine bay. This is as good as it will get I feel.

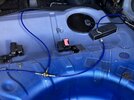
Main line runs through the bulkhead, into the passenger side of the centre console then crosses over and mounts to the side of the handbrake housing.


Then runs to the back, under the isofix which is quite nice, and then into the rear arches. I’ll have to purchase some heat sleeving for these.


Fuel filler cap sorted out. Was actually pretty good anyway, but I wanted to make sure.

I’ve also blasted some bits. Stub axles blasted, heat shields and the fuel rail/lower inlet.


All in all, progress has been made. But, I’m starting to worry about the 8th April trackday at Spa 😂. Hopefully it will be rolling again by early March.
With the help of some friends I’ve also mounted the braided lines in the car and drilled the holes necessary through the bulkhead and rear arches.
This needed to be done first before I could spray the underside properly.
Used degreaser on the head and in the engine bay. This is as good as it will get I feel.
Main line runs through the bulkhead, into the passenger side of the centre console then crosses over and mounts to the side of the handbrake housing.
Then runs to the back, under the isofix which is quite nice, and then into the rear arches. I’ll have to purchase some heat sleeving for these.
Fuel filler cap sorted out. Was actually pretty good anyway, but I wanted to make sure.
I’ve also blasted some bits. Stub axles blasted, heat shields and the fuel rail/lower inlet.
All in all, progress has been made. But, I’m starting to worry about the 8th April trackday at Spa 😂. Hopefully it will be rolling again by early March.
Attachments
Last edited:
cjgower
ClioSport Club Member
Thanks mate. This is just because it’s easier to run them this way, as the bias valve sits inside the car and can be a adjusted whilst I am driving. It also eliminates the risk of the hoses being damaged by stones etc.Great work mate 👍🏻
What’s the reason for the lines being inside the car as opposed to underneath where the factory ones were?
Most people that run this have already stripped their interior as its more of a ‘track car’ mod. But the valve on the rear beam was knackered, so I thought I’d give it a go.
Got you, makes sense now.Thanks mate. This is just because it’s easier to run them this way, as the bias valve sits inside the car and can be a adjusted whilst I am driving. It also eliminates the risk of the hoses being damaged by stones etc.
Most people that run this have already stripped their interior as it’s more of a ‘track car’ mod. But the valve on the rear beam was knackered, so I thought I’d give it a go.
Been watching your videos on YouTube today, can’t wait to get my 172 Cup project this week!
cjgower
ClioSport Club Member
Right, this is how it’s looking after many many hours, maybe even days of trying to treat, prep and clean underneath.
The process has been a combo of grinding, wire brush drill bits and tar remover to get here. All rusty bits have been treated with Jenolite.
Being totally honest, I can’t be bothered anymore. Time to start painting I think.


Also made a slight change to the rear lines and their position, as well as added a rubber grommet to each side to add protection to the fitting.

The process has been a combo of grinding, wire brush drill bits and tar remover to get here. All rusty bits have been treated with Jenolite.
Being totally honest, I can’t be bothered anymore. Time to start painting I think.
Also made a slight change to the rear lines and their position, as well as added a rubber grommet to each side to add protection to the fitting.
cjgower
ClioSport Club Member
In two minds about using the PMS top mounts. I feel reluctant to drill the top of the struts. What are others thoughts?
Might seem a bit stupid to some, seeming as I've already drilled holes on the lines. But I am leaning toward OEM top mounts.
Might seem a bit stupid to some, seeming as I've already drilled holes on the lines. But I am leaning toward OEM top mounts.
cjgower
ClioSport Club Member
Got the bolts back from the platers. Used Deox C to strip them back and then took them to a local company. Asked for them to be finished in blue zinc. Really happy with them.
Bit of a minefield to navigate what’s what at the moment as it’s been a while. Hopefully all becomes clear as I start fitting again!


Bit of a minefield to navigate what’s what at the moment as it’s been a while. Hopefully all becomes clear as I start fitting again!
cjgower
ClioSport Club Member
£60 cash. Money well spent IMOWhat did it cost you to get all of those plated
Decent, that’ll make a huge improvement£60 cash. Money well spent IMO
Similar threads
- Replies
- 13
- Views
- 337