send the beam off to the powder coaters... Get it media blasted and powdercoated your colour of choice then rebuild it all with new :up arts
arts
artsartsAny progress?
Did you get that patch sorted yet?
send the beam off to the powder coaters... Get it media blasted and powdercoated your colour of choice then rebuild it all with new :up
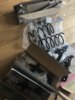
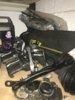
fully dismantled the rear beam and had it all powdercoated
It's your choice. I know I couldn't leave it!
Strength wise it's fine, but if any dampness gets between the overlap from the inside, it will rust and cause it to swell.
If it's welded flush there's no where for it sit.
If you're going to leave them then try and blend them on the outside with filler and make sure you get plenty of waxoyl in once the car is painted.
I was only thinking of this when my boss asked me to patch the sills on his old caddy Mk2 van this morning!
do you have pics of this? I need to strip mine down but not sure what it involves
do the mounting arms come off or did you send it like it is?I said to him is it just going to be a low point for water to gather...he said the low point is the seam that runs the length of where the sill joins to the floor so he'd be more worried about that!
I do see his point and its nice welding, but got the doubt in my mind again now!
I was justifying the patch thinking its a decent job and is covered in stone chip guard. Especially as the sills are generally good anyway.
Hmmmmmm.........
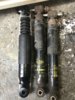
my torsion bars are nice and loose currently as I recently adjusted ride height and copper greesed them up :smile: do the mounting arms come off or did you send it like it is?
please do, more pics the better. I had my 172 beam blasted and zinc coated then powder coated. I can't see any defects with it yet so think I will get the same done to the mk1 beam. Will the heat not effect the rubber bushes when put in the oven though?No the arms are pressed on with the rubber bushing. If i could have got the rubbers i would have taken them all apart.
also what did you mask the splines with so they didn't powder coat them too? Just masking tape like is on the stubs?
I prepped around the arms where they meet the beam so they didnt need to sand blast near the rubber (gaffer taped the rubber too)
Came out nice ill get pics soon next time im in the garage! Had them both done 30% gloss so a nice satin black. Will put stone chip guard on the underside once they are fitted too.
please do, more pics the better. I had my 172 beam blasted and zinc coated then powder coated. I can't see any defects with it yet so think I will get the same done to the mk1 beam. Will the heat not effect the rubber bushes when put in the oven though?
Yeah it looks a lot better but definately spray some graviguard or similar stone chip paint to stop the powdercoat chipping.
I spoke to the powdercoater about the baking and the rubber before i dropped them off. They done a long low temperature bake and they come out fine. Friendly powdercoater though as they do all the architectural and structural steel for my work.
what is up with yours?
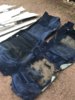
i'm pretty sure at some point I had a Williams carpet in the shed, no idea on condition but wasn't like that that's for sure
want me to have a rummage see if I can turn it up and give it a clean?
i'll see what I can find and we'll talk price once I've unearthed the treasure!
ok mate, il speak to the place I used before and see what they say about the bushes :smile:
Thanks :smile:
BTW this thread needs more pics from you :smiley:
You need to get in touch with this guy on Facebook, he sells the bits you're after https://www.facebook.com/SpecialistaRetro/All i need to do now is source a few of the front window rubbers/seals, find a good quality set of Williams stickers (any recommendations?) and new fixings for the rear windows (those round black metal bits) and i've got everything needed to finish.
You need to get in touch with this guy on Facebook, he sells the bits you're after https://www.facebook.com/SpecialistaRetro/
I've bought from both, the ebay ones are junk in comparisonI need the Williams badges but his ones are £90, have seen others closer to £15 on ebay that look good enough.
Are they really worth the extra? Anyone bought Williams stickers from either seller?
Thanks for the link paddy, i’ll get the better ones ordered up then if there is a difference.
Just had to order a pair of new plastic williams kickplates as they were removed for the respray…£240