ClioSport.net

Register a free account today to become a member!
Once signed in, you'll be able to participate on this site by adding your own topics and posts, as well as connect with other members through your own private inbox!

  • When you purchase through links on our site, we may earn an affiliate commission. Read more here.

Matts Clio 182 rolling project thread


  Renault Clio 182
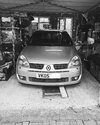
So, thought id post a little update since the purchase of my 182 a month ago. I have been waiting to sell another car and make some space, but now thats done and the clio has gone from hiding in my garage to being taxed and insured, and now my daily driver. I don’t do many miles (4k) in a year so hopefully she will serve me well and get some much needed attention along the way.

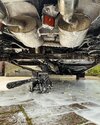
First job was to take out the non res section on the Miltek. It was just too boomey for me. Had to cut away the old clamp from the cat and get a new one from Kam racing. Fitting the resonated section was hard going, as it just wouldn’t push home into the rear box. After much swearing i removed the back box as well to find the sleeve on the rear box wasn’t 100% round- clamped up too tight methinks…. I ended up taking it to a local exhaust firm at Risby who kindly reformed it and supplied new clamps as well. Got it all fitted and my word it is so much more bearable inside!

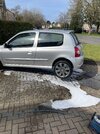
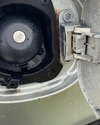
Underside has had a jetwash so i can see what im dealing with and a general inspection. Usual rust around the fuel cap but nothing concerning… for nearly 20 years old its pretty good!

The car only came with 1 working key. Rather than mess about with key cutters and local programers i just went to renault. New key ordered for £165. Thought that was decent.

Few snaps, more to come when i have time!
 

Attachments

  • D14CDF05-D327-4084-97BE-5F648C2BADEE.jpeg
    D14CDF05-D327-4084-97BE-5F648C2BADEE.jpeg
    2.1 MB · Views: 81
  • 5312AA94-9C22-4D3F-80C0-3B27017EA9FB.jpeg
    5312AA94-9C22-4D3F-80C0-3B27017EA9FB.jpeg
    971.9 KB · Views: 79
  • IMG_5314.jpeg
    IMG_5314.jpeg
    2.6 MB · Views: 94
  • C06795C6-16E2-4F27-B2F9-0C690E6FC359.jpeg
    C06795C6-16E2-4F27-B2F9-0C690E6FC359.jpeg
    715.9 KB · Views: 87
  • CCFEB157-8BB3-47FA-8F10-3A5A92395313.jpeg
    CCFEB157-8BB3-47FA-8F10-3A5A92395313.jpeg
    593.7 KB · Views: 80
  Renault Clio 182
Its been a while since i updated this thread, but i am still about, and trying to get jobs done on the Clio. Unfortunately in trying to sort out the rough idle, i found that the car had low compression. Unfortunately a fairly terminal diagnosis followed that would require a rebuild. After much back and forth i managed to negotiate a refund from the dealer, which put the feasibility of a rebuild financially on the table. It was a close call, but has now all been done and i have the car back with a fully rebuilt engine, new clutch and seals etc. They had a nightmare sourcing parts but we got there in the end. Im now running it in and trying to tackle some jobs along the way. I’ll update with some pics once this weather shifts and i can get outside!
 
  Renault Clio 182
A little bit of progress this week. Since buying the 182, the hazards have never worked. I did post about this back in April, and most pointed to tge uch being at fault after i had replaced the switch and checked the fuse was ok. It was driving me mad as the indicators and everything else worked fine. So i sent the uch off for repair to Essa electronics (uch repair on ebay).
IMG_6563.jpeg
IMG_6564.jpeg
I found them to be more helpful than diesel pump repairs on the inital enquiry, and were about £10 cheaper overall. They were brilliant, and got back to me a day after i sent it off. All functions tested and….. no faults 😭….. so it must be the car somehow. Back it came and refitted, but properly this time. A previous owner had clearly had it out and just shoved it into position so at least that was sorted.

Once that was back in, i engaged the hazard switch and lay on my back swearing about french cars… and cursing myself for getting back into a bloody clio…. Amonst this my plan was to basically wiggle the loom about in various areas to see if they would start working. All if a sudden the relay was going and they started working! I traced it to what i believe is part of the alarm loom which had a partially severed earth. Very odd. Soldering upside down isn’t recommended. I did however succeed and i now have hazard lights!
Next job was to get the Cabasse headunit i had secured back in the summer installed. Before that i removed the front of it and de-slimed it as per the guides on here. Its by no means a perfect finish, but i managed to save some of the lettering during the process with insulating tape pressed down firmly. Looks much better and is night and day compared to the sticky mess beforehand! Couple of before / after pics.
IMG_6578.jpeg
IMG_6579.jpeg
IMG_6580.jpeg
IMG_6583.jpeg
IMG_6584.jpeg


Top