Samholmes88
ClioSport Club Member
Clio 172 ph1
Hi everyone,
After 12 boring years without clio ownership, I have once again returned to the fold....
After kicking myself for parting ways with my last inferno 182 cup, this time I've took the plunge with a 172 phase 1. I always preffered the front end of a ph1 over the ph2 cars i've had in the past, and after a lengthy period of 'badgering', a mate of mine eventually agreed to part with it (he had two PH1's) so this one came back with me from only 5 mins down the road!

I knew it would need some work. My mate had resurrected it from an incomplete car to an MOT passable machine but didnt want to go much further. I'm a bit OCD minded anyway and like things to be right, so I'd already succumbed to the fact i'd be spending to get it to the next level. I'm ultimately hoping for a fast road set up, most importantly with everything done right, the car will get what it needs!
Bear in mind im a 37yr old Yorkshire builder with 2 young kids and not much spare time, I'm doing what I can when i can! The combination of minimal mechanical experience, insufficient tools and lack of patients doesnt always result in progress, but I'll get there! Thankfully i've chewed my mates Andy's ear (he's a Porsche mechanic & engine builder) to the point he's finally given in, and is helping me on some evenings with the important stuff!
I started the back end of last year with a few new bits, first i sourced....
PMS air con delete kit
Ktec stealth full stainless system
ktec 200 cell sports cat
BTT poly exhaust mounts
OE equivalent front lights

Turns out the front bumper was self tapped on, so a few bits of home fabrication along the way....


I quickly found that the car must have been sat over a puddle for some time, everything underneath is a bit tired, orange and pitted! Thankfully it seems to be localised to the subframe and front corners, the rest of the floor pan and chassis rails etc are all good.


One thing led to another and as i just want it spot on, i decided to treat her to pretty much new everything in the front corners. So far I've got new;
OE ph1 shocks
Eibach sportline springs
Spring retainers
Powerflex strut top mounts
Heavy duty wishbones
Powerflex ARB bushes
ARB retaining brackets
Powerflex dogbone bush
Powerflex engine mount
GKN oe driveshafts
OE PH1 tie bar kit and Track rod ends
PMS Crank pulley
Braided brake lines
Brembo HC drilled discs
Mintex M1144 pads
OE rubber top mounts
ABS sensors
All new bolts and hardware
All new gaskets
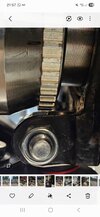
Ive had the subframe/brace plates/ARB/Hubs etc away for powdercoating, the OE calipers have been away for rebuilding/repainting, and Ive sent the inlet manifold / breather plate and upper engine mount casting away for aqua blasting. Cam cover got a couple of hours of love too! happy enough with all of it...


Whilst everything has been stripped from the front corners i've had the arch liners out, scraped back all the old underseal back to the factory stuff and coated everything with Bilt Hamber products, finishing it off with black epoxy resin and their Dynax C, not the best of jobs and more time consuming than imagined, but well worth it for the result...


Then I took the plunge and decided to do the sump gasket while the subframe was off. Had a bit of a fight with some of the Etorx bolts that are made of cheese, but after losing a knuckle, a new sump bolt kit and plenty of cursing, I got there eventually and the saga is long forgotten! That was the last offender...

My mate Andy came around the other night and we got the sump on, subframe back on, steering rack bolted up, new wishbones mounted, ARB and bracketry on and gear linkage connected back up. Good progress for 3 hours id say! Sump got a good polish over too!

And thats where i am at present! Hoping to keep things ticking over in the garage over the next few weeks to try to get the front end completed and back up & running. Then i'm planning to turn it round and strip the back.
Thanks for looking and hope I haven't bored you all off on my first proper post cheers to all you lot on the forums for the countless times I have found the information needed to keep bashing on with it, invaluable!
Sam
After 12 boring years without clio ownership, I have once again returned to the fold....
After kicking myself for parting ways with my last inferno 182 cup, this time I've took the plunge with a 172 phase 1. I always preffered the front end of a ph1 over the ph2 cars i've had in the past, and after a lengthy period of 'badgering', a mate of mine eventually agreed to part with it (he had two PH1's) so this one came back with me from only 5 mins down the road!
I knew it would need some work. My mate had resurrected it from an incomplete car to an MOT passable machine but didnt want to go much further. I'm a bit OCD minded anyway and like things to be right, so I'd already succumbed to the fact i'd be spending to get it to the next level. I'm ultimately hoping for a fast road set up, most importantly with everything done right, the car will get what it needs!
Bear in mind im a 37yr old Yorkshire builder with 2 young kids and not much spare time, I'm doing what I can when i can! The combination of minimal mechanical experience, insufficient tools and lack of patients doesnt always result in progress, but I'll get there! Thankfully i've chewed my mates Andy's ear (he's a Porsche mechanic & engine builder) to the point he's finally given in, and is helping me on some evenings with the important stuff!
I started the back end of last year with a few new bits, first i sourced....
PMS air con delete kit
Ktec stealth full stainless system
ktec 200 cell sports cat
BTT poly exhaust mounts
OE equivalent front lights
Turns out the front bumper was self tapped on, so a few bits of home fabrication along the way....
I quickly found that the car must have been sat over a puddle for some time, everything underneath is a bit tired, orange and pitted! Thankfully it seems to be localised to the subframe and front corners, the rest of the floor pan and chassis rails etc are all good.
One thing led to another and as i just want it spot on, i decided to treat her to pretty much new everything in the front corners. So far I've got new;
OE ph1 shocks
Eibach sportline springs
Spring retainers
Powerflex strut top mounts
Heavy duty wishbones
Powerflex ARB bushes
ARB retaining brackets
Powerflex dogbone bush
Powerflex engine mount
GKN oe driveshafts
OE PH1 tie bar kit and Track rod ends
PMS Crank pulley
Braided brake lines
Brembo HC drilled discs
Mintex M1144 pads
OE rubber top mounts
ABS sensors
All new bolts and hardware
All new gaskets
Ive had the subframe/brace plates/ARB/Hubs etc away for powdercoating, the OE calipers have been away for rebuilding/repainting, and Ive sent the inlet manifold / breather plate and upper engine mount casting away for aqua blasting. Cam cover got a couple of hours of love too! happy enough with all of it...
Whilst everything has been stripped from the front corners i've had the arch liners out, scraped back all the old underseal back to the factory stuff and coated everything with Bilt Hamber products, finishing it off with black epoxy resin and their Dynax C, not the best of jobs and more time consuming than imagined, but well worth it for the result...
Then I took the plunge and decided to do the sump gasket while the subframe was off. Had a bit of a fight with some of the Etorx bolts that are made of cheese, but after losing a knuckle, a new sump bolt kit and plenty of cursing, I got there eventually and the saga is long forgotten! That was the last offender...
My mate Andy came around the other night and we got the sump on, subframe back on, steering rack bolted up, new wishbones mounted, ARB and bracketry on and gear linkage connected back up. Good progress for 3 hours id say! Sump got a good polish over too!
And thats where i am at present! Hoping to keep things ticking over in the garage over the next few weeks to try to get the front end completed and back up & running. Then i'm planning to turn it round and strip the back.
Thanks for looking and hope I haven't bored you all off on my first proper post
cheers to all you lot on the forums for the countless times I have found the information needed to keep bashing on with it, invaluable! Sam


 can i ask.....did you put any coatings over the new parts before you started driving it again regularly? I'm just debating coating ARB, wishbones, tie bars, shock lowers, driveshafts etc with clear Dynax so they stay looking new slightly longer than they would. I mean im only going to drive it during summer months anyway, but might keep it looking a bit tidier for longer?? Anyone had a bash with that sort of thing? Cheers


 Many thanks mharvey - bump stops/dust covers for front shocks ordered from KAM