
Clio 182 Cup, BMW 1M
After spending days searching the Internet for advice on fitting an alternator to a Clio Mk2 sport, I thought that I would share the easiest way to do this and avoid the pitfalls I went through 
I started with the Jubilee clip method for tensioner and removing the grill which I found on YouTube and want people to avoid this since I wasted hours using this method
1) Remove front bumper - this is surprisingly easy since there are only 4 bolts to remove it. 1 in each wheel arch an 2 underneath the car (see pics below)


I suggest that you also remove the driver's side front wheel and inner arch liner since it will make the aux belt replacement easier. On the passenger side you can just move the tab to access the bolt seen in the first photo
When removing the bumper you will need to disconnect the fog light clip and headlight washer pipes on the passenger side (if fitted). Store the bumper safely so that the paint doesn't get scratched.
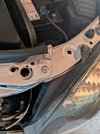
2) Remove top slam panel - remove 2 bolts either side as below and the 2 front bolts above the radiator (sorry nuts removed in 2nd pic.


There are also 2 x 13mm bolts at the base of the mid support (not the bolts you see on top of the support).
Trying to remove these 13mm bolts in front of the radiator with the bumper in place is a total PITA. I know since it's 2 hrs of my life I will never get back!

Here's a pic of the bolts which you can see with the slam panel removed. You only need to loosen these bolts so you can lift the slam panel out with the top 4 bolts each side removed.

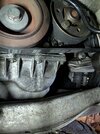
3) Remove alternator and aux belt. Disconnect the negative terminal on the battery. Remove the top 13mm nut on the alternator and loosen the base 16mm bolt. Then place a crow bar or similar lever between the top of the air-conditioning compressor and base of alternator to take pressure off the top bolt.

You can now remove this top bolt and lower the alternator by prying forward to remove tension on the aux belt. God knows why people use a jubilee clip on the belt tensioner since I wasted 2 hrs trying that method

If you can't get the aux belt off remove the long bottom bolt from the alternator and move it sideways. Remove the power out bolt and clip off the alternator before removal.

The alternator will come out easier if you rotate and have the pulley facing forwards.
4, Replace aux belt and alternator. Make sure that if your car has aircon order a 1660mm belt. I was sent a 1650mm belt by Davey which is too short and actually caused the outside belt to rub on the top of the tensioner, so ask the parts dealer what length it is because Davey have it wrong!
Also if you have aircon make sure that you order the correct alternator since some have the power out bolt touching the front air-conditioning pipe which will create fireworks
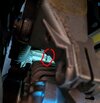
A lot of people, including myself have issues with the tensioner seizing where it fits to the engine. I had to fit the alternator twice (hence the new alternator in the pic) since the first time the power steering squealed on full lock since the tensioner was seized so the belt was not tight enough. I bought a new belt tensioner but the issue was actually where it joins the engine, so I sent the tensioner back. It would be very difficult to remove the tensioner since the pulley bolt is almost impossible to get to with such a tight engine bay.
I used WD40 to free the pivot and used the crow bar to pull it forward to create more tension. Do this with the alternator out.
I have marked in the pic below where this joint is that needs lubricating. Put a cloth below it to stop any drips going onto the belt pulleys when lubing. I couldn't find anything mentioning this on the Internet, so make sure you free the tensioner joint and pull it forward before fitting the new alternator.

There are lots of diagrams on the net for aux belt routing but you can see in the pic below that the rear pulley belt top routes down and under the next pulley. You can also just see on the far bottom right the belt goes on top of the bottom pulley before routing to the aircon pulley.

Before fitting the new alternator check that the original bottom bolt goes through and tightens properly. I again wasted a lot of time since my alternator was reconditioned and the thread on the end was not properly finished. I had to tap the thread with a tap & die for the bolt to take.
It is much easier to get the belt over the alternator pulley before fitting the bottom bolt. Once you have checked that the belt is properly aligned fit the bottom bolt so the thread catches and hand tighten. You can then use the crowbar the lift the alternator to tension the belt and fit in the top bolt. You may need to guide the top of the alternator bracket with a large screwdriver to the right at the same time as levering below if the belt is tight to get it into the top engine mount.
With the top bolt in finally connect the power out and plug on the alternator. Reconnect the battery and start the car before putting back the slam panel and front bumper. If there are any squeals on startup, remove the alternator and pull the tensioner pulley joint forward more with a crowbar.
5, Refit slam panel and front bumper.
When refitting the slam panel be aware of the rubber brackets since these will probably pop out of the top radiator housing. See pic below highlighted in red.

With the brackets in place you can refit slam panel by sliding the base in carefully and tighten the 13mm base nuts.
Refitting the bumper is straight forward just remember to reconnect the light clip and head light washer pipes (if fitted).
You should be able to do this in 2-3 hours. I probably spent 10 times that with the misguided suggestions of removing only the grill and using the jubilee clip method!
I started with the Jubilee clip method for tensioner and removing the grill which I found on YouTube and want people to avoid this since I wasted hours using this method
1) Remove front bumper - this is surprisingly easy since there are only 4 bolts to remove it. 1 in each wheel arch an 2 underneath the car (see pics below)
I suggest that you also remove the driver's side front wheel and inner arch liner since it will make the aux belt replacement easier. On the passenger side you can just move the tab to access the bolt seen in the first photo
When removing the bumper you will need to disconnect the fog light clip and headlight washer pipes on the passenger side (if fitted). Store the bumper safely so that the paint doesn't get scratched.
2) Remove top slam panel - remove 2 bolts either side as below and the 2 front bolts above the radiator (sorry nuts removed in 2nd pic.
There are also 2 x 13mm bolts at the base of the mid support (not the bolts you see on top of the support).
Trying to remove these 13mm bolts in front of the radiator with the bumper in place is a total PITA. I know since it's 2 hrs of my life I will never get back!
Here's a pic of the bolts which you can see with the slam panel removed. You only need to loosen these bolts so you can lift the slam panel out with the top 4 bolts each side removed.
3) Remove alternator and aux belt. Disconnect the negative terminal on the battery. Remove the top 13mm nut on the alternator and loosen the base 16mm bolt. Then place a crow bar or similar lever between the top of the air-conditioning compressor and base of alternator to take pressure off the top bolt.
You can now remove this top bolt and lower the alternator by prying forward to remove tension on the aux belt. God knows why people use a jubilee clip on the belt tensioner since I wasted 2 hrs trying that method
If you can't get the aux belt off remove the long bottom bolt from the alternator and move it sideways. Remove the power out bolt and clip off the alternator before removal.
The alternator will come out easier if you rotate and have the pulley facing forwards.
4, Replace aux belt and alternator. Make sure that if your car has aircon order a 1660mm belt. I was sent a 1650mm belt by Davey which is too short and actually caused the outside belt to rub on the top of the tensioner, so ask the parts dealer what length it is because Davey have it wrong!
Also if you have aircon make sure that you order the correct alternator since some have the power out bolt touching the front air-conditioning pipe which will create fireworks
A lot of people, including myself have issues with the tensioner seizing where it fits to the engine. I had to fit the alternator twice (hence the new alternator in the pic) since the first time the power steering squealed on full lock since the tensioner was seized so the belt was not tight enough. I bought a new belt tensioner but the issue was actually where it joins the engine, so I sent the tensioner back. It would be very difficult to remove the tensioner since the pulley bolt is almost impossible to get to with such a tight engine bay.
I used WD40 to free the pivot and used the crow bar to pull it forward to create more tension. Do this with the alternator out.
I have marked in the pic below where this joint is that needs lubricating. Put a cloth below it to stop any drips going onto the belt pulleys when lubing. I couldn't find anything mentioning this on the Internet, so make sure you free the tensioner joint and pull it forward before fitting the new alternator.
There are lots of diagrams on the net for aux belt routing but you can see in the pic below that the rear pulley belt top routes down and under the next pulley. You can also just see on the far bottom right the belt goes on top of the bottom pulley before routing to the aircon pulley.
Before fitting the new alternator check that the original bottom bolt goes through and tightens properly. I again wasted a lot of time since my alternator was reconditioned and the thread on the end was not properly finished. I had to tap the thread with a tap & die for the bolt to take.
It is much easier to get the belt over the alternator pulley before fitting the bottom bolt. Once you have checked that the belt is properly aligned fit the bottom bolt so the thread catches and hand tighten. You can then use the crowbar the lift the alternator to tension the belt and fit in the top bolt. You may need to guide the top of the alternator bracket with a large screwdriver to the right at the same time as levering below if the belt is tight to get it into the top engine mount.
With the top bolt in finally connect the power out and plug on the alternator. Reconnect the battery and start the car before putting back the slam panel and front bumper. If there are any squeals on startup, remove the alternator and pull the tensioner pulley joint forward more with a crowbar.
5, Refit slam panel and front bumper.
When refitting the slam panel be aware of the rubber brackets since these will probably pop out of the top radiator housing. See pic below highlighted in red.
With the brackets in place you can refit slam panel by sliding the base in carefully and tighten the 13mm base nuts.
Refitting the bumper is straight forward just remember to reconnect the light clip and head light washer pipes (if fitted).
You should be able to do this in 2-3 hours. I probably spent 10 times that with the misguided suggestions of removing only the grill and using the jubilee clip method!

 I found the jubilee clip method fiddly so offering a faster way levering under the alternator instead. I forgot to mention to lever in the middle of the alternator avoiding the vents.
 hi, thanks for sharing, the tensioner seizing bit was mighty helpful.