ClioSport.net

Register a free account today to become a member!
Once signed in, you'll be able to participate on this site by adding your own topics and posts, as well as connect with other members through your own private inbox!

  • When you purchase through links on our site, we may earn an affiliate commission. Read more here.

Monaco Money Pit


VenomUK

ClioSport Club Member
  Clio 172
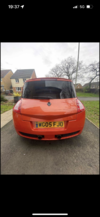
After years of owning an MG ZS180 way back when enjoying tack days the one car at the time that would leave me standing was 172/182 of the time. After years of hating on them, I found myself wanting to get back into track days and scratching that itch. After many failed attempts on faceache marketplace, I found a Clio 172 for the right price and the right history. The owner played me up a little after we had agreed on a price to then tell me that someone was on their way to 'look at the car'. after telling them I will buy the car... the joys of marketplace.

Sadly I didn't get any photos of when I got her apart from one or two at castle combe action day

AF180961-1-C75-446-E-ACED-393884-F55-AE0.jpg


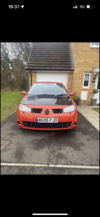
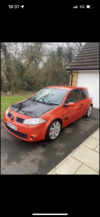
Little paintwork is needed on the front and rear bumper but for £780 and receipts of the dephaser being done a year ago I was well happy.

5-D9-BC763-4-A14-46-DC-83-A7-75-AC38-EEE80-C.jpg

1-BB1753-A-D076-47-A6-95-AA-E48-EF554069-C.jpg

A couple from the action day which you can see I was getting mugged off by other Clios and the body roll..

After that small shakedown at Combe to find out that the car isn't going to blow up on me I booked up for a full track day at Combe with a local group. At this point I had picked up a used set of TD 1.2s with some life left in the tyres. Went and picked them up from a gent at Silverstone where Lotus Silverstone had an open day.

8-F1-B81-F1-774-E-4-E22-B08-F-2374-ED2-DCBD5.jpg


0569-C62-C-56-A9-44-BA-912-F-4289-EFF05-EE2.jpg


3-C2-B7872-FFEF-444-F-AF82-7-E26-ABDB7-EF2.jpg


1972-F199-A4-D7-42-C5-BEE5-58-BA62-AA6-C1-C.jpg


I was probably the slowest thing there and having some decent tyres on just highlighted the body roll and how much the car needed some lows when sat on 15s. However it gave me something to think about, I did run into some issues which was exactly what I wanted out of the day to get the project rolling. A crunch in 3rd gear and pretty much cooked the brakes which put me out for the afternoon as it wasn't safe.

So some RBF 600 was needed along with a gearbox oil change.

Shortly after this was the BIG TEST of a sub £800 Clio. A trip to the ring....
 

VenomUK

ClioSport Club Member
  Clio 172
Few jobs before the trip, added the cheaper ebay tow eye at the front and originally the centre section was held up with some wire.

3-C6-CE343-6246-44-C2-84-DC-DD004-AC818-F8.jpg


65-FAC34-E-1-CA9-4180-82-F7-B4-C72-D3-F6689.jpg


Early morning start for the drive from Gloucester to Folkstone. Met up with my friend locally for a coffee before we set off.

1-E96-BDAA-46-DE-4995-A843-F9218-E09-CE19.jpg


The drive was perfect, and the car didn't put a foot wrong. The computer was telling me I was getting a decent average MPG on the way down.

Boarding onto the crossing and then continuing through France, Belgium and then into Germany. Eventually arriving at the hotel we've stayed at for the past few years.

B8-B17134-A225-42-BC-9010-951-F4222-C8-DD.jpg


Quick unpack and then straight up to the ring for some laps.

FB2-E7-CB5-E2-DA-4306-A554-FAA1-B94-F4-C43.jpg


It was absolutely heaving here on Friday but the only queue we had was getting off the track and back into the paddock area.

27-A0-C48-C-1-A6-E-49-C3-9-CEC-67-F25-D7-D9-E36.jpg


I planned on doing a couple of laps on the day we arrived but due to the number of people on track and the time it was taking for us to get off the ring we decided to go back to the hotel and get ready for the evening. As we entered Adenau we stopped off at the supermarket and got some beers for the room and booked a table at Pinocchios.

C7391-AF6-1-BED-4206-AA94-877-C4-E671048.jpg


For the next couple of days, it was laps, Go-karting and driving around to spots on the track and spectate. We stopped off at brunchen and found another Monaco friend. Also stopped off and took some photos of the cars. Followed by an evening meal and drinks in Blaue Ecke

51347-D33-3-C81-47-C6-92-BB-C2-DF25636194.jpg


EE33-FFA6-E1-D9-40-B3-AB0-D-F5-E359686-C98.jpg


D982-CDB6-7145-4-CEA-8343-2-A20-B429-B70-D.jpg


During our time out in Germany I found I hadn't solved my breaking issue and the discs are warped and getting some bad break judder. Apart from that, the car was flawless.
 
  2014 Clio 200t edc
i was going to say that! Car looks good though. I had a Monaco years ago that had lacquer peel but that was on the door and rear quarter. Yours looks a million times better than mine was though.
 

VenomUK

ClioSport Club Member
  Clio 172
You will see a trend in some plates being blanked and some not being blanked. More for the purpose when I was uploading them to facebook.
 
  2014 Clio 200t edc
I always block my plate when I post online, not sure why as I don’t when I drive about etc, but don’t like putting reg numbers online.
 

VenomUK

ClioSport Club Member
  Clio 172
Once I got back from Germany the project was to really begin...

First up were some new HC discs and pads from George which sorted the braking issue out once and for all.

ED9437-F2-D1-E9-40-DA-86-EF-012-EFC1518-C5.jpg


After a lot of thought and changing my mind several times on what suspension to opt for I finally made my decision. Originally I was going to go for a set of Spax RSX. One of the lads at track day had a nicely done Clio running that setup and took me out for a few laps and I was really impressed with the RSX and how they performed. I had made this mistake in the past of buying top of the shelf suspension which was set up for another car and was never really happy, so this time I had decided to buy brand new. But one thing kept popping back up every time I would search the forum for suggestions and opinions the one thing which was constant throughout was "if you have the money, get AST".

AC763144-E478-4-D28-A3-FA-6-D54-F77-E56-A7.jpg


So I ended up with a set of AST and got some PMS solid top mounts to go with and the strut brace. In all fairness, I'm glad I did because they really are the dogs! So I set to work taking the old Shocks out which had seen better days considering the car has covered 100k miles.

SAM-1377.jpg


SAM-1375.jpg


Apologies for all of you with OCD, I didn't take this opportunity to clean out the arches... I'm also very disappointed in myself.

SAM-1374.jpg


SAM-1384.jpg


Anything I work on I pop a bit of copper slip to make life so much easier if and when you need to take it apart again!

SAM-1381.jpg


SAM-1382.jpg
SAM-1380.jpg


I was surprised just how easy the car was to work on, nothing really put up a fight to come undone and all went back together with no issues. Next was to fit the strut brace and actually start making holes in things that haven't already got holes in them.
 

VenomUK

ClioSport Club Member
  Clio 172
For all you eagle-eyed views, I was doing this at the same time as the suspension install. I started out by loosely assembling the brace and marking out the holes. I should have assembled it a little better as may have made life easier later on and not give myself such a scare when I thought I had cocked it all up. Looking back at these photos and realising just how messy the car is but need to remind myself it's a project now a show car.

SAM-1385.jpg


SAM-1378.jpg


SAM-1386.jpg


Really no going back now. It was at this point I thought I should have assembled it a little better and the "loosely" approach may have ballsed this up as I thought I got the holes in the wrong place and the brace mounts were facing slightly backwards and not across the engine bay.

SAM-1379.jpg


Luckily, when I started to assemble it again the brace and did line it, it was definitely slightly off but not enough that I couldn't get the brace into place. It did put up a fight and needed some force to get it into mounts and the bolts through, but I got there in the end and probably having a little bit of tension is a good thing.

SAM-1379.jpg


SAM-1391.jpg


SAM-1390.jpg


The engine bay isn't the nicest part of the car currently and the previous owner had that air filter cable tied to the bar that runs in front of the battery. It's not how I would have it but it does the job currently and that's how it's staying for now. I also got a set of black series top mounts for the rear shocks to go with the solid top mounts at the front.

SAM-1400.jpg
 

VenomUK

ClioSport Club Member
  Clio 172
While I was doing all of this I got an ACS roll centre kit from a user on here who had got it for his car but never got round to fitting it. It was only in Oxford so off I popped for a little road trip to get some nice shiny parts. At this point, I'm thinking the suspension alone is worth 3x the cost of the car!

SAM-1394.jpg

SAM-1395.jpg

SAM-1397.jpg


With all that fitted I got the car booked in down at ProTyre as it was the only place that had a spot available. The usual tyre place I use was fully booked and me being me and impatient I booked in at ProTyre.

The car goes in and then 20 minutes later a lad came in and ask if he could show me something as he is having some issues with the adjustment. He seems to think the black anodised block has been cross-threaded onto the inner tie rod and is unable to move it. They have had the torch on it to heat it up and everything. I thinking to myself that it is impossible because I installed it and used copper slip and know for a fact it wasn't crossed. But sure enough, it was tight as f**k.

Then the car decides it doesn't want to start, it's now closing time for them and I get them to leave the gate open and call upon a friend to tow me home. My jumper pack wouldn't even start the car and it turned out to be the dry cell battery I had sitting around had died but that was the least of my worries at this point.

I got the car home and set about taking it all apart and thought the only way I can get it off is to cut the tie rod and got in touch with Anthony who made the ACS kit with his mate (who now makes the AM PRO kit) if he happened to have any spares and explained what had happened. Luckily he had 2 spares which I got anodised at work and then set about stripping the roll centre kit.

SAM-1402.jpg


I cut the tie rod and as it hit the floor I noticed the adjustment block moved... It was as free as a bird and what had happened was in the cars previous life someone had replaced the inner tie rods with ones that are too long and what was happening was the rose bearing and the inner tie rod was hitting each other on the thread giving the impression it was crossed-threaded.

I got the passenger side out and measured it and compared it with the drivers side which was now in two parts.

SAM-1401.jpg


With Anthony on hand and the forum and its conflicting information when it comes to tie rod lengths and much searching, we determined a length that would work that wouldn't foul on one another when it came to adjusting the geometry one the car.

SAM-1404.jpg


Whilst I was waiting for the second lot of tie rods to arrive I removed the acoustic valve which was destined for the bin until a lad on here from the Netherlands got in touch and asked if he could have it. So a part of my car is now abroad restoring someone else's car.

SAM-1403.jpg
 

VenomUK

ClioSport Club Member
  Clio 172
Just a couple of little jobs done at this point. As it's a track car I wanted to swap over to a stud conversion to make swapping the wheels over quicker from track to road.

SAM-1416.jpg

SAM-1417.jpg


Another plan for further down the line was to get a trailer and eventually run a splitter which would cause trouble loading and unloading off the trailer so after seeing a few peoples projects of quick-release bumpers I devised a plan of what I wanted to do. Originally I priced up the pins from demon tweaks but because I'm a tight bugger I went for Quik-latch which is a USA brand, the only supplier in Europe was in France and even then with buying 4 from France it was still cheaper than demon tweaks.

SAM-1409.jpg

SAM-1412.jpg


Having the front bumper off for the first time I could see the AC rad had taken a knock. Not sure what has happened here but the AC still works and nothing else looks damaged behind it or around it.

SAM-1411.jpg

SAM-1413.jpg


I also broke the bumper down and removed all plastic out to give it a bit of a refresh as they looked quite grey. The bumper sits fine but I think it can sit a little tighter to the lights so I will revisit this at a later date with a better design on attaching the pins to the crash bar as I was only using existing holes and can do a better job if I redesign the way the pins are mounted to the frame.

SAM-1414.jpg

SAM-1415.jpg


Completing my days project and light left in the day I treated the car to a quick wash.

1-C678759-067-C-46-A2-8131-17-D64-BA47041.jpg
 

VenomUK

ClioSport Club Member
  Clio 172
Little update,
eBay was having a discount weekend which was posted on here. I was always on the hunt for a second set of wheels and with the discount added there wasn't much difference between getting a used set of wheels or buying a brand new from Demon Tweaks with the weekends discount added. So I opted for a black set of 15" TD 1.2 again as my "wet/daily" wheels. Which arrided quickly and set about getting some protection on them before wrapping them in Uniroyal Rainsports.

36916-FC8-6-CED-4-B14-B530-7-CFE6-D8-E16-CA.jpg

557-EF2-BF-A688-4841-8596-5-E2388-BE7-EED.jpg


While the bumper was off I stripped it down and removed all the heavy plastic reinforcement and refreshed the plastics as they were looking rather "tired" at the time..

3848-AE90-EF93-4911-A331-5-F8671-AFB13-E.jpg

04795831-5-F6-B-4-A30-BBF5-B62-E86-BF3-E82.jpg

2-E258-ADA-8-FAA-47-C1-A30-F-E54-B43360-D3-F.jpg

428-AF675-17-A9-41-BC-896-C-64-FBC75-E0-DEA.jpg

DB17-BC91-95-BB-422-B-B4-D6-52-F8-FFDA2179.jpg

C3-ADD5-B1-4301-482-D-94-FF-30-DB7-FE771-EA.jpg

C5-FD4-EC5-5999-464-D-ABBB-1-B0291681954.jpg

7-F18-A565-BEEC-4-FDA-AA73-C5883239-CD6-A.jpg


I managed to retain the OEM stickers on the grill by masking them up close to the edge and trimming the excess off so that the stickers look as if they have been renewed along with everything else.
 

VenomUK

ClioSport Club Member
  Clio 172
Yeah, that was me mate. I was invited to a monthly classic car meet. Except I got my weekends mixed up so decided to go for a little spin.
 

VenomUK

ClioSport Club Member
  Clio 172
After the suspension mods, I was itching to go and try them out, give the car a shakedown and find the next issue that needs fixing. I booked up another Slip N Grip day at Combe after enjoying my first meeting. The people who attend these were all welcoming and there weren't any nobs on track, so it seems the ideal thing to do to go and stretch the car's legs and give the new mods a workout.

7-EB29-F9-D-2834-40-C1-B098-28-B8412684-D8.jpg

45-EEDFC8-39-FB-40-D6-836-E-660-C6-EAD3-B19.jpg


Starting off with the AST in the softest setting I was so impressed with how they performed and knew forking out the money was the right thing to do. After a few stints of learning the new set up, I ran into issues again with the brakes. This time it wasn't fade, they felt fine but I was getting brake warning light flashes up every time I would press the brakes and would stay on till I got on the brakes again. I checked online and the usual "check the fluid level" came up but this was all fine. The brakes felt fine so I pushed on. Apart from this and the annoying rattle of the heat shield on the exhaust which had dropped.

51-C21-DCD-CEBC-4-F0-C-ACE7-9413498-FC265.jpg


Again my day was cut short by 2 o'clock, as I went out by this point I decided to see what these shocks could do and went full hard setting I got halfway around the track literally shouting in the car with amazement at how 12 clicks on all for corners the car felt like it was on rails. I was already impressed before but this was a whole different game. I got halfway round and then the car coughed. It was only a little one which made me think 'did it just misfire?' and question it. Next, turn all fine and then as I got on the power the car completely went into limp mode with a warning light. I tried turning it off and on again while rolling but nothing cleared so I limped it in, lucky I had just gone through Bobbies so I was close to the pit lane at which point I went under the Avon bridge and it cut out on me. I pushed it to the side of the road and managed to get it running again. This time the warning light had gone out but that was it for me. All confidence had gone in the car and didn't want to get stuck out on track and I still needed to get home.

CC4-C58-D9-EEE8-426-F-83-D6-4-FD80536-C972.jpg


So I packed everything up slowly and took a slow drive home. The car again was fine and didn't miss a beat the whole way home. The next few days I took the car out or drove it to work and nothing happened again...?
 

VenomUK

ClioSport Club Member
  Clio 172
I haven't updated this thread in a while, I've been slowly working away on the car and have a backlog of updates so I had better start working my way through them.

August 2020, considering everything that is kicking off at this time 6 of us were lucky to get away and have a lads weekend away at the ring. In true French fashion, the sub £800 baguette decides to try and throw a spanner in the works. I took it to a local tyre place to get the tracking checked over before taking on the 1000+ mile trip to be told that the newly installed CV boot has split. They couldn't do anything with it themselves until 2 days away which would be too late for me. I decided to simply bodge it and hope for the best. It had lost some grease which could be seen over the bottom of the suspension strut which I replaced with a syringe, probably doing next to #### all good and then plugging the small hole with glue and activator... JOB DONE!!

B5-E44035-EFED-413-E-ADC6-8490-F35-E812-A.jpg


So far, all is well and good with the group apart from those without A/C which I was glad to have sorted before setting off because it was a scorcher! Halfway through Belgium, I noticed that if I applied the brakes the car would pull to the left. Giving it some thought it didn't take long to figure out what was going on. My bodge had failed but in all fairness, it's lasted this far! I pulled over and wiped the back of the brake disc to find it was smothered in grease. Taking it steady the rest of the way we arrived at Hotel an der Nordschleife, the others went over the road to spectate as I nipped down to the Lidl to grab some cling film and BBQ cleaner ready for another bodge job. This time the bodge lasted this time.

9077-E26-F-FCB4-4042-8-FDD-6426-DF23507-E.jpg


I still went out and did some laps over the next couple of days, as the laps ticked over the pads started to feel better as I was cooking off the grease and not once did it feel as though it was going to fail on me. We couldn't have asked for better weekend weather wise, the whole of Europe was having a heatwave.

990-AE690-7165-40-CA-93-DD-3-FC9262-DF327.jpg

BA180658-4-A20-4-BDD-89-AB-AC435259-B232.jpg

64-C3105-E-E3-AF-426-C-96-A7-5234-D80-BB9-A0.jpg

020-F7808-FEEE-45-B9-8-A2-A-AE2-DFC42-C8-CA.jpg


A couple of my favourite shots from the ring (yes I'm pikey and haven't uploaded the paid ones)

D43-B84-B7-A9-E5-4666-87-C5-0-A8-CD2664-D80.jpg
C2-C1-F47-F-056-C-42-C5-B0-E4-45344-FC30828.jpg
4557-A327-EC44-45-B2-A799-61563-CECDDB5.jpg
719-D84-CB-C036-40-C7-B2-C9-1-D6934-A6-C488.jpg
 

VenomUK

ClioSport Club Member
  Clio 172
UPDATE

After another 1000 mile plus trip to the ring the car performed like a dream and didn't miss a beat, even the cling film CV boot held together. Because of this, it sends my anxiety through the roof that it's only a matter of time that this little 100k mile sub £800 frogger is going to leave me high and dry. So first things first I got a new set of injectors and plugs to have in the garage. Many would just replace but I like to get my money's worth and hate myself more for putting myself through worry every time I go on a long journey with it.

F4-DA9-E1-D-E4-FD-4-AFA-BA51-8-A31-DDE673-D6.jpg

SAM-1546.jpg


Back tucked away in the garage for the next steps. by this point, it was clear the project needed stepping up so I kicked on, set myself some goals with it that I would like it to be more a completed project that I can use and not feel I was kidding myself doing things slowly. To start with it was time to strip it down to 90% to get some buckets and cage installed.

SAM-1603.jpg

SAM-1604.jpg

SAM-1616.jpg


Seats out it was time to get the lightweight seat in and give it a trial fit. I must admit I was happy with the way it felt, it was nice and low but offered little in support. I called it a day after this because it started raining.

SAM-1605.jpg


Picking it up the following day I cracked on and got the carpets and roof lining out leaving me with the lovely sound deadening. After taking this task on before with my Evo build I was actually looking forward to this part as I find it strangely satisfying 😂 Also had a count up of the loose change found in the car during the strip down. Sadly not even enough for a bloody Freddo!!

SAM-1610.jpg

SAM-1611.jpg

SAM-1614.jpg

SAM-1615.jpg
 

VenomUK

ClioSport Club Member
  Clio 172
Picking up from where I left off the day before I set about removing the sound deadening from the various parts of the car. The last time I did this it was winter and armed with a flat head screwdriver and a hammer I chipped away at the thick tar. This is what many people prefer to do is to chip away at it but I like the heat method. Breaking out the old black & decker heat gun my old window scraper I started heating up and area at a time and taking it off in strips. I did bag it all up and weigh it but obviously never took a photo of it but I was surprised just how heavy it was!!

SAM-1631.jpg

SAM-1632.jpg


Then came out the trusted Tardies to soften things up and gave them a wipe over with an old microfibre cloth leaving me with the off large blob or two which just got a direct treatment of tardies to break it down and a rub down with a red Scotch-Brite pad. Not forgetting the large slab of stuff on the roof too.

SAM-1633.jpg

SAM-1634.jpg

SAM-1642.jpg

SAM-1644.jpg


Then turned my attention to taking the dash top off so that I could hide some wires away also to have a look at a future project and how to integrate it into the OE wiring along with the removal of the airbags. Also to fix the broken vent blades which has been annoying me since the day I got the car!...

SAM-1639.jpg

SAM-1640.jpg

SAM-1641.jpg

SAM-1645.jpg
 

DomP182

ClioSport Club Member
  ph1 172, Arctic182
Good progress, I've always wondered why the front seat rail support for the passenger side seat is painted black on 172/182s. Anything to do with being seen if the autochanger or seat storage isn't fitted.
 

VenomUK

ClioSport Club Member
  Clio 172
Haven't done an update in a while, Have done a few little jobbers here and there in preparation for our annual (catch up from last year's missed) Germany trip which I will update in a later post, but I will use this segway to a new addition. Not sure what the plans for this are but as of now it is a toy to take to Germany in 5 weeks time as I haven't had enough seat time in the Clio with the cage, buckets and harnesses and worried it was going to be an awful experience driving 1000+ miles in it without testing it.

Considering the fuel prices I picked this tangerine for £2k, was it a deal?... Who knows yet
 

Attachments

  • 2388976F-F31F-4B3C-B37C-627DD4B87B68.png
    2388976F-F31F-4B3C-B37C-627DD4B87B68.png
    7.5 MB · Views: 52
  • 81DE4CC4-2838-4401-A18E-A39B135FF644.png
    81DE4CC4-2838-4401-A18E-A39B135FF644.png
    7.7 MB · Views: 67
  • 6996053C-8D7D-4BE5-BAB5-74363DE52750.png
    6996053C-8D7D-4BE5-BAB5-74363DE52750.png
    5.9 MB · Views: 60

VenomUK

ClioSport Club Member
  Clio 172
UPDATE

I haven't updated this build in a long while but work hasn't stopped on the Clio and have a backlog of updates to catalogue. Sharing time and money between this and the Meg has kept me busy, some have seen the Clio out and about at meets so some of these updates won't come as a surprise.

D9A813B0-06ED-40E0-B286-172EEA7A1FC0.jpg


First off was a trip to see Mick at Diamond to have the airbags and a few other things turned off, what a great bloke! He is such a wealth of knowledge and spent a fair bit of time chatting away with things to do to the Clio, it was an absolute pleasure and highly recommended him to anyone. SharkyUK was also there collecting his trophy which was nice to have a poke around.

SAM_1635.jpg

SAM_1651.jpg

SAM_1653.jpg

SAM_1662.jpg


I had accumulated the next puzzle piece to the build, turning my attention to the interior. I wanted some Recaro SPG as I had a set before in a previous build and are some of the nicest buckets to sit in. A mate of mine brought these to my attention that apparently back in the day Bimarco were very popular with the Clio crowd. To be fair at the price point these are also very comfortable and do a great job and wouldn't hesitate using these in another build again. As for the cage I wanted a true bolt-in that used the original seat belt mounts and rear struts so I had to do zero welding. I decided to have it powder coated in nardo grey.

Before fitting them I finished a little job which had bugged me the day I got the car, someone had put a naff aftermarket aerial on the car and it welded itself into the base so with a trip to the local breaks and found a nice new base and aerial, I dismantled it and gutted it as I was never going to have music in this car, it was for pure originality look.

SAM_1648.jpg

SAM_1649.jpg

SAM_1650.jpg


Much better, why people change these is beyond me, they just look absolute pants!
 

VenomUK

ClioSport Club Member
  Clio 172
Once all the parts arrived I started to fit the half cage and the buckets. I had been recommended the Bimarco seats by a few people along with the Jon Foz X-low seat bases and OMP side mounts. A while ago I grabbed a set of Sabelt harnesses in red which I think go really well with the seats. First up was wrestling the half cage into the car, lucky the seller had explained the best way to get this in and managed it on my own after no more than 20 mins which I was expecting to be fighting it a lot longer!

SAM-1657.jpg

SAM-1659.jpg


Once jiggled in I turned my attention to getting the bases in and test fitting the seats to make sure they were in the correct position.

SAM-1664.jpg

SAM-1665.jpg

SAM-1666.jpg

SAM-1668.jpg

SAM-1671.jpg

SAM-1673.jpg

SAM-1675.jpg


There isn't much to write about here, everything went in effortlessly without any hassle or issues. I have had a bit of seat time and upon first impressions, the seats are really nice and comfortable. I've had a few days out in the car in its current set up to caffeine & machine among other places and it has genuinely been a pleasure to drive and get behind the wheel of. I was expecting them to be quite bad after a couple of hours but in all honesty, these seats are really comfortable and can happily do some hours in them.
 

VenomUK

ClioSport Club Member
  Clio 172
That looks really nice. I love the true bolt in cage, where did you find that? All the ones ive seen you might as well just weld them in!!
It was Cyclone Racing, I found them on eBay. I'm finding it very hard to find their socials again but I have still got a contact for the chap. His name was Rob Cheesbrough. Lovely bloke and even delivered the cage to me via his parents free of charge because they were passing through from his workshop in Liverpool back home to Bath where he use to live. I have his contact details still if you're interested?
 

Howell

ClioSport Club Member
  172, Crafter, A3
It was Cyclone Racing, I found them on eBay. I'm finding it very hard to find their socials again but I have still got a contact for the chap. His name was Rob Cheesbrough. Lovely bloke and even delivered the cage to me via his parents free of charge because they were passing through from his workshop in Liverpool back home to Bath where he use to live. I have his contact details still if you're interested?

Could you send me the contact details too pal?

The cars coming along lovely!
 

VenomUK

ClioSport Club Member
  Clio 172
When I first got the car I've been slowly gathering parts for this build, one of which was the steering wheel, I wanted the Sparco wheel over the Sabelt for some unknown reason, to be slightly different I guess. So once the seats were in, the factory wheel needed to vacate its position in the car ASAP. I ordered up a Momo boss from Merlin motorsport and set about fitting the wheel into the car.

SAM-1654.jpg

SAM-1679.jpg


It feels so good in the hand now. Shortly after this, the wiper mech failed and because I'd stripped the interior, I removed the rain sensor. I also wanted to retrofit cruise control for those long journeys in the car that I'll never do now I have a recovery truck so I may reuse these parts on another build like the Master or Trafic...who knows yet but for now it's installed in the Clio. I managed to get a squib from eBay for £130 which was a lot but also cheaper than some of the other examples on eBay wanting close to £200.

So out with the old squib and in with the new. because I was replacing the wiper mech and the rain sensor was removed I reverted back to pov spec wiper stalk without the rain sensitivity.

SAM-1871.jpg

SAM-1873.jpg

SAM-1874.jpg

SAM-1875.jpg


Trying to keep with the originality, being a 172 it never came with traction control so I could have put a 182 panel in and blanked off the traction button. Instead, I found a Clio in the brakes with the light toggle and single switch panel which was perfect for putting the cruise button in. Excuse the fingerprints all over it after cleaning it.

SAM-1872.jpg

SAM-1876.jpg


Thanks for reading
 

VenomUK

ClioSport Club Member
  Clio 172
Continuing on with the Clio build, I've been stocking up on photos and posting at later dates so some of these updates aren't always in order or very recent and there will be a few continuity issues with the photos if you spot them but I have tried to keep it in order as best as possible.

Time to fit the PMS shifter, this had been on my list of things to do for a while and after getting one from @andybutlers as he was restoring his 182 at the time back to standard. The first challenge was to get the original CAT off of the car. I loaded the car onto the trailer and dropped it off at the garage next to my work so they could remove the CAT for me. Once the shifter had been fitted, take it back and have a decat fitted as I tried to do this on the drive with the old man and there was no way I was getting this done!

This has been covered many times here so I will simply post up the photos of the work carried out.

SAM-1737.jpg

SAM-1742.jpg


I'd like to add a thank you to @Don’t call me Dave for giving me the lead shot he had left over from his own install. I can't be sure where I had seen this but I also re-used the boot, filling it with grease and stretching it over the joint and cable tieing it up. I also replaced the old worn out plastic bush with a new one. frustratingly the one that arrived was broken and had to wait a few more days for another replacement to arrive.

SAM-1744.jpg

SAM-1745.jpg

SAM-1735.jpg

SAM-1748.jpg

SAM-1743.jpg

SAM-1740.jpg
 

VenomUK

ClioSport Club Member
  Clio 172
Thought it was time to tackle a job I’ve been putting off for some time now. If you’ve been following along just before the last outing to the ring for the Clio I had the tracking checked to find a CV boot had split. I dodged it together by pumping grease through the split with a syringe and then using super glue to patch the hole. Long story short this worked till about half way through Belgium and I noticed if I got on the brakes the car would pull to one side. A few miles later I realised what had happened and what could be causing the issue. I pulled into a lay by and called through to the others if anyone had any brake cleaner. One of the lads come through after stopping at the services with BBQ degreaser, I guess it will do for now.

I pressed on and arrived at Adenau, quickly unpacked and walked down to Lidl and grabbed some scissors and cling film. Nabbed a couple of cable ties from one of the lads and set about patching the CV boot. This is how it stayed for quite some time and it’s held up really well 😂

SAM_1684.jpg

SAM_1680.jpg

SAM_1681.jpg

SAM_1682.jpg


Inspecting the CV and was happy it didn’t need replacing and all was needed was a new boot. Armed with lots of washing up liquid, a bowl of hot water and something that wouldn’t look out of place in a sex shop I stretched the CV boot over the drive shaft.

SAM_1683.jpg


The job wasn’t that bad to do to be fair so next time I won’t leave it for a year before replacing the CV boot next time.
 

Louis

I Park Like a C**t
ClioSport Club Member
Thought it was time to tackle a job I’ve been putting off for some time now. If you’ve been following along just before the last outing to the ring for the Clio I had the tracking checked to find a CV boot had split. I dodged it together by pumping grease through the split with a syringe and then using super glue to patch the hole. Long story short this worked till about half way through Belgium and I noticed if I got on the brakes the car would pull to one side. A few miles later I realised what had happened and what could be causing the issue. I pulled into a lay by and called through to the others if anyone had any brake cleaner. One of the lads come through after stopping at the services with BBQ degreaser, I guess it will do for now.

I pressed on and arrived at Adenau, quickly unpacked and walked down to Lidl and grabbed some scissors and cling film. Nabbed a couple of cable ties from one of the lads and set about patching the CV boot. This is how it stayed for quite some time and it’s held up really well 😂

View attachment 1638653
View attachment 1638654
View attachment 1638655
View attachment 1638656

Inspecting the CV and was happy it didn’t need replacing and all was needed was a new boot. Armed with lots of washing up liquid, a bowl of hot water and something that wouldn’t look out of place in a sex shop I stretched the CV boot over the drive shaft.

View attachment 1638657

The job wasn’t that bad to do to be fair so next time I won’t leave it for a year before replacing the CV boot next time.
Nice work.

I've used that giant bad dragon looking tool a few times myself. Getting sus looks from the neighbours is the best bit.

Top tip for next time, use a microfiber to slide it down the stretcher. I struggled for ages doing it with gloves on as it was just so lubey
 

VenomUK

ClioSport Club Member
  Clio 172
@Louis oh that is a top tip to remember. I watched a few online clips and it was a struggle to get a grip when wearing latex gloves and washing up liquid everywhere. I like that using a MF cloth, so assuming you turn the boot inside out as you would and then stuff the MF cloth through the inside and then pull that down over the big green butt plug 👏🏼 love it! I will deffo be trying that next time! Thanks for that mate.

@KitsonRis I couldn’t agree more and it done the job too and got me through the weekend at the ring👌 I keep looking at Llandow at the end of the month and really want to get the Clio back out this year, may have to see how much Donington cleans me out next weekend first.


Top