ClioSport.net

This is a sample guest message. Register a free account today to become a member! Once signed in, you'll be able to participate on this site by adding your own topics and posts, as well as connect with other members through your own private inbox!

  • When you purchase through links on our site, we may earn an affiliate commission. Read more here.

MY2005 Racing Blue Clio 182 CUP - Senna

Car  clio 172 ph1
Hey,
some of you might know me already, but some of you might not.
so here is on of my Clio's which i'm doing some work on.
as discussed in a different thread, this a somewhat famous 182, and is pretty well looked after for todays standards, however I felt it could be done much much better, so here we are:
Screenshot_20220417-232101_WhatsApp.webp


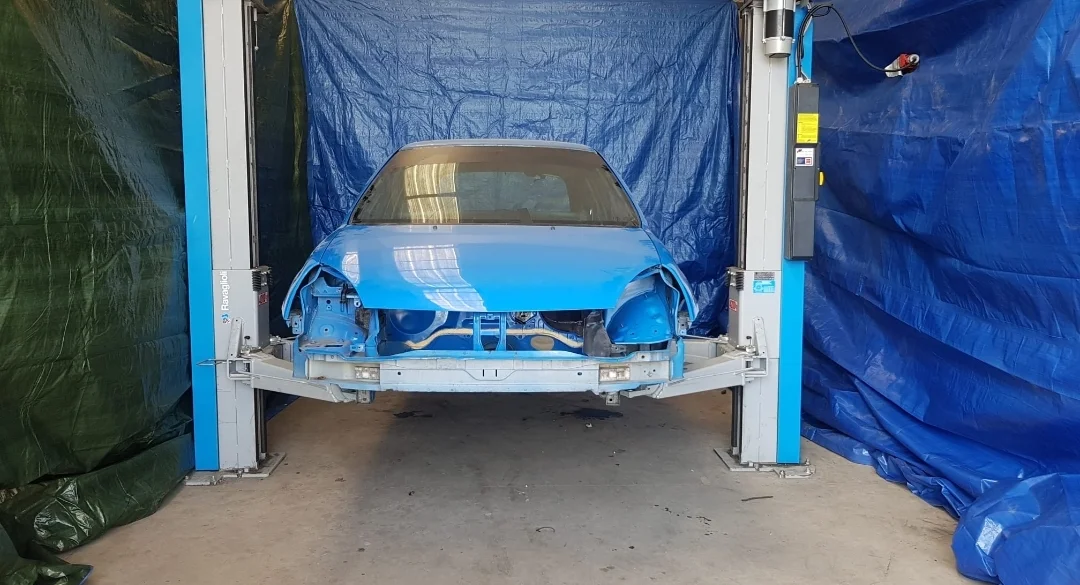
already on my 2 post lift and all the covers installed, because it's goin' to get dirty!
 
20220416_135539.webp
20220416_135544.webp
20220416_135548.webp
20220416_135552.webp
20220416_135611.webp
20220416_135614.webp
20220416_135620.webp
20220416_135629.webp


these are the before pictures, which tell the story this car carries, which isnt intresting at all lol! its just dirty and rusty on some places, which isnt all bad.
after these pics i hung up all my sheets around the shop to stop the water getting everywhere and ductaped the interior of the clio shut. I luckily have some experience doing this stuff, so all good on that part. it's just a pressure washer (80 Degree water) with alot of Gyeon Tar and tons of brushes and rags.
 
20220416_154209.webp

A picture during the cleaning, i've foamed the whole car down with some Degreser mixed 1:10 in my foam cannon (kranze HD+) which i let soak, this basically makes the dirt less sticky. but doesnt do any magic either, the pressure washer helps for the most part!
20220416_182655.webp
20220417_124819.webp
20220417_124932.webp
20220417_124855.webp
20220417_124921.webp
20220417_124927.webp


after several hours of cleaning, 99% of all the tar was gone luckily, so off i was to cleaning off the rust. which is a very time consuming part of the job, i used some 3m wire wheels and several bottles of brake clean for regular cleaning in between.
 
IMG-20220417-WA0053.webp

I used this product from Locktite, which is a rust converter type of product, i find it better to apply the Bilt hamber, but it's also much more expensive. it applies green and dries up very hard and black of color. it forms a kind of primer layer so to say. after the stripping of all the rust back to clean metal, it looked like this when applied
IMG-20220417-WA0054.webp
IMG-20220417-WA0055.webp
IMG-20220417-WA0056.webp
IMG-20220417-WA0057.webp
IMG-20220417-WA0059.webp
IMG-20220417-WA0060.webp


i'm sorry my pictures absolutly suck, after soaking for some hours and then cleaning rust, couldn't care too much so to say. tommorow it will be dry and ready for sprayable undercoating and color layer. i'm happy all rust has been tackeled.
 

Attachments

  • IMG-20220417-WA0058.webp
    IMG-20220417-WA0058.webp
    54.4 KB · Views: 246
all the aluminium bits had also returned from the Aqua blaster by this point:
starting off at this:
20220317_211149.webp

and ending up like this:
IMG-20220321-WA0051.webp
IMG-20220321-WA0050(2).webp


pretty neet!

also i've started on the rear beam:
20220417_124417.webp

Screenshot_20220418-001344_WhatsApp.webp
20220417_170111.webp
20220417_170114.webp


Beam was Okayish, but not to my liking, so i opted for powdercoating in gloss black and some Powerflex Purple bushes,
also this was added:
PMS 10mm spacer kit, new renault bolts and later zinc plated, previously fitted discs (as they were 150 odd miles old), powerdercoated hangers, powdercoated stubaxle brackets and new hanger bolts.

the brakelines were okay, as were the abs sensors, luckly i got them out, so all good there.

i'll try and upload more soon
 
all the aluminium bits had also returned from the Aqua blaster by this point:
starting off at this:
View attachment 1588929
and ending up like this:View attachment 1588928View attachment 1588927

pretty neet!

also i've started on the rear beam:
View attachment 1588930
View attachment 1588931View attachment 1588933View attachment 1588934

Beam was Okayish, but not to my liking, so i opted for powdercoating in gloss black and some Powerflex Purple bushes,
also this was added:
PMS 10mm spacer kit, new renault bolts and later zinc plated, previously fitted discs (as they were 150 odd miles old), powerdercoated hangers, powdercoated stubaxle brackets and new hanger bolts.

the brakelines were okay, as were the abs sensors, luckly i got them out, so all good there.

i'll try and upload more soon
Proper restoration. Love it!
 
Here I am again with an update:
Continued the painting and rust removal process.
I bought some SprayMaxx 2K epoxy primer from my local supplier and some innotek (Medium Grey) metal paint. The Medium grey is an exact match to the oem grey undercoating, so it matches well. Although this time i'm on a budget, i'm a massive paint in the behind when it comes to matching oem. So off i was sanding the rust converter down, and applying the expoxy primer. Later i painted the Innotek paint and it came out well, although i need more paint and primer (ffs)
20220418_163902.jpg
20220418_163911.jpg

As you can see, it matches the grey from the tank area perfectly, i just need more lol.
After this time spraying some random blue everywhere to make it look oem, because thats what i'm after really.


Off to the rear beam, i chose to powdercoat mine, as it's the best finish in my book. I did the stubaxles, and stubaxle cups at the same time aswell, this being a roadcar, i chose powerflex purple:
20220418_164016.jpg

Came out okay to my standards, had to replace both brake lines as they were fooked, luckily i had a brand new set for a twingo 133 laying around, and there the exact same. Happy days. I re-used the calipers, brakepads and discs as they were fine, and with being on a budget, would make zero sense Replacing..

The subframe also came back from powdercoating, looks amazing!:
FB_IMG_1650303706927.jpg
 
Here I am again with an update:
Continued the painting and rust removal process.
I bought some SprayMaxx 2K epoxy primer from my local supplier and some innotek (Medium Grey) metal paint. The Medium grey is an exact match to the oem grey undercoating, so it matches well. Although this time i'm on a budget, i'm a massive paint in the behind when it comes to matching oem. So off i was sanding the rust converter down, and applying the expoxy primer. Later i painted the Innotek paint and it came out well, although i need more paint and primer (ffs)View attachment 1589031 View attachment 1589029
As you can see, it matches the grey from the tank area perfectly, i just need more lol.
After this time spraying some random blue everywhere to make it look oem, because thats what i'm after really.


Off to the rear beam, i chose to powdercoat mine, as it's the best finish in my book. I did the stubaxles, and stubaxle cups at the same time aswell, this being a roadcar, i chose powerflex purple:View attachment 1589032
Came out okay to my standards, had to replace both brake lines as they were fooked, luckily i had a brand new set for a twingo 133 laying around, and there the exact same. Happy days. I re-used the calipers, brakepads and discs as they were fine, and with being on a budget, would make zero sense Replacing..

The subframe also came back from powdercoating, looks amazing!:
View attachment 1589033
Did you powder coat it yourself then? I agree the finish is good but the first beam I got powder coated rusted after 3 months.

I don’t think many commercial companies like to faff about treating the rust prior to application. So ultimately they just powder coat over rusty steel and you’re back to square one.
 
Top work, albeit it looks like you are working much faster than me! 😂 mines taken 2 months! So jealous of your ramp
 
Did you powder coat it yourself then? I agree the finish is good but the first beam I got powder coated rusted after 3 months.

I don’t think many commercial companies like to faff about treating the rust prior to application. So ultimately they just powder coat over rusty steel and you’re back to square one.
Yes i do, i degrease first and clean with my heated powerwasher, and then pre heat to soak out oils, after that we blast using aluminium beads (don't know the exact name, but red of color) and later we powdercoat, i've seen my beams go 10 years old without any issues
 
Then i finished cleaning the shocks and springs;
6FD621EE-62A3-4613-B673-20794F65A1A3.webp
FFC8F7D4-5E9D-4060-9B63-C5B05BB15EFC.webp

I had a brand new oem heatshield laying around, and the car didnt had one previously, also installed some powedercoated exhaust hangers and powerflex bushes, installed the previous Ktec Racing rear shocks (never seem them before) and some new handbrake cabels from renault.

also i cleaned the Ktec Ultra Sport exhaust rear damper, but it fits horribly, so i’m currently busy with a big hammer :)
B8198BBB-70EC-484C-8758-AB60436C692D.webp
236BBA65-D8C0-4307-A62C-379016E51F43.webp
 
long time no see fella's.
I'm back from holiday in Greece and school has started again. but yet i'm here with an update for you all.

i've started on a other project since i was waiting on bits for the 182 cup:
image00004.webp


image00006.webp
image00007.webp


as you can see it was all pretty dirty again! ffs. But no challenge for me!:
image00028.webp

image00020.webp


image00021.webp

sadly i dont have anymore pictures of the finished work as i'm still waiting for the bumpers to get back from the painters:
image00029.webp


so thats's all from the 172 cup project for now.
 

Attachments

  • image00020.webp
    image00020.webp
    1 MB · Views: 283
back to the 182 cup!!:
image00027.webp


when i was on holiday, I got sent this exact picture and i fell in love again with the color. It's so simple yet soo good. All the motivation was back yet again:
image00031.webp
image00033.webp

the shell has been back from the painters after the LHD conversion, all good! color match is very good. so i started disassembling all old parts and installing the correct ones:
image00034.webp

all parts are from a 12K mile 182 FF with Setnav, as i aquired that car for all the correct bits for the conversion. this insulation was in mint state as was the rest:
image00035.webp

new pedals!
image00041.webp
image00042.webp

pulled an all-nighter on the interior, as I grew tired of waiting, I'm very exited as you can probaly tell. also fitted a alcantara shift boot and handbrake lever.
still loads of cleaning to do, as its proper filty lol!
image00045.webp

also made a start on the engine bay wiring, the master cylinder was f*cked so that's on its way from france atm. but i'm pleased overall with the results. I can't wait to start on the rest of my projects now that i'm finally making progress. ( notice the rust on the brake booster, i ordered a new one ;) )
 
Wow looks incredible, Cant wait to see this finished.

Do you have a link for the new brake booster you ordered? I think I need one as mine is just as rusty.
 
Wow looks incredible, Cant wait to see this finished.

Do you have a link for the new brake booster you ordered? I think I need one as mine is just as rusty.
for a uk car it would be the Bosch 0 204 125 733. as would be stated on the Bosch sticker on the brake booster matey
 
  • Like
Reactions: Gus
Just a lovely project build. Proper commitment.

I'm sure many Clio Sports owners will be thinking they wished they had the skills or facilities to do this, but it's definitely doable on a driveway if it's done in sections.

Sadly we're going to see a lot of these cars taken off the road in the next few years as they rot beyond economical repair. So it's great to see you tackling yours now and preserving it to enjoy for many years to come.
 
Just a lovely project build. Proper commitment.

I'm sure many Clio Sports owners will be thinking they wished they had the skills or facilities to do this, but it's definitely doable on a driveway if it's done in sections.

Sadly we're going to see a lot of these cars taken off the road in the next few years as they rot beyond economical repair. So it's great to see you tackling yours now and preserving it to enjoy for many years to come.
Thanks so much, it means alot coming from you and your builds. I’m commited in fixing them up, hence why i almost bought a Inferno 2 weeks ago, sadly someone beat me to it
D0B6672F-C3C6-4783-97E3-82F5D20A82FA.webp
 
for a uk car it would be the Bosch 0 204 125 733. as would be stated on the Bosch sticker on the brake booster matey
What about for a LHD car ? I might need one myself in the future. Is it still available as an OEM part from Renault? Thx! Absolutely lovely thread mate!
 
Hey,
some of you might know me already, but some of you might not.
so here is on of my Clio's which i'm doing some work on.
as discussed in a different thread, this a somewhat famous 182, and is pretty well looked after for todays standards, however I felt it could be done much much better, so here we are:

View attachment 1588888

already on my 2 post lift and all the covers installed, because it's goin' to get dirty!
Hey,
some of you might know me already, but some of you might not.
so here is on of my Clio's which i'm doing some work on.
as discussed in a different thread, this a somewhat famous 182, and is pretty well looked after for todays standards, however I felt it could be done much much better, so here we are:

View attachment 1588888

already on my 2 post lift and all the covers installed, because it's goin' to get dirty!
Hi I have clio rs200 gordini not quite sure what I’m doing with it it’s in perfect running order and very clean it’s sorn at the moment in the garage would you have any ideas on the price of them and where would be the best place to advertise it should I decide to sell it many thanks Steve
 
Back
Top