HaveaCuppa
ClioSport Club Member
Managed to pick this up today after getting g an email from Kevin to let me know it was ready.
It was possibly the worst day to pick it up as we had snow last night + torrential rain this morning, but never mind haha.
Im genuinely blown away with the finished product. The guys really really know their stuff and gave me a quick tour around the workshop. Plenty of very very nice metal around including a liquid yellow 182.
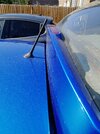
Unfortunately I took minimal decent before pics. Here’s the state of the car before the bodywork.

This was above the rear bumper on the offside. About the size of a 50p and it was starting to bubble further back too.

The fuel filler was starting to bubble everywhere. Top, bottom, side and also behind.


Crushed jacking points and sills both sides. This also meant the side skirts didn’t quite fit right either.
There were also a ton of dents, stone chips and scratches along the doors and rear quarter.
I’ll post the after pics in the next post.
It was possibly the worst day to pick it up as we had snow last night + torrential rain this morning, but never mind haha.
Im genuinely blown away with the finished product. The guys really really know their stuff and gave me a quick tour around the workshop. Plenty of very very nice metal around including a liquid yellow 182.
Unfortunately I took minimal decent before pics. Here’s the state of the car before the bodywork.
This was above the rear bumper on the offside. About the size of a 50p and it was starting to bubble further back too.
The fuel filler was starting to bubble everywhere. Top, bottom, side and also behind.
Crushed jacking points and sills both sides. This also meant the side skirts didn’t quite fit right either.
There were also a ton of dents, stone chips and scratches along the doors and rear quarter.
I’ll post the after pics in the next post.
 I used to see people post about rust round the arch and others would say it's probably had some crash damage/repair.