I have recently started playing with Photoshop and having looked at a lot of videos on YouTube, and doing a lot of experimenting with shots, I was able to create a seemingly convincing shot of my car, as if it were taken while moving, be it from a chase car, or on a rig.
This was the finished article:
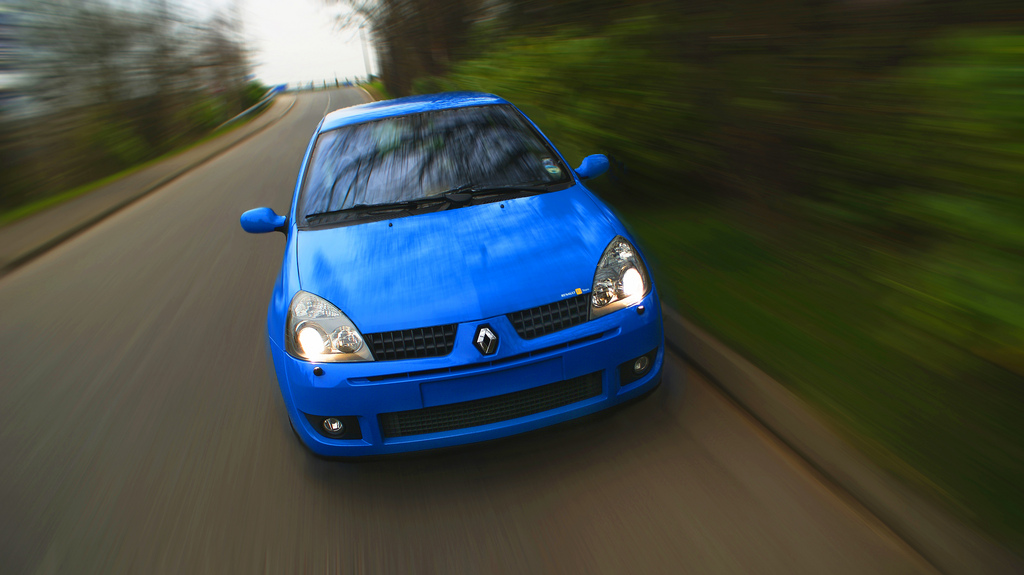
6831458826_248600e4ee_o by Eddie the Kid, on Flickr
A few people asked if I could make a tutorial on how to do it. Now I am no expert on PS so the thought of doing this was a little daunting! I have however had a go at making a quick run through of the process involved, using a new shot, that I took tonight.
I must stress I'm not that competent on PS so please excuse any noob methods or inaccuracies!
Step 1.
Open your image in PS, and immediately create a new layer. Layers will be vital to this working, (if you're unsure on layers and how they work, please have a look on YouTube, there are plenty there) so make sure you continually use them.
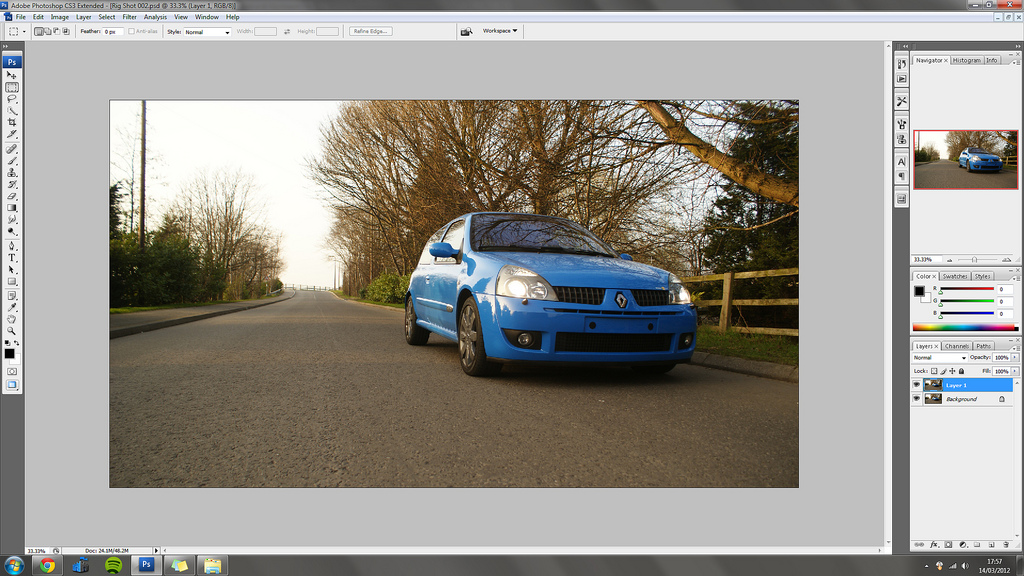
Tutorial screen grab (3) by Eddie the Kid, on Flickr
Step 2.
Use the "Clone" (again there are lot of videos explaining this on YouTube) tool to clean up any imperfections, in my case, I removed the velcro plates from the front of my car.
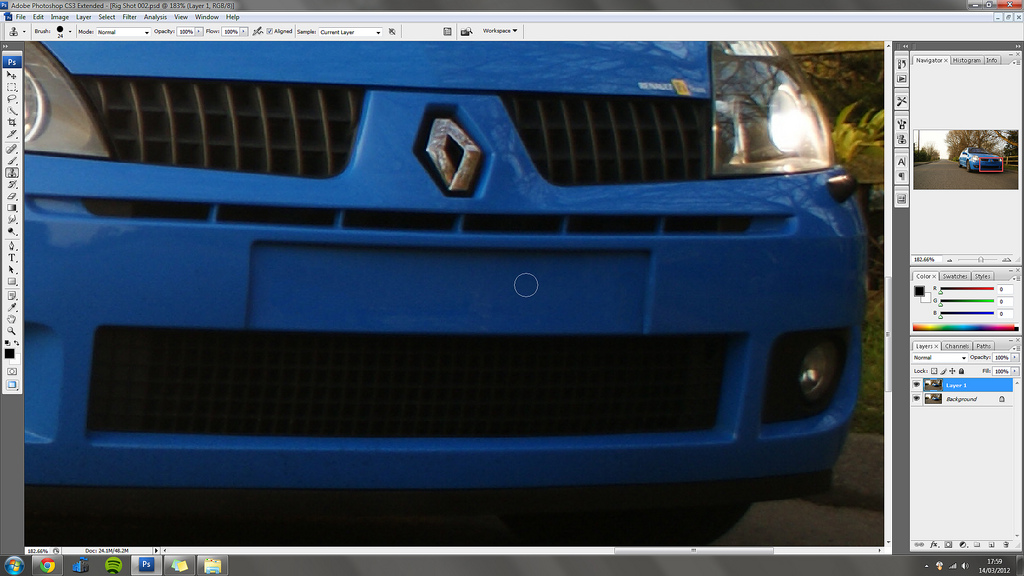
Tutorial screen grab (2) by Eddie the Kid, on Flickr
Step 3.
Now you are ready to separate the car, and any objects that would be moving with the camera, from the background that will be blurred. There are a number of ways to select the areas you want, all with varying degrees of accuracy and ease of use, personally I find the "Mask" tool a very good way of accurately selecting certain objects. At this point, it is worth noting that taking your time is vital here, the better the layers are, the better the final image will look. If you rush, it will show through later on, so be warned :evil:
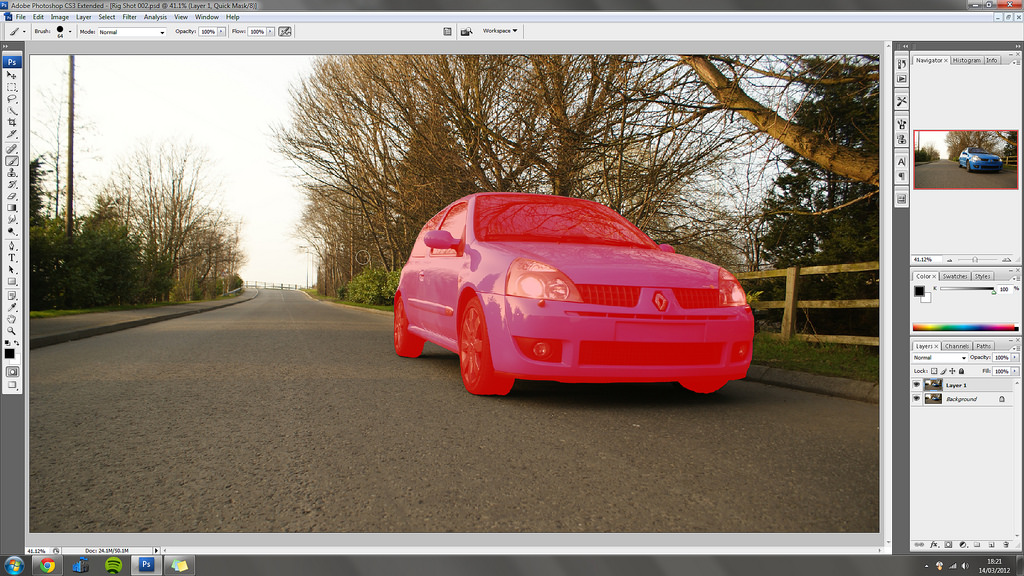
Tutorial screen grab (12) by Eddie the Kid, on Flickr
Once you have selected everything you want, create another layer, copy the image across with the selection still active, on one layer delete the background, and on another layer, delete the car:
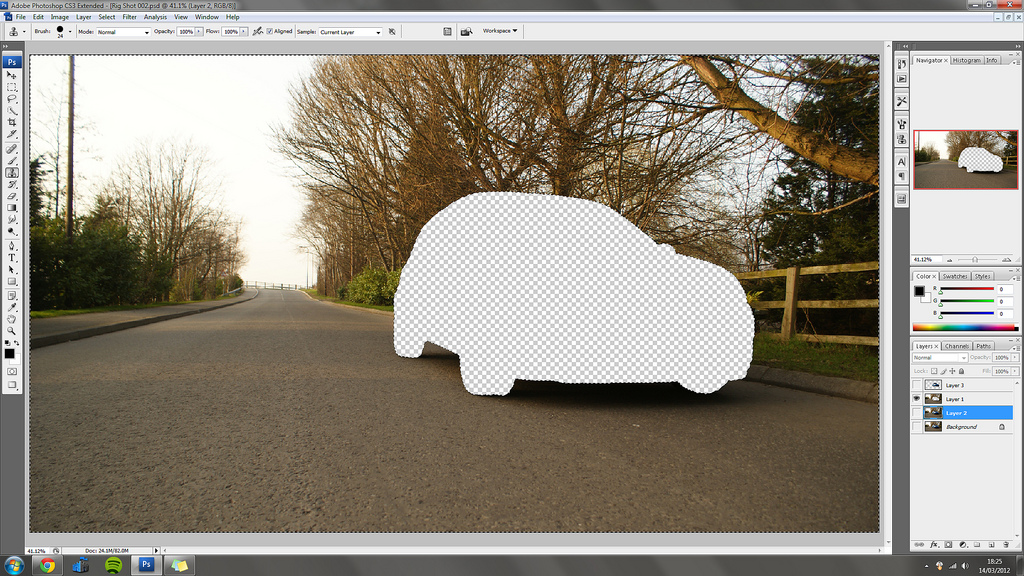
Tutorial screen grab (5) by Eddie the Kid, on Flickr
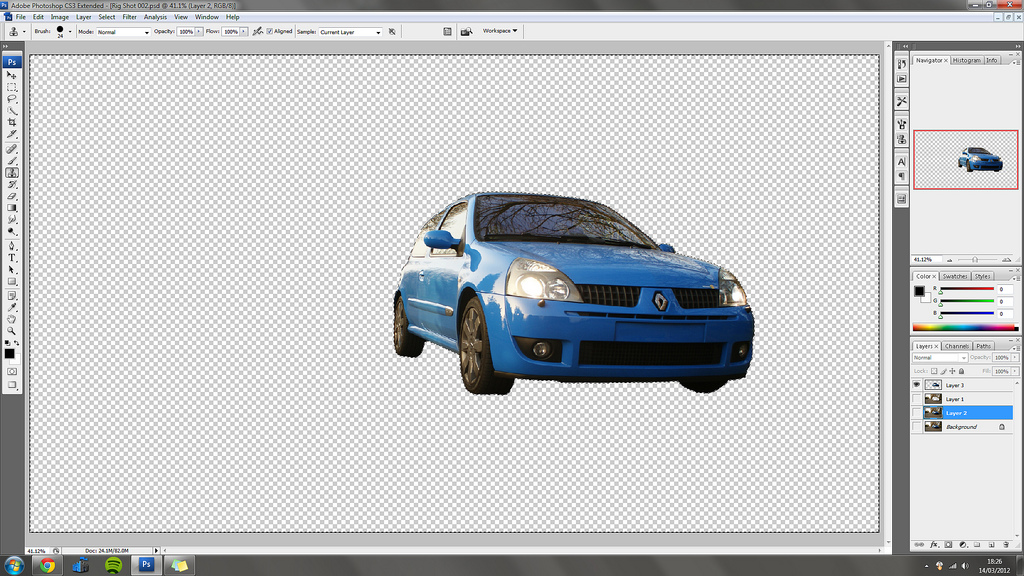
Tutorial screen grab (8) by Eddie the Kid, on Flickr
Step 4.
Now that you have the background separated from the car, you can blur the background. To do this I use something called "Radial Blur" to find it drop down the "Filter" menu, then scroll down to "Blur" then select "Radial Blur" from the sub-menu:
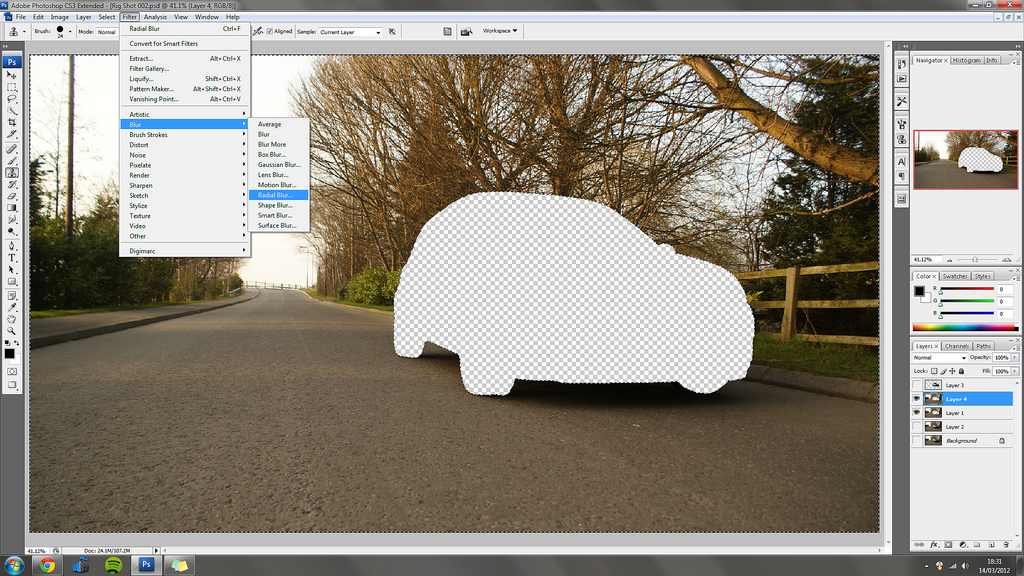
Tutorial screen grab (13) by Eddie the Kid, on Flickr
Once you have done that you will be presented with this window:
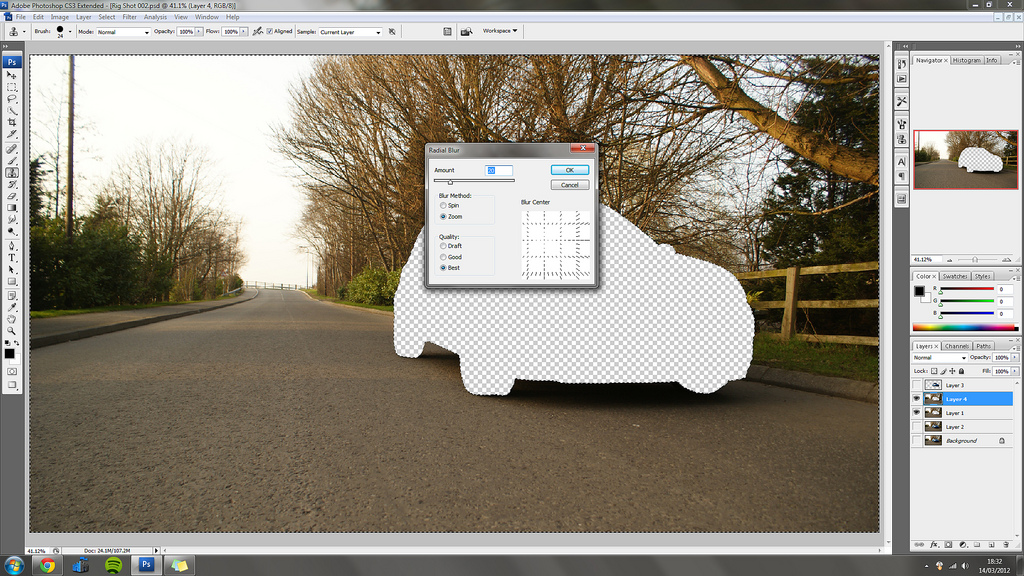
Tutorial screen grab (14) by Eddie the Kid, on Flickr
In this window you have a few options, in the middle there is a "Spin" and a "Zoom" option box, make sure you tick the "Zoom" option. Under that there are quality options, set it to "Best".
You can also set the slider at the top, to decide how much blur you want, again have a play with this, you won't need as much as you think!
To the side there is a grid, this grid allows you to adjust the direction of the blur, this takes some practise and time, but you want to try and find the "vanishing point" of the photo, in my case it was somewhere around the end of the road.
Once you have done all this, click okay, it may take a minute or two to render.
You should be left with something like this:
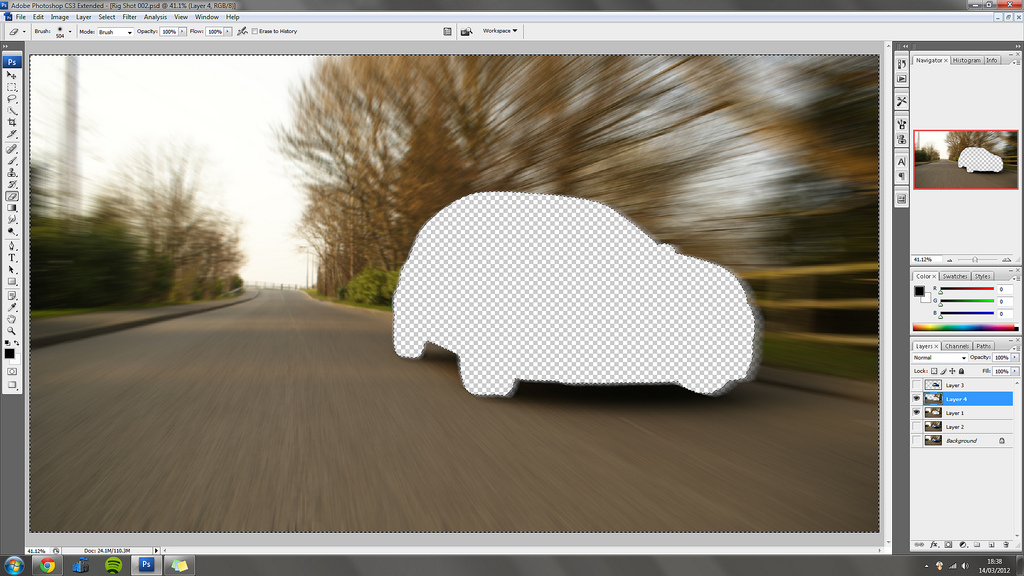
Tutorial screen grab (9) by Eddie the Kid, on Flickr
(Optional Step)
Even with rig shots, the photo will have some depth of field to it, so for me it was important to include this, my lens isn't very shallow, so the original shot needed modifying to add some DOF.
To do this I made a copy of the blurred background and added a "Gaussion Blur" to it, set to around 2.5 pixels.
I then set the copied layer under the blurred background, then erased the original blurred layer using a feathered edged eraser tool:
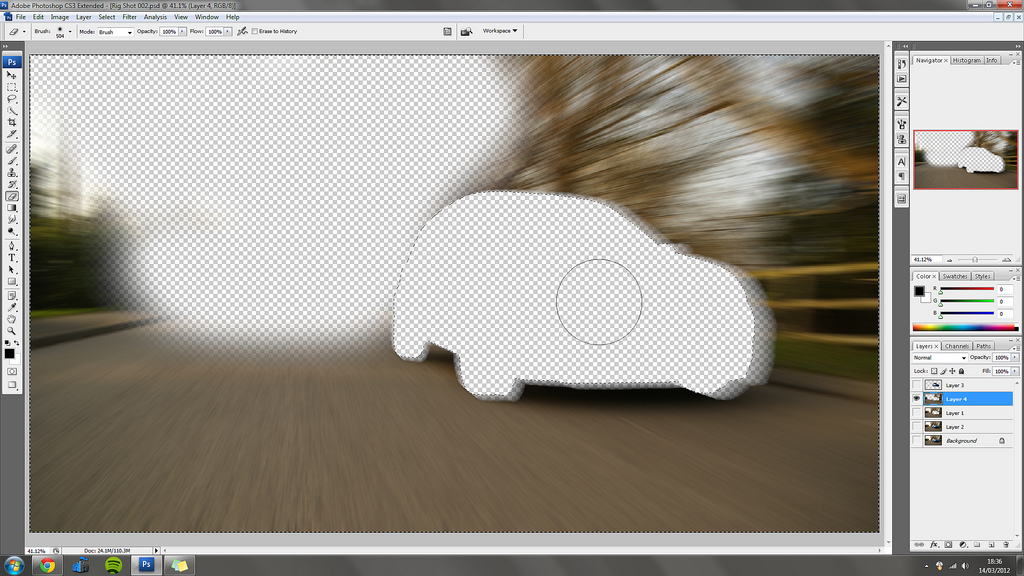
Tutorial screen grab (4) by Eddie the Kid, on Flickr
Step 5.
Now that the background is looking right, it is time to get the car looking correct, it is important not to forget the reflections on the car, and the fact that they would also be blurred.
You will be left with this shot after you have sorted the background:
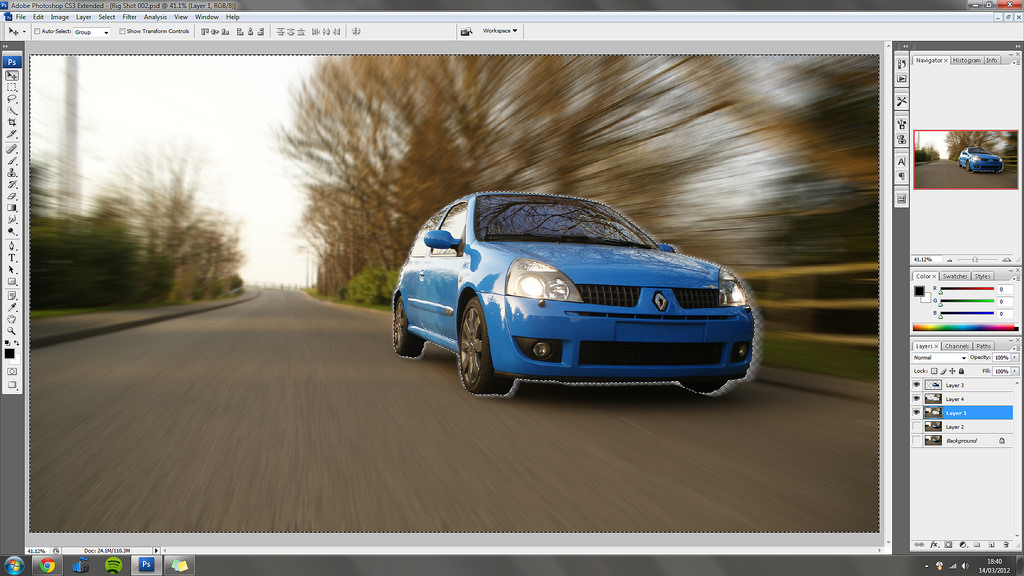
Tutorial screen grab (16) by Eddie the Kid, on Flickr
Don't worry that there is a see through overlap, the background layer will be visible at the end and you will be able to clean it up.
With the background visible:
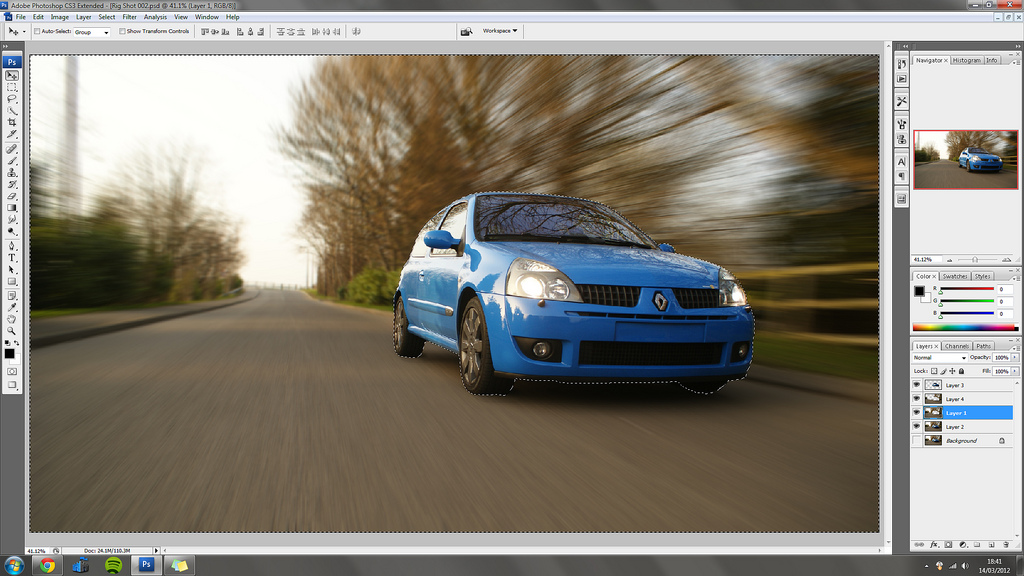
Tutorial screen grab (15) by Eddie the Kid, on Flickr
The first thing I did on the vehicle itself, was the most technical, the wheels.
The "Radial Blur" tool isn't able to blur the wheels correctly so you have to distort them first. To do this select the wheel in question (do one at a time) in this case again I have used a "Mask" remember to only select the face, the tread of the tyres can easily be done with the "Smudge" tool later on.
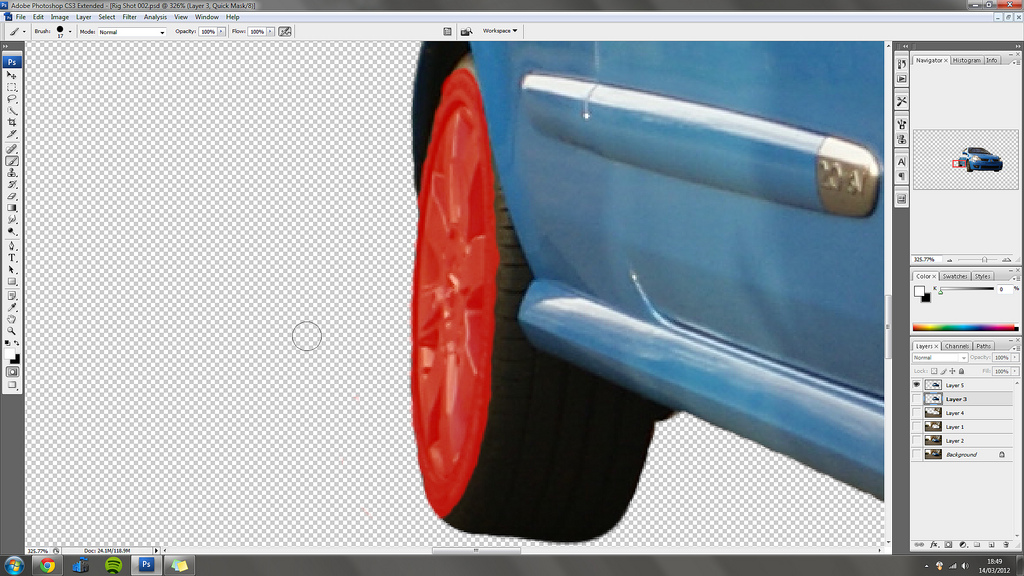
Tutorial screen grab (11) by Eddie the Kid, on Flickr
You then want to copy the selected wheel to a new layer, and once you have done this, select "Free Transform" (Ctrl + T on a PC) then stretch the wheel selection box so it is as close to square as you can make it.
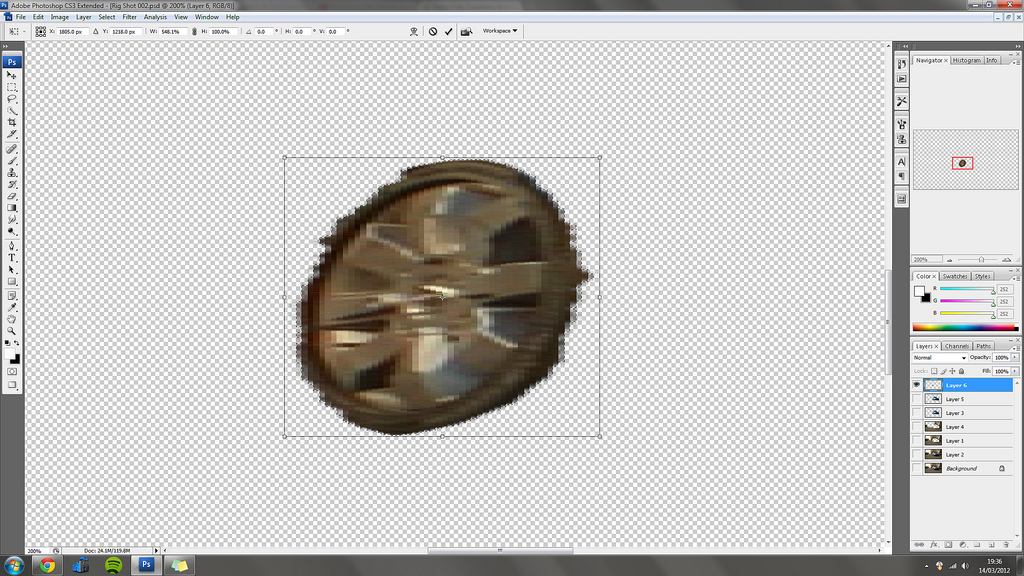
Tutorial screen grab (17) by Eddie the Kid, on Flickr
Once this is done, you can blur the wheel accordingly. Again this is done by clicking on "Filter > Blur > Radial Blur" This time we will use the "Spin" option instead of "Zoom"
As with before, there is a grid, this time the centre of the grid needs to be at the centre of where the wheel will appear to spin, so slightly off centre worked best for me.
The slider at the top can be used to adjust the amount of blur required.
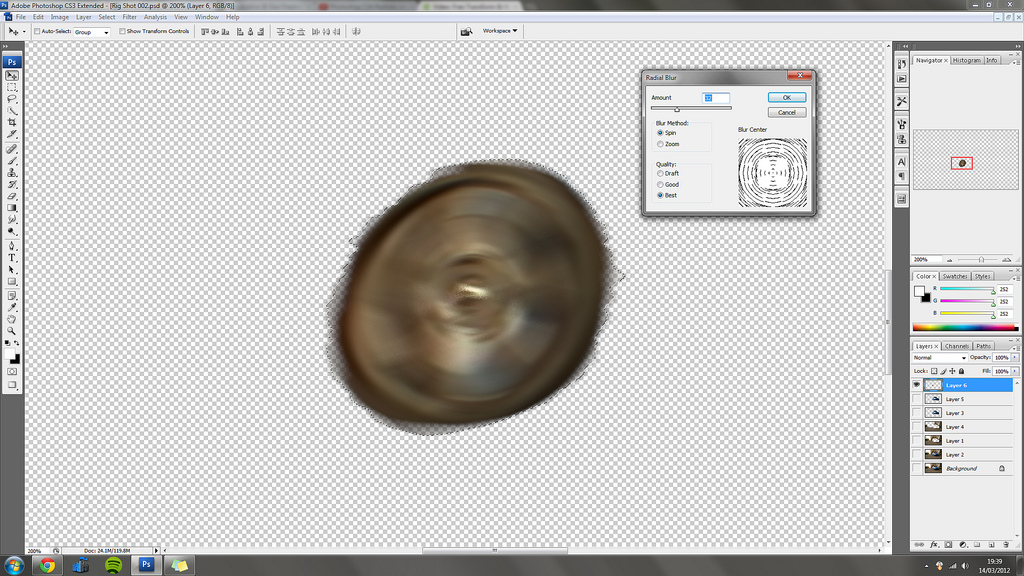
Tutorial screen grab (19) by Eddie the Kid, on Flickr
Once you have done this and it has rendered, use the free transform tool to reshape the blurred wheel into position.
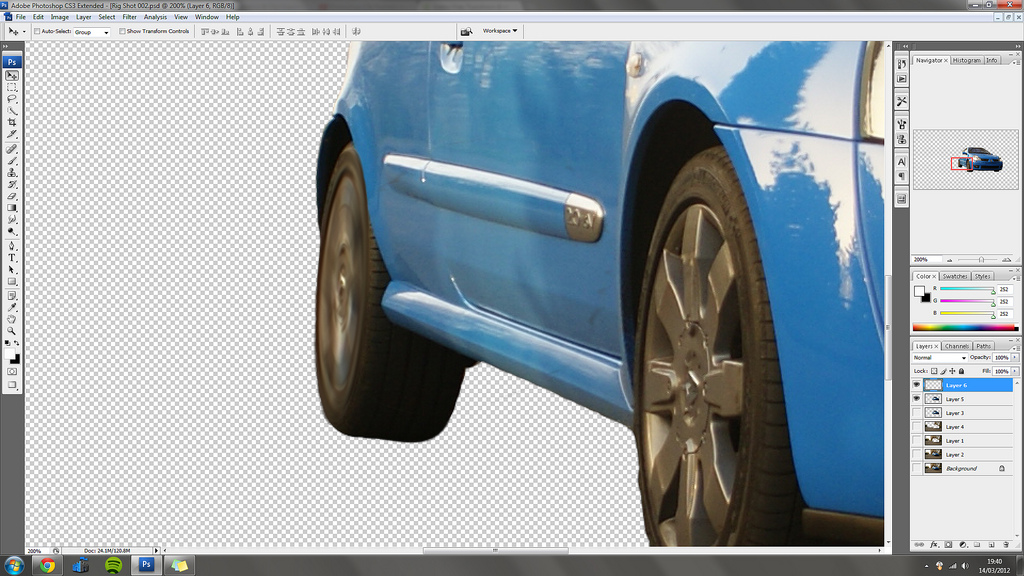
Tutorial screen grab (18) by Eddie the Kid, on Flickr
As you can see I have only done the face.
Do the same for the other wheel(s)
Once the wheels are done, the rest of the car needs doing, to do this all you need to do is the same as the above, select each section, use the "Radial Blur" tool, set to zoom, and find the vanishing point.
Work your way around the car, paying attention not to blur static items, like reflections of wingmirrors or the tax disc!
You should be left with something like this:
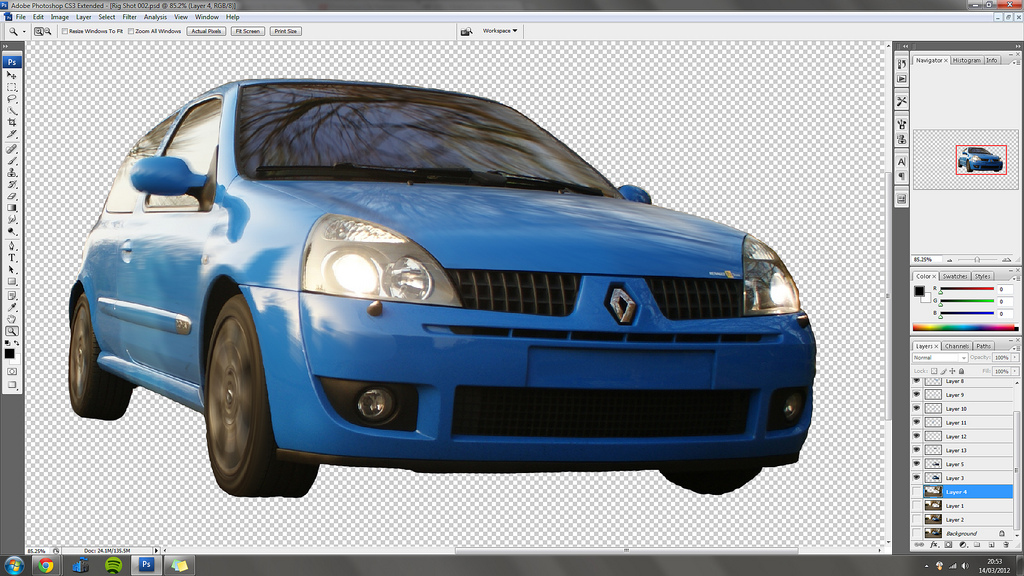
Tutorial screen grab (10) by Eddie the Kid, on Flickr
Step 6.
You have no pretty much completed the image, the final step is to alter the colours of the layers, I usually try to use colours to liven the shot up, and make the subject stand out.
I also did some work on the grills and smudged a lot of the reflections that were left over, and also sorted the tread of the tyres.
Once you are happy, go round and clean up the edges of the car, there may be sharp sections left, use the clone and smudge tool to feather them into the background.
Once finished you should be left with something like this:
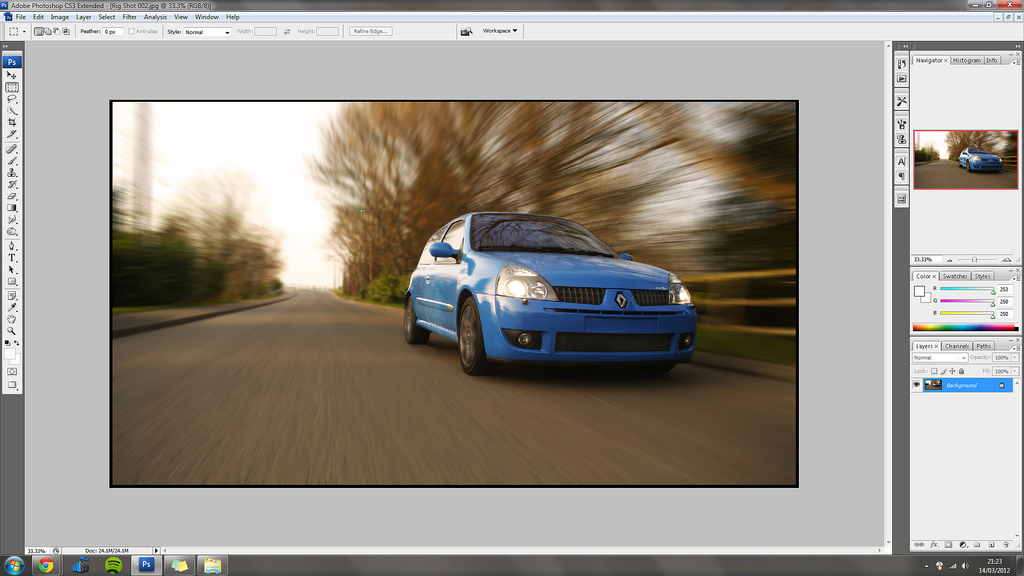
Tutorial screen grab (7) by Eddie the Kid, on Flickr
Then with a border added and embedded properly into CS :
:
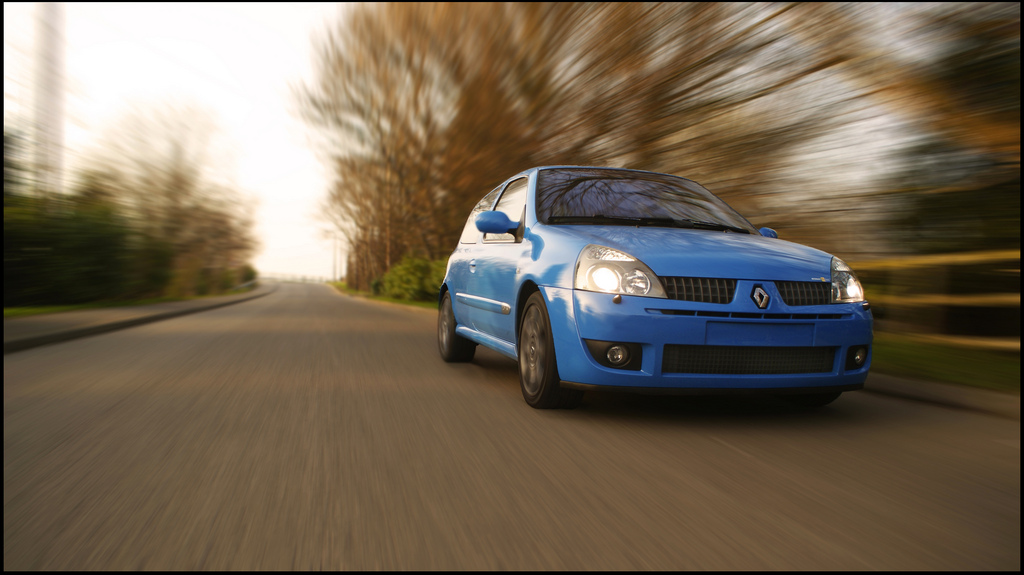
Rig Shot 002 by Eddie the Kid, on Flickr
Now as I have said a number of times, I am no Photoshop expert so the above is a basic guide, I dare say there is more than half that I have missed out, so if any experts want to add any advice to this, please feel free
Thanks for reading, and best of luck.
This was the finished article:
6831458826_248600e4ee_o by Eddie the Kid, on Flickr
A few people asked if I could make a tutorial on how to do it. Now I am no expert on PS so the thought of doing this was a little daunting! I have however had a go at making a quick run through of the process involved, using a new shot, that I took tonight.
I must stress I'm not that competent on PS so please excuse any noob methods or inaccuracies!
Step 1.
Open your image in PS, and immediately create a new layer. Layers will be vital to this working, (if you're unsure on layers and how they work, please have a look on YouTube, there are plenty there) so make sure you continually use them.
Tutorial screen grab (3) by Eddie the Kid, on Flickr
Step 2.
Use the "Clone" (again there are lot of videos explaining this on YouTube) tool to clean up any imperfections, in my case, I removed the velcro plates from the front of my car.
Tutorial screen grab (2) by Eddie the Kid, on Flickr
Step 3.
Now you are ready to separate the car, and any objects that would be moving with the camera, from the background that will be blurred. There are a number of ways to select the areas you want, all with varying degrees of accuracy and ease of use, personally I find the "Mask" tool a very good way of accurately selecting certain objects. At this point, it is worth noting that taking your time is vital here, the better the layers are, the better the final image will look. If you rush, it will show through later on, so be warned :evil:
Tutorial screen grab (12) by Eddie the Kid, on Flickr
Once you have selected everything you want, create another layer, copy the image across with the selection still active, on one layer delete the background, and on another layer, delete the car:
Tutorial screen grab (5) by Eddie the Kid, on Flickr
Tutorial screen grab (8) by Eddie the Kid, on Flickr
Step 4.
Now that you have the background separated from the car, you can blur the background. To do this I use something called "Radial Blur" to find it drop down the "Filter" menu, then scroll down to "Blur" then select "Radial Blur" from the sub-menu:
Tutorial screen grab (13) by Eddie the Kid, on Flickr
Once you have done that you will be presented with this window:
Tutorial screen grab (14) by Eddie the Kid, on Flickr
In this window you have a few options, in the middle there is a "Spin" and a "Zoom" option box, make sure you tick the "Zoom" option. Under that there are quality options, set it to "Best".
You can also set the slider at the top, to decide how much blur you want, again have a play with this, you won't need as much as you think!
To the side there is a grid, this grid allows you to adjust the direction of the blur, this takes some practise and time, but you want to try and find the "vanishing point" of the photo, in my case it was somewhere around the end of the road.
Once you have done all this, click okay, it may take a minute or two to render.
You should be left with something like this:
Tutorial screen grab (9) by Eddie the Kid, on Flickr
(Optional Step)
Even with rig shots, the photo will have some depth of field to it, so for me it was important to include this, my lens isn't very shallow, so the original shot needed modifying to add some DOF.
To do this I made a copy of the blurred background and added a "Gaussion Blur" to it, set to around 2.5 pixels.
I then set the copied layer under the blurred background, then erased the original blurred layer using a feathered edged eraser tool:
Tutorial screen grab (4) by Eddie the Kid, on Flickr
Step 5.
Now that the background is looking right, it is time to get the car looking correct, it is important not to forget the reflections on the car, and the fact that they would also be blurred.
You will be left with this shot after you have sorted the background:
Tutorial screen grab (16) by Eddie the Kid, on Flickr
Don't worry that there is a see through overlap, the background layer will be visible at the end and you will be able to clean it up.
With the background visible:
Tutorial screen grab (15) by Eddie the Kid, on Flickr
The first thing I did on the vehicle itself, was the most technical, the wheels.
The "Radial Blur" tool isn't able to blur the wheels correctly so you have to distort them first. To do this select the wheel in question (do one at a time) in this case again I have used a "Mask" remember to only select the face, the tread of the tyres can easily be done with the "Smudge" tool later on.
Tutorial screen grab (11) by Eddie the Kid, on Flickr
You then want to copy the selected wheel to a new layer, and once you have done this, select "Free Transform" (Ctrl + T on a PC) then stretch the wheel selection box so it is as close to square as you can make it.
Tutorial screen grab (17) by Eddie the Kid, on Flickr
Once this is done, you can blur the wheel accordingly. Again this is done by clicking on "Filter > Blur > Radial Blur" This time we will use the "Spin" option instead of "Zoom"
As with before, there is a grid, this time the centre of the grid needs to be at the centre of where the wheel will appear to spin, so slightly off centre worked best for me.
The slider at the top can be used to adjust the amount of blur required.
Tutorial screen grab (19) by Eddie the Kid, on Flickr
Once you have done this and it has rendered, use the free transform tool to reshape the blurred wheel into position.
Tutorial screen grab (18) by Eddie the Kid, on Flickr
As you can see I have only done the face.
Do the same for the other wheel(s)
Once the wheels are done, the rest of the car needs doing, to do this all you need to do is the same as the above, select each section, use the "Radial Blur" tool, set to zoom, and find the vanishing point.
Work your way around the car, paying attention not to blur static items, like reflections of wingmirrors or the tax disc!
You should be left with something like this:
Tutorial screen grab (10) by Eddie the Kid, on Flickr
Step 6.
You have no pretty much completed the image, the final step is to alter the colours of the layers, I usually try to use colours to liven the shot up, and make the subject stand out.
I also did some work on the grills and smudged a lot of the reflections that were left over, and also sorted the tread of the tyres.
Once you are happy, go round and clean up the edges of the car, there may be sharp sections left, use the clone and smudge tool to feather them into the background.
Once finished you should be left with something like this:
Tutorial screen grab (7) by Eddie the Kid, on Flickr
Then with a border added and embedded properly into CS
Rig Shot 002 by Eddie the Kid, on Flickr
Now as I have said a number of times, I am no Photoshop expert so the above is a basic guide, I dare say there is more than half that I have missed out, so if any experts want to add any advice to this, please feel free
Thanks for reading, and best of luck.

