ClioSport.net

Register a free account today to become a member!
Once signed in, you'll be able to participate on this site by adding your own topics and posts, as well as connect with other members through your own private inbox!

  • When you purchase through links on our site, we may earn an affiliate commission. Read more here.

Custom 1*2 Exhaust Mount


  soon to be 182 ;)
I'm currently saving for a 182 and in the mean time gathering a few parts, one thing that i know is naff is the rear exhaust mounts and being a mechanical design engineer I have been thinking of different ways to come up with a new mount. I had seen a couple of threads with people using the Powerflex EXH001 universal mount, I liked the idea of these as you don's have to drill any holes for your exhaust bracket to fit through as a couple of people have said theirs have split using the other type of universal mount.

I started by buying 2 X Brand new 182 Exhaust mounts and 2 X Powerflex EXH001 exhaust mounts.

I also used 4 X M6 x 20 Hex Head Screws, 8 M6 penny washers and 4 Nyloc nuts.

Here is what I have come up with:

First off take the new exhaust mount:

DSC_0155.jpg


And Cut out all of the rubber:

DSC_0128.jpg


Once all the rubber is removed you will see there is a raised edge around one side, this needs filing off like so:

DSC_0129.jpg


DSC_0138.jpg


This then left the inside completely smooth and the EXH001 Mount sits in perfectly

Next step I marked out and chain drilled a slot on each side of the mount like so using a 7mm drill bit:

DSC_0140.jpg


I then filed this so that it looked a bit neater:

DSC_0141.jpg


In the above picture you will also see that there is a raised bit to the top of the slot, I filed this flush also:

DSC_0142.jpg

DSC_0144.jpg


The next step is to drill 2 7mm dia holes in the EXH001 Mount like so:

DSC_0146.jpg


You now need to fit your M6 x 20mm screws and one of the penny washers into the mount like so:

DSC_0149.jpg


They take quite a bit of fiddling and swearing but they will fit :)

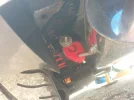
Next you can fit the new mount into the original mount body like so:

DSC_0153.jpg


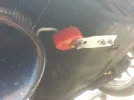
Fit the other penny washer and the Nyloc nut so that it is finger tight (just bit into the nylon) You can either leave it at this or you can paint the metal bit like I did,

Primed and the I used UHT paint:

DSC_0154.jpg


DSC_0157.jpg


The idea is now that you can fit the mount to your car and adjust the mount up and down and when your happy with how it sits you can tighten the screws which will lock the mount in the place that you require, this solves the problem of the 182 exhaust sitting too low you can now tweak it to suit without having to bend any exhaust brackets.

For a 172 you will need one of the above mounts, for a 182 you will need 2 :)

Hope this helps at least one member :)

Todd
 
  Range Rover Sport
Very nice, I have one of the 'competition mounts' they are certainly better than OEM however I'm not sure it's the weight of the backbox or not but mine is already starting to weaken. I know there is supposed to be movement in the exhaust (slight) but after time I'm sure even the competition ones will need replacing.

Something like this may be my next route. Very good idea and very neat!
 
  soon to be 182 ;)
Very nice, I have one of the 'competition mounts' they are certainly better than OEM however I'm not sure it's the weight of the backbox or not but mine is already starting to weaken. I know there is supposed to be movement in the exhaust (slight) but after time I'm sure even the competition ones will need replacing.

Something like this may be my next route. Very good idea and very neat!

I wasnt too keep in the idea of the competition ones they just look too solid for an every day jobby, using the powerflex bush seemed logical as theyre only 6-7 quid to replace if one does go :)
 
  Range Rover Sport
I first thought that, but the rubber inside is already starting to weaken on mine.

I have no doubt my entire exhaust isn't the lightest so maybe this needs to be addressed.

I love the idea of this though, fairly simple in design but certainly looks the part. Maybe cut and reweld the entire square to suit the rubber so a more snug fit would be the next step?
 
  soon to be 182 ;)
I first thought that, but the rubber inside is already starting to weaken on mine.

I have no doubt my entire exhaust isn't the lightest so maybe this needs to be addressed.

I love the idea of this though, fairly simple in design but certainly looks the part. Maybe cut and reweld the entire square to suit the rubber so a more snug fit would be the next step?

That could be an option, however I know when a lot of people fit aftermarket exhausts its nice to be able to have some sort of adjustments so that they can get the exhaust to sit right
 
  Range Rover Sport
Yes I understand that, I'm not engineer but would there be any more stress on the rubber itself it sitting in the middle rather than at the top or bottom?

Either way, it's looks great. Well done!
 
  soon to be 182 ;)
It's always gonna be supported better if it has a bit of metal underneath it but the mounts are.designed to be hanging so should be fine :)
 
  330i. E30 Touring.
Looks good, but not really worth the hassle when a new mount is £20.

Could replace it yearly if you're that worried.
 
  soon to be 182 ;)
This cost me about 15 quid to make and about an hour :) not too bad imo, plus oem ones you can't infinity adjust the height
 
  Clio 182
I just finished this, thanks for posting the idea. I originally put the powerflex bushes in with cable ties but the exhaust still sat too low for my liking. This was a tedious job though, cutting that rubber out was really difficult. Trying to cut it with power tools just melted the rubber and then it became tacky and stuck to everything. Using a blade took a long time. I don't think there's any need to remove the rubber at the bottom (I did on one, then realised it was pointless), but probably worthwhile cutting the top out if you want the exhaust tucked up really close to the bumper. It's a tricky section to cut because the bracket is in the way, so I just shaved back the bulge in the centre.

Once I'd got most of the rubber out I used a dremel to cut the inside edges off. I didn't need to file back that ridge on the outside as the washers don't come close, maybe if I cut the rubber at the top out I'd need to. I drilled two holes in each side and then cut the area in between out with the dremel.

My biggest suggestion for this is to use 25mm bolts and put them in from the outside, rather than trying to stuff a 20mm bolt through a washer from the inside, which seemed to be just about impossible to me. It's a bit fiddly to get the nut to thread but I just pressed a flathead screwdriver against it and it threaded up pretty easily.

Results are good, it took a few goes to get them to the same height as one of the bushes sagged more than the other. It's still not perfect but it's close enough, I'm happy with it. Definitely not a 1 hour job though!

exhaustbushes_zpsw0vhdm2h.jpg

exhaust_zps1yzdi0dy.jpg
 
  172
Had mine on for a short period however the welds on my centre section have cracked. I don't know wether I can attribute this to the mount but I do wonder if it's too stiff and so has contributed to the welds going
 
  HBT 172 Cup
Some food for thought, its how i did mine, but i did have a customer exhaust made so the hanger points wont be there on your systems. But a modified main mount with a powerflex bush to hang the weight of the system on, and another mount to stop side to side movement, its works well.
 

Attachments

  • exh2.jpg
    exh2.jpg
    1.7 MB · Views: 296
  • exh1.jpg
    exh1.jpg
    1.5 MB · Views: 247
  172
Some food for thought, its how i did mine, but i did have a customer exhaust made so the hanger points wont be there on your systems. But a modified main mount with a powerflex bush to hang the weight of the system on, and another mount to stop side to side movement, its works well.

Mate what did u use to make the mount on the other side? Where did u get the exhaust strap from?
 
  HBT 172 Cup
Just made it made, its some 2mm aluminium sheet with some holes drilled in, i need to change it though to some 3 or 4mm ally as its currently too flexible and the mount slips off when car is used hard, but it works well to keep the tail pipe dead centre when its on.


Top