ClioSport.net

Register a free account today to become a member!
Once signed in, you'll be able to participate on this site by adding your own topics and posts, as well as connect with other members through your own private inbox!

  • When you purchase through links on our site, we may earn an affiliate commission. Read more here.

Inferno track car build


Right time to start a project thread about a car thats already nearly done 😂 Should have started this when i got the car so bare with me as i get this documented 🙈

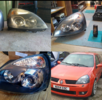
So previously i was a fairly active member on here with my build on one of my old 1.2s long story short, The car ended up getting scrapped after being rear ended at a roundabout, then I was given false details from the driver who crashed into me. Was pretty gutted but cars are replaceable.

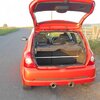
A couple of quick pics of the car in question then its replacement then onto the inferno the reason im making this thread.

FB_IMG_1574093475179.jpg
FB_IMG_1574093462110.jpg


Once written off I had loads of spare 1.2 parts so ended up driving my, shall we say "clean" build
FB_IMG_1579614480917.jpg
FB_IMG_1579614676936.jpg
FB_IMG_1600540666572.jpg
FB_IMG_1600168183996.jpg


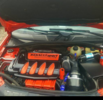
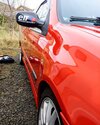
Now onto the inferno.

Was driving the silver car for a while untill i saved up for a good example of what i really wanted, a sport.

Eventually a nice low mile clean example of an inferno 182 cup appeared up for sale local to me, so I went to view and ended up coming home with it.

FB_IMG_1611869756525.jpg
FB_IMG_1611869759703.jpg


Instantly got the urge to get the polish and the d/a out and gave it a good once over.
 
Since that was done I got round to swapping some bits off the old car onto the inferno
First to change was the gear stick insert due to it being totally worn
FB_IMG_1611869763677.jpg

Then onto the changing all the orange indicator bulbs to silvervisons
FB_IMG_1611869770318.jpg

Now in the 1.2 I alcantara wrapped a good few interior trim pieces so swapped all them in too
FB_IMG_1611869774333.jpg

Bought a matching footrest to go in aswell
FB_IMG_1611869782384.jpg

Also took the shinier handbrake button from the 1.2
FB_IMG_1611869786495.jpg

And the main thing i couldnt wait to fit from the 1.2. A pair of dc2 recaros 👌
FB_IMG_1611869777797.jpg


Now with the interior spruced up a bit it was time to tend to a few things on the exterior.

Cleaned the bay and noticed some dirt under the grill etc so whipped the bunper off and clean all the slam panel and the support bracket and since the bumper was off i thought may as well spray the grills as well
FB_IMG_1611869789407.jpg
FB_IMG_1611869792755.jpg


Round the back the backbox was doing my head in sitting squint! Half an hours worth of messing about with clamps and mounts and I managed to get it sitting a lot better (still not perfect i know but miles better)
FB_IMG_1611869799822.jpg
 
So onto a few more mods to come were the addition. Of the rear brace from the old car
FB_IMG_1611869803824.jpg

Then a delivery came in the post. A new set of drilled and grooved brakes and new pads. So got the car backed into the garage and got them fitted
Screenshot_20210128-215043_(1).png
FB_IMG_1611869807585.jpg


So upto now this is how its looking
Screenshot_20210128-214949~2.png


Now the number plates had always got on my nerves so chamged them for plain cleaner style ones. Whilst I got them i also ordered a carbon wiper blank and a newer style rear badge
Screenshot_20210128-215053_(1).png

Them onto the next purchase
A scorpion decat pipe
Screenshot_20210128-215141_(1).png


Id attatch a video of how it sounded but the car has had different systems from this one.
 

Attachments

  • FB_IMG_1611869803824.jpg
    FB_IMG_1611869803824.jpg
    105.2 KB · Views: 105
  • FB_IMG_1611869807585.jpg
    FB_IMG_1611869807585.jpg
    69.5 KB · Views: 126
Since a new brake set up was fitted i thought why not get some lighter and fancier wheels for the car
Screenshot_20210128-215931_(1).png

Now i didnt have tyres as of yet so they were put back in the boxes till the time had come. They were test fitted like but will put up a pic of them fitted afterwards.

Now the engine bay looked a bit too plain and seen some photos on here of others so decided to give it a go on mine.

Sprayed the inlet and fuel rail cover inferno
Screenshot_20210128-215940_(1).png
Screenshot_20210128-215947_(1).png


A quick pic of the car on the clubstand at the Scottish performance show
Screenshot_20210128-220004_(1).png


Back home and thought why not try the wheels on from the 1.2 after yet another clean and polish

Screenshot_20210128-220012_(1).png


I did like the look but deep down inside i knew they werent getting kept on.

The tyres came for the new wheels so got them mounted and the new wheels were fitted. White really contrasted with the orange!

Screenshot_20210128-220020_(1).png


Now iv always been a fan of a roll cage so that was next to be bought, painted and fitted along with some orange luke 4 point harnesses

Screenshot_20210128-220026_(1).png
Screenshot_20210128-220030_(1).png
Screenshot_20210128-220034_(1).png
Screenshot_20210128-220040_(1).png
 
Here's how its looking now with the addition of a subtle sunstrip

Screenshot_20210128-221039_(1).png
Screenshot_20210128-221043_(1).png


Thought id get round to finishing the engine bay off painted the engine cover black along with the throttle body and the renault sport lettering and addwd a nice little battery cover.

Then car got another wash and off for a picture
Screenshot_20210128-221100_(1).png


Next on the list was the front plate a custom sized one 👌

Screenshot_20210128-221225_(1).png


Then sourced myself a nice set of black insert xenons. Lenses were fogged up like but i soon sorted them with a light sand and maxhine polish etc.

Screenshot_20210128-221242_(1).png
 

Attachments

  • Screenshot_20210128-221051_(1).png
    Screenshot_20210128-221051_(1).png
    1.9 MB · Views: 119
  • Screenshot_20210128-221129_(1).png
    Screenshot_20210128-221129_(1).png
    2 MB · Views: 146
  • Screenshot_20210128-221250_(1).png
    Screenshot_20210128-221250_(1).png
    3.1 MB · Views: 120
Back to the engine bay and i fitted a piwerflex mount and a bmc cda induction kit.

Screenshot_20210128-222401_(1).png


Then i was beginning to think the Japan racing wheels were a bit on the wide side and opted for a set of team dynamics pro race 1.2s that i got for an absolute steal.

Fancy wheel nuts and a lick of white paint

Screenshot_20210128-222442_(1).png
Screenshot_20210128-222453_(1).png


Back for another polish and to date my favourite picture of the inferno paint 😍

Screenshot_20210128-222459_(1).png


Now i had kept seeing the bit below the lower grill either wrapped or painted black so decided to jump on the trend. Also wrapped the foglight surrounds and the washer jet blanks

Screenshot_20210128-222530_(1).png
Screenshot_20210128-222645_(1).png


Then these popped up on ebay and couldnt say no really 🙊

Screenshot_20210128-222701_(1).png
Screenshot_20210128-222707_(1).png
 
Now the bit im really not proud of... At all 🙈😂

I went to cleanfest... A stance show and my inner stanceyboy hit hard... I'll quickly through some pics up. This was short lived and thank god! As it completely ruined the car. Handled garbage and was extremely harsh on the bumps.

Here we go.

Screenshot_20210128-223536_(1).png

Screenshot_20210128-223544_(1).png

Screenshot_20210128-223552_(1).png

Screenshot_20210128-223645_(1).png

Screenshot_20210128-223655_(1).png
Screenshot_20210128-223707_(1).png
Screenshot_20210128-223617_(1).png
Screenshot_20210128-223721_(1).png


Dont get me wrong the car attracted a lot of attention etc but really it wasnt what the car was made for. Totally ruined the characteristics of the car as mentioned.

Luckily as I say it was short lived and before i knew it it was back like this. With a refresh of some goodies
Screenshot_20210128-224426_(1).png
Screenshot_20210128-224455_(1).png


Much better !
 
So moving on from the "scrape on everything and broken suspension look"

The mrs at this point ended up pregnant so that was the cage to be removed and back seats put back in :(

Screenshot_20210128-224504_(1).png


The car stayed like this for a really long while so not much progress was made. We had a little boy this outfit was a must for helping on the car
Screenshot_20210128-224919_(1).png


Honestly couldnt resist when i seen it 😂😂

Now the old bonnet had a small dent in the front of it, not very noticable but i knew it was there. Also had some faded stripe marks on it which also annoyed me so bonnet off and new one on. The mrs also said that her car was going to be the family car.... So we all know what that meant. Back to the mods!

Screenshot_20210128-224931_(1).png

Ph1 rear lights made an appearance quite like how they blend in with the car colour
Screenshot_20210128-225021_(1).png


The front got some holes drilled, more for looks than anything tbh
Screenshot_20210128-224955_(1).png


The team dynamics got a new coat of paint
Screenshot_20210128-225054_(1).png


And the interior got treated with some Evo mr recaros a bms shifter and a kode wheel.

Screenshot_20210128-225103_(1).png

Screenshot_20210128-225129_(1).png


Made the car feel so much better!
 
Next mods to come were

Ktec front brace, solid top mounts and a cm composites splitter 👌💪

Screenshot_20210128-230601_(1).png

Screenshot_20210128-230610_(1).png


The fitted a new sunstrip and removed the foglights. Pretty sure by this point i had also removed the carbon cannister and acoustic valve

Screenshot_20210128-230619_(1).png


Got the brace fitted

Screenshot_20210128-230631_(1).png


Then went about making my own headlight blanks. Gutted a ruined set of old headlights i had lying around. I think they look pretty mean when fitted

Screenshot_20210128-230655_(1).png

Screenshot_20210128-230724_(1).png


Now by this point i was getting tired of Crail raceway and turnedmy attention more to knockhill racing circuit. Everytime i went i was itching more and more to finally get the bottle to go out on track.

So set about making the car more of a track car

Screenshot_20210128-230859_(1).png


Full interior strip, sound deadening removal, flat door cards all round and a fresh lick of inferno orange paint

Screenshot_20210128-230916_(1).png
Screenshot_20210128-230924_(1).png
Screenshot_20210128-230956_(1).png
 
Looks lovely on the silver Team Dynamics, the more I see running them the more I want a set to run on mine in the summer.
the BMS shifter is great isn’t it! (y)
At first i never really liked the look of the team dynamics until,as you say seeing them more and more on clios. I like them both silver and white to be honest but the silver does look more classy 👌

The bms is a cracking bit of kit!
 
Next was to get the new splitter fitted. Tarted it up a wee bit with the addition of some stickers for the side spats

Screenshot_20210128-230936.png

Screenshot_20210128-230950.png


Got the dash back out the car and fabric wrapped it to avoid glare

Screenshot_20210128-232259_(1).png


Now as much as i loved the evo recaros. I thought safety would be a better option , reclinable seats in a track car etc... So sold them and bought some recaro spg's

Screenshot_20210128-232304_(1).png


Was time for the next car show got to admit i was chuffed with how the car is looking.

Screenshot_20210128-232316_(1).png
Screenshot_20210128-232320_(1).png
Screenshot_20210128-232324_(1).png


A couple of weeks later the clutch started to go :( now the timing and dephaser was also due at this point. So got the engine out and with help we managed to get it all sorted and also done a diy aircon delete which free'd up some room and weight 👌 unfortunately i dont have any pics but its the Saab pulley
version.

Ignore the table had to use what was at hand 😂
Screenshot_20210128-232418_(1).png


Then all back in and tidied up

Screenshot_20210128-232454_(1).png


And another pic from a meet with the clio showing off its little party trick

Screenshot_20210128-232503_(1).png
 
Now a working progress here... Dont worry it gets better.

Decided i wanted something to match the more aggressive front end as the rear looks a bit tame.

So decided a custom diffuser was the answer
Screenshot_20210128-233557_(1).png

Screenshot_20210128-233601_(1).png


Now this is fitted through the exhaust mounting brackets through the 182 boot floor. Basically removed the original bolts and replaced with longer to go through the diffuser, mounts and hanger. I now know an exhaust change is definitely due. But more on that later.

1st couple of track days 💪 finally got the bottle to go out on track. Car permormed great and reallynenjoyednthe experience!

Screenshot_20210128-233658_(1).png

IMG_3403.jpg
IMG_3470.jpg
IMG_3406.jpg
 
Now the dual exhaust with the diffuser looked gash so it was now time for a custom exhaust.

Massive weight saving and looks 100x better!!

Also sounds great but ill need to find out how to upload videos.

Screenshot_20210128-234620_(1).png

Screenshot_20210128-234628_(1).png

Screenshot_20210128-234647_(1).png

Screenshot_20210128-234641_(1).png


Also added a front tow eye and rear chassis mounted tow strap


Next purchase!
Screenshot_20210128-234729_(1).png


And went and got some aero catches fitted 💪

Screenshot_20210128-234733_(1).png
 
Now seei g as its going to be a track car i decided a livery was a good idea. Now i spenr ages trying to pick a design i liked. Also one od ne capable of doing. I like to do things on a budget.

So I seen pictures online of the old x65 cup racers and i absolutely loved the design!

So gave it a bash... Took around 3 days and even afterwards bits got redone etc.

IMG_20200318_150845_125.jpg
IMG_20200404_220940_405.jpg
IMG_20200404_220940_404.jpg
IMG_20200404_220940_424.jpg
IMG_20200402_210214_139.jpg
IMG_20200402_210214_140.jpg
IMG_20200413_110901_615.jpg
IMG_20200414_172458_912.jpg
IMG_20200424_091046_694.jpg
 

Attachments

  • IMG_20200318_150845_125.jpg
    IMG_20200318_150845_125.jpg
    190.2 KB · Views: 103
Since the livery was done I sprayed the mirror surrounds gloss black as they were faded same with the grills
IMG_20200406_155632_980.jpg


And upto now thats pretty much it. I have another big list of things that need done that i am currently doing. So the clio is now tucked away in the garage.

IMG_20210110_165155_863.jpg


Ar the moment i have a few things off for spraying including the scuttle panel. I have this off just now as iv swapped for a smaller heater box with non aircon from a 1.2. Gets rid of the pipes and also used a non aircon bulkhead panel as well

IMG_20210125_184622_109.jpg
 
With the car nearly sitting all of 2019 due to being on furlough it needs some tlc so as from now posts will be updated. Was just a quick thread from when bought to now. Theyre is probably loads i have missed but the pictures do the talking really only other thing thats worth mentioning are the bms shifter now has brass bushes, the whole car runs black series powerflex bushes. The engine mounts are vibratechnics and have a polybush dogbone mount.

The cup racer roof scoop was sold as couldnt bring my self to drill a hole in the roof 😂

Lots more goodies waiting too be fitted will jist need to get pics 👌
 
Going to be changing the interior up a bit and giving it a general tidy up. Made a start with the dash trims. Thought seeing as the shift knob is white and so are the recaro emblems and stickers on the side mounts. White will be the colour to go for. Annoyingly the cage and brace were already white until i took them out to spray silver but ach well. Another lick of paint wont be much hassle.

20210129_174504_HDR~3.jpg
 
Had my rain light for a good while now and never really had anywhere to fit it. So after a quick search on google a clio popped up with the same one. Made this quick mock up before i butcher the inferno one. Think its turned out quite well 👌🏁

IMG_20210130_153526_626.jpg
IMG_20210130_153526_618.jpg


Just a prototype mock up, The one that will be fitted to the car i will take a lot more time with till its looks perfect
 
Got round to fitting the painted scuttle panel. Looks like the wipers will be coming back off 😂 They look grey as hell compared. Also done a bit of heat tapeing

IMG_20210131_200034_364.jpg
IMG_20210131_200034_373.jpg


Bay needs loads of tlc. Really been neglected through last year.
 
So got a chance today to fit the rain light. Quite pleased with how its turned out. Also might keep it in the black plastic. Seems to contrast well and tie in with the livery.

IMG_20210202_161951_474.jpg
IMG_20210202_161951_462.jpg
IMG_20210202_161951_480.jpg


Had to cut some metal away from the bootlid to get the actual light to fit through. Next step is now to spend a life time trying to fiddle about getting cables down the inside of the bootlid 🙄. Never mind progress is progress
 
Nice write up Billy and welcome back to the Premium Clio club ;)

Glad you eventually came up to KH.
Thanks Dave! Wish I took the time to document the progress when i actually bought the car, would have been more informative and indepth

Well your too thank for that one mate! If you didnt invite me to track nights and give me tips on track day driving i probably would still be sitting in club stands dying to get out on track but not having the bottle 🙈
 
Havent made any progress on the Clio lately, Issue at the moment is trying to find a suitable way to run the rear rain light off the front foglights. (Sounds strange i know)

Basically my thinking is. The wiring for the front fogs is currently unused as the fogs are obviously removed but they still have the function on the stalk.

So basically I'm thinking the rain light will turn on on the first turn on the stalk and be on on its own. Im guessing theyre will be a cable for the foglights running from the interior fusebox but i just need to figure out what one is what 🙈

So seeing as theyre is no pics or anything to look at. Heres a couple of videos i was meant to post of the Inferno on track. After playing the footage back I now need to find a better place to have the action camera 😂


So small bit of progress made today on the Clio. Finally managed to find the time to go round to the garage and get the car outside for a change.

20210228_115216_HDR~2.jpg


Unfortunatly the battery was basically dead, so car had to be pushed. Also has a flat tyre but no biggie got that re inflated.

With the car outside i now had more light to actually see what im doing and get around the car. So got back to sorting out the rain light, With a bit or perseverance and a whole amount of stress i got the cables down the inside of the bootlid, through the loom cover and into the car. For just now the rain light is just tapped into the rear foglights and unfortunatly due to the battery nearly being dead the light is a bit dim but this is pretty much the finished product. Im hoping to find some sort of resistor to make flash.

20210228_140105_HDR.jpg


I also bought my self a new grinder and thought why not put it to use and do some gutting!

20210228_141803.jpg

20210228_131629.jpg


Wiring in the pic is just for it to be tested. It will all be tidied up properly so none are visible. Now for all the rough edges to be smoothed and painted.
 
Spent a bit of time on the car today mostly wasted trying to solve an issue with the rain light which is currently unresolved 🙈 Put the recharged battery back on and started the car. Turned on the rain light and was nice and bright, working brilliantly.

So decided to tidy up the rear wiring, earthed off the rear lights earthing point and powered by bridging into the passenger side rear foglight. Now the rain light only partly lights up 🙄 So yeah, lost the head with that and moved onto removing the top of the dash to get access to removing the airbag.

20210304_145925_HDR.jpg


Now after disconnecting the battery and waiting 20mins so the airbag doesnt explode in my face. Decided to get the dials out and give them a bit of a spray to match the freshly painted dash trims.

20210305_143237.jpg


Also made more progress with the heat tape under the bonnet... Unfortunately ran out of tape before i finished though 😂😂. Never mind more on order 👌

20210305_132624_HDR.jpg


So anyway. Got the airbag removed, Also removed the airbag ecu and made a start to sorting some wiring out. Got some of the bolts out for removing the lower dash also so i get all the airbag wiring out and the horrid sticky sound deadening.

20210305_143636_HDR.jpg


Thats about it for today. Also are the side impact sensors removable without causing issue? Or will they need to be kept in. Same with the cable that runs to the handbrake. Im guessing thats just for the light on the dash to luminate. Im guessing this can also be removed?
 

Attachments

  • 20210305_121523_HDR.jpg
    20210305_121523_HDR.jpg
    3.2 MB · Views: 94
Why do you put the heat tape in the bonnet? You want to keep the heat inside the engine bay?

In all honesty i was questioning my self the same thing whilst doing it. But to be honest I have seen it done on other cars and thought it was quite smart looking. I will however be heat taping the underside of the intake plenum and also round the air filter area once i change my set up.
 
A bit more work been done to the clio over the past few days, safe to say i never want to go through the bother of removing that foam padded sound deadening behind the dash 😂 What a mare that was getting the lower dash out and then re fitted.

Whilst i was under there though i tidied up the wiring and removed the airbag. Imo its looking much neater and tidier.

20210316_145910_HDR.jpg

20210316_151004_HDR.jpg


Set about getting the lower dash back in. A bit fiddly but eventually for there after a while of shouting and swearing at it 😂

20210316_171659.jpg


Then was onto the top half... After about half an hour of trying to get the heater controls to sit back in properly. All back together and all the freshly painted dials and dash trims fitted. Really liking the white accents. Next to do white will be the backs of the recaros and the cage and brace.

20210321_134649_HDR~2.jpg

20210321_134658_HDR~2.jpg

20210321_134721_HDR~2.jpg


Git round to completing the gold tape on the underside of the bonnet too. (Just for looks really) i will be gold taping some bits in the bay though so the tape will be used purposefully.

20210321_141429_HDR.jpg


And heres how she now stands.

20210321_141532_HDR.jpg
20210321_141548_HDR.jpg
 
Another update.

The seats were always doing my head in in the clio, The blue just did not tie in with anything at all.

So enough is enough, got the seats out and stripped down at the weekend and got the backs lightly sanded.

20210323_174039.jpg

20210323_174048.jpg


Then a fresh lick of primer

20210324_124727.jpg


And then paint

USER_SCOPED_TEMP_DATA_MSGR_PHOTO_FOR_UPLOAD_1616595546469_6780493166943463897.jpeg


So after another coat and left to dry and cure. Same with the passenger. I gave all the cushions amd fabrics a good going over and a well deserved clean! The pics do the talking.

Much better looking!

20210324_184339~2.jpg

20210324_184330~2.jpg

20210327_205340.jpg

20210327_205359.jpg
 
Time to sort out the next step of the puzzle.

20200607_120805_HDR.jpg

20210321_134721_HDR~2.jpg


Seeing as the interior is getting an overhaul. The half cage will be getting taken out, then out of the 2 cages a full one will be getting made.

The rear cage in just now has harness bars which I need for running the harnesses. So I'm now in the process of getting bits fabricated on my rear cage out if the same tubing which will alloy me to join the front section of the new omp cage to it.

Then once done it will all be removed for a fresh lick on the interior shell and cage.

Then some more goodies will be arriving 🙊
 
Recently I have been toying with the idea of adding a sticker in the plate recess (like on race cars) but obviously removing a plate every trackday/car show would be a pain plus all the sticky tabs or screw holes will be an issue.

More so for the front with having the holes in the bumper. Now this can possibly be helpful for anyone that has had the same thought or for people that run sponsor plates or have fancy plates made up for shows etc.

So came up with this.

First I ordered a set of magnets off eBay but unfortuantly they were tiny and no use what so ever. So back to the drawing board

Eventually after searching a bit more i got these

20210410_194751.jpg


They have 15kg of pull and are extremely strong. They came with 3m tape but i didn't bother using that. Instead i used loctite super glue and stuck 4 of them on the numberplate

Now i began to think to my self what if the force of me pulling the plate off the car and the strength of the magnets was too much for the glue. So i decided to vinyl wrap over the whole lot.

USER_SCOPED_TEMP_DATA_MSGR_PHOTO_FOR_UPLOAD_1618081465443_6786725562833537596.jpeg


With this done i decoded to test it on the fridge door they stuck brilliantly.

Now onto the car... I went round to the Clio and removed all the glye and residue off the bootlid from where the plate was and set about fitting the sticker.

20210411_120018_HDR.jpg


Then the finished product! Another plus side of this is even if you out the plate on and its slightly squint you can easily adjust the placement by moving it about slightly.


Extremely impressed with how it has turned out.


Top