ClioSport.net

Register a free account today to become a member!
Once signed in, you'll be able to participate on this site by adding your own topics and posts, as well as connect with other members through your own private inbox!

  • When you purchase through links on our site, we may earn an affiliate commission. Read more here.

My 182ff track car build (so far)


1985michael182

ClioSport Club Member
Next I tried something new after watching many, many, many YouTube videos.
20200829_084803.jpg

20200829_084704.jpg

I wanted to try the door bullets mod.

So I got my bullets and sanded the raised lettering off using 80grit, 180grit, 240grit then 400.
20200828_135909.jpg

20200828_172235.jpg


I primered them in black high build primer, flatted them off with 800 wet and dry then used satin black to colour them up again.
20200829_084628.jpg

I then got a parts box, washed it out and filled it with warm water. 30°c is the sweet spot. The water surface needs to be spotless or it ruins the dip finish.
20200901_170037.jpg

You place your hydro dip film ontop of the water shiney side down. Give it 30 seconds to settle and flow out. Spray the activator wait another 30 seconds. Then dip your item at 30/40° nice and slowly.
20200901_170034.jpg

You are left with a slimey PVA coating which you run under the Tap to remove.
Dry them off and then fit the decals.
20200901_173539.jpg

Ensure the decals are properly seated and then lacquer them.
20200901_175712.jpg

Pretty easy and look good.
20200902_083946.jpg

Another tick off from the list of jobs
 

1985michael182

ClioSport Club Member
Headlights were next.

Usual faded foggy clio lenses.

I flatted them with 1500 wetNdry then finished them off with a wet 3000 Trisact on the DA sander. Masked the main body of the headlight off. Adhesion promoter and 2 coats of Lacquer.

Look brand new.
IMG-20200829-WA0008.jpeg

And whilst I was fitting them Rob @CCF
Dropped me off a little present.
20200829_144535.jpg

I had previously lightened and painted the steel bonnet which ended up planted in the windscreen and roof after I didnt close the bonnet catches so was pretty bent and misshaped. Even lightened it was 8.8kg. The fibreglass one was 5.3kg so a big saving over a standard weight one.
20200830_120304.jpg
20200830_120317.jpg
20200830_120341.jpg
 

1985michael182

ClioSport Club Member
Next job was clearly the bonnet.

Started by test fitting it. I had lined the wings up to the steel bonnet and headlights first and the bolted the fibreglass one on
IMG-20200830-WA0008.jpeg

It's not perfect but it never will be as it's not steel but atleast it's got no dents... or so I thought 🤦‍♂️ turns out there must be wanker dents in the mould bonnet.

But I got cracked on and can deal with them later.
Painted some black paint ontop of the bonnet pins and closed the bonnet onto them to give the the pin centres, and drilled them.
20200830_130606.jpg

Then used the catch itself as a template to draw around and 95% of the material out. Just a case of test and adjust using a file to fine tune the fitment.
20200830_130610.jpg

Once it fits mark your 6 bolt holes and drill them. To finish off the sharp/rough edges I just used some 180grit sand paper. Then boltcthem in. Test they lock into the bonnet pins and jobs a good en.
20200830_135820.jpg

I had to over size the inside skin to make the catch fit properly.
20200830_135832.jpg

Now to sort the wanker dents. They are called this as they are caused by w*****s who push down on the bonnet to close them, rather than letting the bonnet drop from 10/12 inches to close it.
I used Upol Fantastic, really nice filler to use. Spreads in nice and easy to sand. Suffers from a few pinhole but thats easily fixed after primer.
IMG-20200906-WA0030.jpeg

Removed it from the car once the filler was done. I blocked the full outside skin with 80grit then 180grit too remove any high imperfection in the panel. This also highlights and low spots to.
Then I prepped the bonnet for primer. Full inside was done with 180 and the edges with 180 and filler to fill the pin holes.
20200913_142604.jpg

Then it's just a quick blow off, panel wipe it and go paint it.
20200920_092516.jpg
20200920_092533.jpg

Another tick in the box 👍
 

1985michael182

ClioSport Club Member
Next we need to tone its belly up!

It has been covered in waxoil/underseal to help with anti corrosion but doesnt scream race car. See below
20200818_182442.jpg

I started by stripping the underside components off to clear the way.
I got out the slow panelwipe and red scotch brite and scrubbed the waxoil within an inch of its life.
Once it was loose I used panel cloth to clean the mess off. Leaving nice clean factory anti stone chip covering.
20200829_153338.jpg

20200829_153407.jpg

Any bits of corrosion or loose stone chip I removed with the wire wheel. Once cleaned up I primed the bare metal with BMW's self etching primer. After this had dried I used seam sealer an a peice of scotch brite to mimic the texture finish of the stone chip a d to seal the repaired areas.
20200830_140220.jpg

20200830_140222.jpg

This requires a good 24hours to dry before painting over to let the solvent evaporate out of the sealer.
Again I used and hammerite hammered silver as topcoat. I gave it 2 good coats.
IMG-20200830-WA0018.jpeg
IMG-20200830-WA0020.jpeg

Looks like it's been sprayed, glad I spent the time to do it now. Once dry i began the rebuild the conponents
20200831_144540.jpg

20200831_144553.jpg
20200831_144603.jpg

Alot if hard work but glad I saw it through
 

RSRowe

ClioSport Club Member
  Megane 250 Cup
it's going to be a shame getting it dirty once you've finished 😄
 

1985michael182

ClioSport Club Member
Now that the paint was dry I dropped it down onto wheel stands.
20200913_122245.jpg

So I could get to the jacking points which were sat on the lift previously. Etch primer, seam sealer and hammered silver to finish.
20200913_124340.jpg

After Croft last time I managed to ruin a brand new front wheel bearing so again a new one was fitted.
20200920_111714.jpg

Because I had painted the full car the front bumper now didnt match the wings and bonnet so I prepped and painted that.
20200920_092519.jpg

Then built it up, fitting the cup racer brake ducts, CMcomposites canard and splitter. Looking pretty mean with the headlight blanks!
20200920_132518.jpg

20200920_132522.jpg

With the bumper mounted I could now fit the deflector plates, the kit uses the original subframe mount and I used alloy rivets to mount the fronts to the chassis leg.
20200920_140241.jpg

I needed to trim some bits where the wheels rubbed on the insides, belt sander worked a treat.
20200920_141514.jpg

Hopefully it works and reduces the brake temps before I burn the paint completely off the calipers
20200920_140250.jpg

Good days work done
 

1985michael182

ClioSport Club Member
On to the washer bottle. It had the larger bottle for the headlight washers.
20200921_180519.jpg

so I bought a cup one and a new washer motor.
Because I have the fibre glass bonnet now the washer jets never fit properly so i decided to mount them on the wipers.
I bought a kit from Ebay which clips straight onto the wiper arm.
Then I just laid the pipes down the arms through the scuttle to a T peice and into the new pump.
20200921_180531.jpg
20200921_180535.jpg
20200921_180540.jpg
20200921_180545.jpg
20200921_180547.jpg

Quick test and adjust the washer nozzle and finished.
Now the bonnet can go on and stay on.
20200922_135657.jpg

Starting to see the finished product
20200922_142850.jpg
 

1985michael182

ClioSport Club Member
Later that day after work I refitted the canards
20200922_174856.jpg

And then I moved on to something a bit special.
I have been playing around with the carbon hydrodip using different base colours and also candy red tint.
I wanted to try and do the diamonds in candy red carbon so I gave it a go and this is the results.
20200925_084157.jpg

20200925_164213.jpg
20200925_164228.jpg

Think we can all agree they are bloody pretty. When the sun hits it it looks even better. That's a satin black base colour, 3d carbon hydrodip and red candy tint. I let it dry over night and then gave them 2 coats of BMW clear coat.

Next I had a number plate light wire to repair. Some Rupert had cut the Renault connector off and fitted 2 blade terminals. Obviously the connection didnt seal from the elements so the lamp terminals corrided and it stopped working.
So I bought another connector with a good amount of wire on it.
20200925_172657.jpg

Used some heat shrink crimp terminals to repair the wires then wrapped it in tape. Job done.

Next I had ordered a pair of smoked led side repeaters so I fitted those. @Eddie555 pointed out to me they were the wrong way round and wanted to strobe forwards so I flipped them round after the video.
That's the lights complete.
 

Attachments

  • 20200925_173118.mp4
    48.6 MB

1985michael182

ClioSport Club Member
Figured I best do an update....

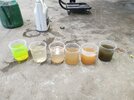
So after the candy carbon badges I decided to flush the coolant system
As you can see it was pretty grim!!
I use a tool called a Snap on Rad kit plus, you vacuum the cooling system to -25psi leave it for 1 minute to vacuum check for leak and then open a tap which suck fresh coolant in. Easy and quick
 

Attachments

  • 20200927_152450.jpg
    20200927_152450.jpg
    4 MB · Views: 111

1985michael182

ClioSport Club Member
The next few bits were kind of finishing off bits.
Re lacquered headlight fitted.
20200927_152709.jpg

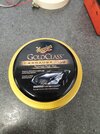
Then I gave the whole car a good coat of wax.
20200927_152641.jpg
I noticed that there was no heat protection to the underside of the petrol tank whilst doing final checks.
20200928_140446.jpg
20200928_144516.jpg
20200928_144523.jpg


Fitted a handheld extinguisher, and grip tape to the floor plates.
20200928_173955.jpg
20200928_174014.jpg


Door cards back on and carbon cage protectors fitted.
20200929_160756.jpg
20200929_160807.jpg

Then I had a quick 4 wheel alignment to see what the back axle is doing after welding the PMS strengthening kit on.
20201003_092421.jpg


Top