ClioSport.net

Register a free account today to become a member!
Once signed in, you'll be able to participate on this site by adding your own topics and posts, as well as connect with other members through your own private inbox!

  • When you purchase through links on our site, we may earn an affiliate commission. Read more here.

My cheap(ish) 172 Cup


Darren S

ClioSport Club Member
@Darren S will be able to confirm.
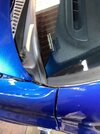
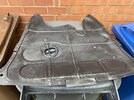
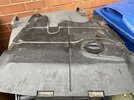
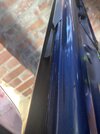
The left side looking towards the windscreen is the one I'm least familiar with. It looks a fair bit different to mine there? Easiest way to test is to get a bottle of water and pour some in - it should piss out behind your driver's side front wheel.

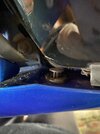
The centre hole is roughly where that first wiper rubber is pictured - I did an image on here a while back, I'll get the link in a sec.

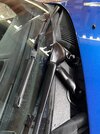
The far right one is underneath the washer bottle, iirc. Again, pour some water in there and it should easily flow out behind the passenger side wheel.
 

Darren S

ClioSport Club Member
The centre one is just to the right of the mounting bulkhead for the wiper mechanism. I've got a clear plastic tube in this image leading down into it.

1759246042893.png


1759246073109.png


1759246096837.png
 

ex-Chinese Dave

ClioSport Club Member
Thanks for the info guys. I’ve poured water down different holes to see what happens. Standing at the bonnet looking at the car, the left hole no problem, the next one to the right no problem, and the far right one underneath the washer bottle, no problem. I cannot for life of me see a centre hole anywhere. I’ve had a poke around with a flexible plastic tube and had a good look but I can see nothing. From the photo you can see how much water is left after it has drained out from the second hole along. It’s only a little bit and I think with movement of the car, it would probably all come out.
Without taking off all of the wiper mechanism, which I really don’t want to do, are we sure that the Cup has this hole as everyone thinks?
IMG_5063.jpeg
 

ex-Chinese Dave

ClioSport Club Member
All sorted. I stuck my phone down the gaps and managed to match up one of the photos with one that Darren sent. One coat anger death later and some water started to trickle out and I could actually see where it was coming from. I had no idea that the pipe was behind the insulation. I managed to open up the rubber flap And pull out probably a decades worth of s**t. Now everything is draining as it’s should.

Cliosport to the rescue again!
 

Attachments

  • IMG_5077.mov
    17.7 MB

Darren S

ClioSport Club Member
All sorted. I stuck my phone down the gaps and managed to match up one of the photos with one that Darren sent. One coat anger death later and some water started to trickle out and I could actually see where it was coming from. I had no idea that the pipe was behind the insulation. I managed to open up the rubber flap And pull out probably a decades worth of s**t. Now everything is draining as it’s should.

Cliosport to the rescue again!
That water above my central drain stunk when I let it out!
 

ex-Chinese Dave

ClioSport Club Member
Day 471. Food has been rationed. People are starting to drink their own piss……

I took the wiper arms off and gave them a bit of a tarting up yesterday. I’d rate the quality of this work 7 out of 10 as I was doing it on top of a wheelie bin. Not ideal. I’ve managed to find and do a semi-repair for the scuttle panel where it meets the windscreen. I think lots of us have had trouble trying to keep this piece as flush as possible to the screen and this is the best solution I can come up with as the original plastic clip is long gone. It sits much better than it did before and considering the condition of the rest of the car this is well passible. Now that’s all of the scuttle panel drain holes are running free I’ve got no worries about this.
 

Attachments

  • IMG_5081.jpeg
    IMG_5081.jpeg
    1.8 MB · Views: 16
  • IMG_5083.jpeg
    IMG_5083.jpeg
    2.3 MB · Views: 15
  • IMG_5085.jpeg
    IMG_5085.jpeg
    1.6 MB · Views: 14
  • IMG_5086.jpeg
    IMG_5086.jpeg
    1.5 MB · Views: 16
  • IMG_5087.jpeg
    IMG_5087.jpeg
    2.7 MB · Views: 14
  • IMG_5088.jpeg
    IMG_5088.jpeg
    2 MB · Views: 15

ex-Chinese Dave

ClioSport Club Member
Next was to clean up the cheap under tray I got off FB knobhead place and fit a rubber grommet that doesn’t belong. I think this needs fitting after the bumper goes back on.
 

Attachments

  • IMG_5090.jpeg
    IMG_5090.jpeg
    2.8 MB · Views: 15
  • IMG_5091.jpeg
    IMG_5091.jpeg
    3 MB · Views: 15

Darren S

ClioSport Club Member
Next was to clean up the cheap under tray I got off FB knobhead place and fit a rubber grommet that doesn’t belong. I think this needs fitting after the bumper goes back on.
Yeah - as Matt says, it connect via four bolts to the subframe. Just a little elevation is enough for you to reach under and have access to all four bolt points - the front two being the easiest. I've got some small plastic shallow ramps - which only lifts the car by about two inches off the ground - but a lot easier than faffing about with the jack. Make sure that you clip on the undertray around the edges of the subframe before screwing it in - there's three sets of 'lips' on the edge of the tray itself.

As ever, worth just dipping the starting threads of the bolts into some copper grease to make them easier to remove again in the future.
 

ex-Chinese Dave

ClioSport Club Member
One saved undertray back on. The bolt hole threads were ok…..apart from the last one I did. It’s stripped! I’ve used a longer bolt but it’s hardly gripped. I’ll have to find an Acme nut that will fit.
IMG_5092.jpeg
 

ex-Chinese Dave

ClioSport Club Member
A few more jobs done today. First up was to polish the headlights a little as they are full of scratches. Last time I sorted them I didn't have enough 2K clear coat left to give them a good coat and I think they've suffered. Maybe next year I do them properly but for now a quick machine polish bring them up ok.
I also gave the roof another cutting polish but I think it'll need a full wet n dry and then a full polish to bring it back. It's smooth but there are millions of little marks in the lacquer. The photo should show it better.
As for the bumper......well the traffic is bad here so i'm not taking the car out just yet to see the colour match (it's under the carport) and I really can't tell if it's a good match or not. However it is it's better than before.. I bought the best paint that was recommended and did my best but it's not ideal unless you have a room to work in. And when refitting I can feel the stress on the bumper whilst trying to get it back into position and secure. It looks ok but we now know that the little kiss the car had in the past means it's difficult to line things up. If anything else happens to the front end I'll be looking for a new bumper rather than try to repair this one again.
Bonnet got a quick machine polish and the black stickers were added to the bumper before the plates went back on. A bit of that black trim gel bullshit was put on and the lights checked. I've had enough this week. Golf tomorrow and pics to follow eventually..


Top