ClioSport.net

Register a free account today to become a member!
Once signed in, you'll be able to participate on this site by adding your own topics and posts, as well as connect with other members through your own private inbox!

  • When you purchase through links on our site, we may earn an affiliate commission. Read more here.

2003 172 Cup “Clubsport” Build


JGrant

ClioSport Club Member
  2003 172 Cup
I bought this car back in November last year not really knowing a great deal about them. My initial plan was to keep it for a few months to tick it off the list and then sell it on, but now I can’t really see myself ever getting rid of it!

I was looking for a 172/182 for just over a month when I was offered this one from a member on the Clio Sport group on Facebook. The car seemed mechanically spot on and had a few tasteful mods fitted to it, and the owner seemed to be a proper Renault Sport enthusiast having owned a few different Clios/Meganes before, including owning this one 3 times! Also I was never initially looking for a Cup model so this was a huge bonus coming across such a good example of one.

The spec was as follows when I bought it:

Exterior

* Ktec carbon front splitter
* Carbon door inserts
* De wiper

Engine & Gearbox

Mileage - 111K

* Cambelt, Dephaser, Aux Belts & water pump replaced by The Clio Man @104k 04/2019 along with spark plugs, gear selector bush, vvt solenoid seal, pas pump & alternator
* Engine oil changed @ 104k 04/2019
* Gearbox oil changed @ 104k 04/2019
* Leads & coils replaced @ 89k
* Ktec induction kit (black) with cold air feed
* Ktec 2.5” stainless stealth cat-back exhaust
* Decat pipe
* RS tuner 95 Ron remap

Chassis

* Powerflex Gearbox dogbone mount (purple)
* Powerflex wishbone kit
* Powerflex outer ARB bushes (purple)
* Powerflex inner ARB bushes (purple)
* Powerflex rear beam bushes (purple)
* Powerflex engine mount (yellow)
* Gram springs, new cup shocks & top mounts
* Brembo high carbon front discs
* Ferodo DS2500 front pads
* Brembo rear discs
* PBS rear pads
* Goodrich braided brake lines
* Dot 660 brake fluid @104k 04/2019

Wheels & Tyres

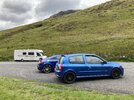
* 16” Turini’s in black with 195/45 Michelin PS3’s


A few pics after washing it post collection from Portsmouth.

293D16A0-FD62-4B76-857D-7BCF3FE7FF6F.jpeg
FD11F326-7BBA-4DA7-A086-2D2E6D47BAAE.jpeg
18AE515A-2085-4085-8A05-631FEEBA5ADD.jpeg
7BD9DE98-2717-4F08-A4E0-04C9B7AE7CA8.jpeg
C9F782F8-9E6D-48E5-AFD6-FFFA089BC04D.jpeg
C88EA455-71B0-484A-A50C-B8C9061E1C74.jpeg


I have since made a few more key mods to the car following a “Clubsport” route that I will address in a later post, along with my future plans for the car.

Thanks

James
 

JGrant

ClioSport Club Member
  2003 172 Cup
So the first thing I set about doing was removing the rear bench and covering the floor with a custom long boot mat I bought from eBay (chose the grey colour as it matches the interior carpets better than the black). As the car won’t be used for daily duties, this made sense as the rear seats were never used and it helped save a bit of weight.

96B5CA50-5F3B-4962-87CD-4ADA91195071.jpeg


I was also lucky to source a 1.2 8V heat shield from a forum member. As I had previously removed the original engine bay heat insulation which was looking very tired, this was the perfect option as it keeps the oem look and is also functional.

CFD5E441-1043-49DC-B3F6-D6F096F98ED8.jpeg
 

JGrant

ClioSport Club Member
  2003 172 Cup
I'm curious as to where the term clubsport has come from?

It’s basically a fast road/track set up I’m going for - not a full on track build and I want to keep some of the originality of the car. I’ve seen the term Clubsport used before on similar builds to mine so I just called it that haha
 

JGrant

ClioSport Club Member
  2003 172 Cup
The car stayed as it appears in my previous update until May this year; when it then went through a quite a transformation. This was all to prepare the car for its, as well as my, first track day at Anglesey.

The first area I looked to improve were the front seats. I used to drive with them in their lowest height setting and even then it still felt like I was sitting on the roof so this needed to be addressed.

After a long hunt I managed to find a pair of Corbeau Clubsports on Facebook marketplace which were in immaculate condition. I then purchased a pair of Jon Foz’s X-Low subframes which I bought directly from him, to achieve the lower driving position I desired.

D7CB6F5C-8F74-4272-AEA6-7E6E00D12680.jpeg


EE7F00CC-F1B0-402C-947D-641D2734DDF7.jpeg


I began working on the passenger side - removing the original seat and runners by undoing the 4 bolts that are located underneath the car. I then cleaned the carpet before placing the Jon Foz subframe into position.

B9C9AA1F-3A27-42F0-9520-B21CBD187FF4.jpeg


I then attached the side mount to the seat and loosely bolted the seat with the mount onto the subframe for a test fit.

A399EBED-1EE6-48AD-ACD3-B45B1088C618.jpeg


Once I was happy with the seat position, I tightened up all the nuts and bolts and moved onto the drivers side.

Once again, the 4 bolts holding the seat into place were removed from underneath the car and the seat was removed, as well as the carpet cleaned.

733D3315-B6ED-4027-B93F-4082ACEAA1B5.jpeg


The subframe was then installed and the seat was correctly positioned after a few test fits and the fixings were then fully tightened.

As the original seats had the seat belt retainers fixed to them, I used 2 Toyota Aygo seat belt retainers and fixed them to the subframes so that the original seatbelts could still be used.

7DE6A93E-9234-49FF-B343-AD7E79E86AC4.jpeg


Before

34C9C417-59C3-4704-B88C-582F384FFEE0.jpeg


After

74E25D15-9F3F-455D-B8B8-7D84D28463E3.jpeg


This is by far one of the best modifications I’ve done so far as it completely transforms the driving experience. I’d highly recommend the Jon Foz subframes to anyone considering them; they are great quality and they actually sit flat unlike some other subframes out there. For anyone that’s interested in fitting them, I’ll post the list of fixings needed that Jon sent me.


For each subframe to chassis you will need;

4 x M8 x 40mm high tensile steel bolts with washers

You can use your existing nuts from under car

For sidemounts to subframe

4 x M8 x 25mm high tensile steel bolts with nuts and washers
 

JGrant

ClioSport Club Member
  2003 172 Cup
The next big mod I went on to fit in preparation for Anglesey was a PMS shifter. I wanted to do this as I’d heard they massively improve the gear shift and they are also less harsh on the synchromesh when driven hard. As second hand prices seemed pretty strong, I decided to order a new one from KAM Racing as it was not a great deal more to pay and it was also more convenient as they offer next day delivery.

Before carrying out the installation, I did a few things to try and limit the amount of vibration I would experience with the shifter. First of all was to use the original rubber gaiter with the PMS front pivot arm which I packed with grease. I’ve heard this can slightly limit vibrations and as it would also keep the dirt away I thought it was well worth fitting.

12481A59-22E3-48E3-8C3B-3A79F8361548.jpeg


I then decided to fill the linkage rod with kiln dried sand as it would hopefully absorb and kill most of the vibrations.

9B3EE7E3-E9C5-4343-9CE2-59B0BC7F7EBC.jpeg
4048ECAF-8D95-4791-8CFA-6D56BAD552C4.jpeg


To prevent sand from pouring out of the linkage rod when in use, I ended up cutting a toothpaste lid in half and pushing down the linkage rod until it met the top of the sand and created a seal :ROFLMAO: This actually worked perfectly due to the tapered shape of the toothpaste lid.

DD551C83-E326-480B-BE72-AD9A421550C1.jpeg


Installing the PMS shifter was a pretty simple procedure - just unbolt and drop the old shifter and remove the linkage from the gearbox, and then bolt in the PMS shifter and connect the front pivot arm to the gearbox with a nylon bush and a circlip. Then all that needs to be done is to attach one end of the linkage rod to the end of the shifter and then connect the opposite end to the front pivot arm. The hardest part of the whole process was setting up the shifter. I think I must have spent well over an hour adjusting where the linkage rod connected to the front pivot arm in order for the shifter to properly engage through all gears. I ended up cable tying the shifter permanently into reverse gear as I found this was the best way to find the optimum position.

8F019A53-3D6D-4454-A0F7-69632163D273.jpeg

24EA688E-820C-4D1F-A11B-96E7334031F0.jpeg


Some pics after the install was complete.

EB19C688-5B5F-4CBB-A387-733FDD07BDE5.jpeg
D0038195-D848-4913-A529-2113DF61C700.jpeg

F2C65B09-1243-4366-98A3-D1C70235C546.jpeg


Whilst I was underneath the car, I took the time to carry out an oil & filter change using a genuine Renault filter, a new sump plug and Castrol 5W40 oil.

I also decided to fit some updated black series Powerflex steering rack bushes as the steering was feeling a bit woolly before.

Next, I decided to modify the accelerator pedal by removing it and bending it in a vice. This was done to raise the height of the pedal so that it makes for an easier heel/toe action.

To finish it off, I then installed a Whiteline rear anti roll bar that I had bought second hand from a member on the Clio Sport Facebook group. As this was the first time I’ve used an upgraded anti roll bar, I set it to the softest setting to see how I get on with it.
94C801B4-D3D4-4753-80FA-99CE66C112B9.jpeg
 

bowen86

ClioSport Club Member
Great start.

Nice small steering wheel and the interior is pretty much done...unless you opt for harnesses in the future.
 

yeecup

ClioSport Club Member
  mk8Fiesta ST,172 cup
nice mods, same seats and frames that are in mine, and also the pms shifter / rear arb. coming along nicely
 

JGrant

ClioSport Club Member
  2003 172 Cup
Great start.

Nice small steering wheel and the interior is pretty much done...unless you opt for harnesses in the future.
nice mods, same seats and frames that are in mine, and also the pms shifter / rear arb. coming along nicely
Cheers guys. Yeah I’m thinking of putting an OMP or Sabelt wheel on it at some point amongst many other things haha. Only thing is that I would like to have harnesses if I’m going for a different wheel which also means I’m gonna need a half cage in the back. Looking into doing other things to it first before I go onto that.
 

JGrant

ClioSport Club Member
  2003 172 Cup
At this point the car was fully ready for the Anglesey track day.

I decided to drive the Clio up there from Essex (will definitely not be doing that again) 😭 The journey ended up taking us around 6/7 hours with a few stops so I was glad we’d booked a hotel to stay the night before the track day.

04A223FD-4658-4871-8D84-FCDC6E460AD2.jpeg

Was in good company when I eventually arrived.

69D6630C-D0B6-44B0-B718-C36C2719B89F.jpeg


D45C769B-BEBB-470F-AC69-F981B63543F1.jpeg


Unfortunately these are the only pics I took on the day but I can happily say that I will definitely be doing plenty more track days in the Clio. Coming from a karting background I was hugely impressed with how you can throw these things about and as the track was wet I had it sideways on plenty of occasions (probably due to the anti roll bar). The track was also brilliant - the tight and twisty corners were great fun and the views were insane being right on the coast!

On the way home we went through Snowdonia and stopped off at Mach Loop for a few photos.

F15ADA9D-F12C-4932-8B5A-A3EAD918A804.jpeg
FA939D9C-4F9A-4764-9D78-CF138E115E86.jpeg
6CB0046A-0ADB-458A-8653-AED53AD1C5CB.jpeg
1F1DE14A-B86C-423B-AC62-7DB15D205FCB.jpeg
449A9E09-FF11-4108-AC62-333AEF58D0ED.jpeg
730732BE-33CF-45B0-99F3-04A20C4818B4.jpeg


It was a great drive despite being a bit outnumbered 🤣 The views were also incredible throughout.
 

Attachments

  • 0E1213A6-07E8-495E-ABD6-005B88DBCD11.jpeg
    0E1213A6-07E8-495E-ABD6-005B88DBCD11.jpeg
    1.3 MB · Views: 49

JGrant

ClioSport Club Member
  2003 172 Cup
Only a small update - I decided to give the car a proper detail a few weeks back and fit a few small bits to smarten it up.

9D46AE11-E8F1-4596-88FF-DFDA622F2973.jpeg


000A5E36-A7A3-49F9-AB99-7269E5CBA66C.jpeg


B507CD96-5665-4B28-B37A-70C2D6E6E521.jpeg


967C9E4D-FEF2-4E8E-80FD-A6A8CFEFF18E.jpeg


Took these off and cleaned all the crap out.

EF8DC0A0-473C-4FC3-AEC4-4EB5559D956E.jpeg


842CC2AB-8A86-4192-BA70-2B727F08F664.jpeg


Fitted a stubby aerial - looks so much better than the old one!

66A98F50-40F3-4375-AF2D-A751481A2995.jpeg


9992612A-E419-49C9-97E3-7DB2879CE9B0.jpeg


Also replaced the old number plate light lense for a fresh item.
 

JGrant

ClioSport Club Member
  2003 172 Cup
A few photos after it was detailed.

35834FC5-F387-4112-A806-FA45A17DA590.jpeg


C2740D10-695E-4791-A49A-A3FDBBEBEC3D.jpeg


0CBB1BF8-9F6B-4E46-A323-1F0CC8B79764.jpeg


I also fitted a M.A.D Designs towing eye. These are great quality items and really smartens up the front end.

417AF991-8C4B-4EC2-A03A-8F201279BF6D.jpeg


After washing the car I found I had some water ingress coming in from around the boot.

710062CA-7E89-4F41-BA09-AB06F6AAB24C.jpeg


I ended up tracking this down to a perished rubber boot stop which wasn't creating a seal.

5D85BB31-D53A-48C3-B24D-11CF0BC4822B.jpeg


Luckily Renault still use these on newer models so I was able to get 2 replacements - only cost around £3 for both I think.

326B0BD1-8928-42E1-BBC0-AD3E060E09F1.jpeg


0A8023E1-DAAF-41FA-8CF3-B6407B30EF15.jpeg


Only one was leaking but both were replaced for good measure.

Non Clio related but I also finally managed to buy my affordable dream car after 2 years of searching for one! Was my last chance to get hold of one realistically as prices are starting to get a bit mental now.

94FA917B-3F87-41AE-8069-5A9CAFCFEF64.jpeg


Top