So with not much time to do anything before track time at Knockhill on monday evening. I have fitted a new action camera mount to my rollcage to hopefully get better footage.
And also been toying with a different headlight intake design for my track day blanks.
Endless searching of different styles and looks I came accross one on instagram that someone else had made. So i take no credit for this idea but i have to say i do really like the look!
So basically i got an old absolutely knackered headlight off a scrap 1.2. The headlight had been left outside the car upside down and the inside of it was like a swamp. So cleaned it out a bit and got the Dremel out and cut out the headlight and main beam shape.
Its a little rough round the edges etc so i sanded it all back and got it as smooth as I can. I then started to gut the back of the headlight and removed everything possible but kept the black insert inside to act as a sort of deflector.
With that done I then gave it a coat of paint
Then onto a trial fit. Now unfortuantly the paint reacted like God knows what but I'm not fussed cause I'll probable just wrap it like my other ones.
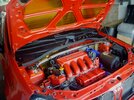
So heres the result. Im happy with the look of the blank. Im not happy with whole outcome though.
As you can see you can see far too much through the blank and it looks a bit naff.
I do belive that once the filters behind there it will look better but im trying to work out a sort of plastic welded duct to the back so all you see is a black duct directing the air directly to the filter once I refit my 45 degree elbow and have the filter facing towards the passenger headlight.


 Any suggestions?
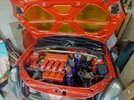
 but yeah will need to get the dremel out and get these fitted at the weekend also
")


 just back from the powdercoaters