Thank you, not many show love to an old Silver clio. So I’m trying my bestJust read the whole thread. Great work mate. Really nice attention to detail.

Thank you, not many show love to an old Silver clio. So I’m trying my bestJust read the whole thread. Great work mate. Really nice attention to detail.
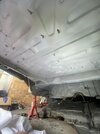
I replaced my tank bolts and moved it around sufficiently to get a torch in there. The only corrosion I could see was where that rear exhaust heat shield goes. There was a small continuation of rust on the floor pan so easy to access and treat.So has anyone dropped the tank without disconnecting fuel lines etc. perhaps then swinging it forward out of the way? I don’t want to be angle grinding under the car with an open tank.
View attachment 1580285View attachment 1580286View attachment 1580287View attachment 1580288View attachment 1580289View attachment 1580290View attachment 1580291View attachment 1580292View attachment 1580293
I have to replace my tank bolts as well, they are knackered. Luckily I have some stainless ones left over from last time! I am going to drop the tank I think I don’t want to be doing this again any time soon. In fact if I ever do another one, it will be on a rotisserie. Balls to crawling underneath cars with rust in my eyesI replaced my tank bolts and moved it around sufficiently to get a torch in there. The only corrosion I could see was where that rear exhaust heat shield goes. There was a small continuation of rust on the floor pan so easy to access and treat.
It’s a filthy job isn’t it? But well worth it in the end.
I’ve been eying up:Been ages since I did mine now, cannot recommend epoxy mastic enough, as well as a Milwaukee die grinder!
I personally over coated with wax, but you can primer and paint if that's your thing.I’ve been eying up:
Bilt Hamber Epoxy Mastic 1 Litre - Black
The UK's largest independent supplier of automotive oils, fluid and parts. We've products to suit any vehicle, from full blown Race / Track weapons, to Daily Drivers looking to save money. Plus FREE expert advice & recommendations - OPIE KNOW OILSwww.opieoils.co.uk
But I’m unsure what to overcoat it with. If anything….
I flattened the epoxy mastic slightly with wet and dry (1500) after it dried. Then gave it some coats of Matt Black paint (Aerosol) before giving it a few coats of clear lacquer. Stuck a lance from a tin of S50 Cavity wax into all those little places you can’t get to.I’ve been eying up:
Bilt Hamber Epoxy Mastic 1 Litre - Black
The UK's largest independent supplier of automotive oils, fluid and parts. We've products to suit any vehicle, from full blown Race / Track weapons, to Daily Drivers looking to save money. Plus FREE expert advice & recommendations - OPIE KNOW OILSwww.opieoils.co.uk
But I’m unsure what to overcoat it with. If anything….
I’m not fussed about a painted, immaculate finish. It’s the underside of a s**t old car. I was thinking of just good old stone chip on top of it .I personally over coated with wax, but you can primer and paint if that's your thing.
Yea that works too. I think anything works tbh, if I were to do it again I would likely give Buzz weld a go, gets good reviews.I’m not fussed about a painted, immaculate finish. It’s the underside of a s**t old car. I was thinking of just good old stone chip on top of it .
That’s interesting stuff, looks like it doesn’t need a primer? Do you think it would limit its rust prevention capability if I used a primer?Yea that works too. I think anything works tbh, if I were to do it again I would likely give Buzz weld a go, gets good reviews.
I was quite impressed with gravitex stone chip in the past but only used it because I was painting the underside. Needs a compressor to apply nicely really.
You have to rub the Pro-am ones down anyway and paint because of the welds on the captive nuts. So good job saving the originals. Mine were completely shot.Getting there slowly! Underside grinding is now complete! All treated, few more areas to clean up under the tank (remove old waxoil) before hitting with Bilt Hamber electrox. Pics to folloe as the grinding stage is not very exciting! so here is a pic of some of the mess…that’s one chassis rails worth of crap
View attachment 1586048
Whilst underneath I had to remove and repair the only stud that snapped during the strip down…there is a small stud that attaches what looks like an earth point and the filler neck on the fuel tank. After a bit of head scratching I drilled the broken stud and fitted a rivnut in place
View attachment 1586049
next up, exhaust mounts…so I was doing to buy a new stainless pair from ProAm. But decided I’d give the originals another shot at life. They were heavily corroded, but felt structurally good. Quick rub down before a 24hr bath and scrub in Deox C and they came up Ok, hit with Electrox, before a final coat of my old mat ‘bed liner paint’. They look very good given their starting condition and have save me from another £50 bill
View attachment 1586050
View attachment 1586052
View attachment 1586051
View attachment 1586053
View attachment 1586054View attachment 1586055
 But at least you can sleep at night knowing it’s solid under there.
Thanks Jon, well it’ll be as solid as I can make it lying on my back in a grinding above my head. I’m pretty happy with what I’ve done and the car will never be used as a daily in my ownership. So should last a good while now. Looking forward to getting it all back together now. Not long!You have to rub the Pro-am ones down anyway and paint because of the welds on the captive nuts. So good job saving the originals. Mine were completely shot.
Scary when you look at the crap that comes out of the chassis rails
I’ve seen so many “Mint” Clio’s driving around with nice bodywork but rotten as hell underneath.
Great work!
After spending all day grinding the underside of your car I especially enjoy the first nose blow of the evening... the one where your like "maybe I should wear a mask tomorrow".Thanks Jon, well it’ll be as solid as I can make it lying on my back in a grinding above my head. I’m pretty happy with what I’ve done and the car will never be used as a daily in my ownership. So should last a good while now. Looking forward to getting it all back together now. Not long!
Ha ha, yep! The best one is after the third time of ‘rusty bogies’ I still say to myself, that I need to wear a mask.After spending all day grinding the underside of your car I especially enjoy the first nose blow of the evening... the one where your like "maybe I should wear a mask tomorrow".
Great work mate.
Thanks Daniel, still a long way to go mind.Just read this from start to finish. Superb work!
Looking great, what primer did you use?Pleased to report the final coat of primer is now on! Epoxy mastic will be slapped on over the coming week and then finally I can start putting it back together!
View attachment 1586824View attachment 1586825View attachment 1586826View attachment 1586827View attachment 1586828View attachment 1586830View attachment 1586831
Bilt hamber electrox mate. I’m Fully converted to their products now!Looking great, what primer did you use?
Top job!Pleased to report the final coat of primer is now on! Epoxy mastic will be slapped on over the coming week and then finally I can start putting it back together!
View attachment 1586824View attachment 1586825View attachment 1586826View attachment 1586827View attachment 1586828View attachment 1586830View attachment 1586831
The Epoxy Mastic phase will be the worse bit. I was covered in it and high as a kite for a weekBilt hamber electrox mate. I’m Fully converted to their products now!
Lovely when it dries though, you’ll be able to go underwater with it.The Epoxy Mastic phase will be the worse bit. I was covered in it and high as a kite for a week


Just lovely work. Another one savedHad a bit of time this weekend to crack on! We are finally getting somewhere!
first up, rehung the fuel tank with new stainless bolts and washers, always a pain when lying on your back! I then went about fitting the heat shields I had repaired, with a new centre exhaust hanger.
View attachment 1588940View attachment 1588943View attachment 1588941
before starting to fit out my rear beam. I had a load of bolts zinc plated as well as the exhaust hanger. Until I find or get a new one made. Whiteline poly bushes fitted, I took measurements from the old Beam to ensure everything is as close as possible to the factory Alignment. I will hang it I hope tomorrow! But the wife may have something to say about that. Pretty happy
View attachment 1588944View attachment 1588942View attachment 1588939

Absolutely! Rear end rot is going to be the single biggest killer of Clios over the next few years. I’m pretty confident that I have fixed that particular issue with this car. I am really enjoying the bolting back together process now. Its made the shitty bits worth it.Just lovely work. Another one saved
Been following your progress on IG mate. This is looking absolutely fantastic, you’ve done a great job.

Thanks David, let’s not overplay the talent part. Moronic is much more apt. Who in their right mind ploughs this many hours into a silver 182…Great job David.
I have just caught up on this thread. Who knew you have such talent.
You’re making David’s around the world proud.