
ClioSport.net
-
When you purchase through links on our site, we may earn an affiliate commission. Read more here.
You are using an out of date browser. It may not display this or other websites correctly.
You should upgrade or use an alternative browser.
You should upgrade or use an alternative browser.
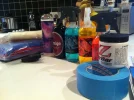
A few bits this week - I've a £200 order from Polished Bliss too which isn't here yet
What a heroic post! Soo much stuff. I love getting fresh new bottles of stuff. You got loads!
Gavin.
ClioSport Club Member
Auto Finesse Citrus Power - 250ml
Auto Finesse Imperial - 500ml
Auto Finesse Tripple - 250ml
Auto Finesse Revive - 250ml
Auto Finesse Gloss - 250ml
Auto Finesse Spritz - 500ml
As said above, it would be rude not to on the 3 for 2 offer.
Auto Finesse Imperial - 500ml
Auto Finesse Tripple - 250ml
Auto Finesse Revive - 250ml
Auto Finesse Gloss - 250ml
Auto Finesse Spritz - 500ml
As said above, it would be rude not to on the 3 for 2 offer.
I went to the KDS Detailing meet today.Bought two dodo juice buckets.
They demo'd The new C1 and C1.5 silo spray. Looked very easy to apply.
And some new aerosol EXO or something that's being launched in summer.
They demo'd The new C1 and C1.5 silo spray. Looked very easy to apply.
And some new aerosol EXO or something that's being launched in summer.
Im planning on doing my big clean in the next couple of days, I was just wondering, is it possible to split it over several days, even though I don't have a garage?
I was thinking of maybe doing the clean/tar/iron/clean/clay/clean on one day, leave it over night so I have a whole day on the polishing/glaze/wax stage?
Is it okay to do this? What would I need to use in the morning to remove any dust or anything that settled on it before polishing?
I was thinking of maybe doing the clean/tar/iron/clean/clay/clean on one day, leave it over night so I have a whole day on the polishing/glaze/wax stage?
Is it okay to do this? What would I need to use in the morning to remove any dust or anything that settled on it before polishing?
Okay, great! Got a few questions I want to ask before I get started!
1. When I rinse the car after de-tar/de-iron, do I need to dry it before I clay?
Just a bit worried I might end up with water spots if the water dries on panels before I get to clay them..
2. Pad/chemical combo:
I have :
Hex Logic Blue: Soft Polishing/ Finishing Pads- Glaze & Cleaner Foam Pad
Hex Logic White : Medium -Light Polishing Pad
Hex Logic Green: Heavy Polishing Pad
Polish: Menzerna Super Finish (PO 106 FA)
Glaze: Britemax Black Max
From what I understand, you start with the lightest cutting pad, and if it doesn't give the required results, step down. So for the polish, would I start with the blue pad, if its not cuttinge enough, go down to the white pad, and then down to the green pad?
What about for the glaze, I'm assuming blue?
3. If I use the same pad with different chemicals, Do I need to clean imbetween? If so what's the best way of doing it. I did get some pad cleaning tool with my polisher that has metal spikey cogs on it?
4. Working areas. I've been watching videos of making "passes", at the moment I'm thinking of breaking each panel into say 4 (e.g the bonnet), so I have manageable sized areas to work on, is this okay?
Sorry for all the questions, and I have been doing a lot of research in preperation, but if anything I've said is wrong, or you have any other tips that would be very very much appreciated!
Golf GT & A4 Avant
Okay, great! Got a few questions I want to ask before I get started!
1. When I rinse the car after de-tar/de-iron, 'rinse' do I need to dry it before I clay? NO, wash / rinse after claying ideally
Just a bit worried I might end up with water spots if the water dries on panels before I get to clay them..
2. Pad/chemical combo:
I have :
Hex Logic Blue: Soft Polishing/ Finishing Pads- Glaze & Cleaner Foam Pad
Hex Logic White : Medium -Light Polishing Pad
Hex Logic Green: Heavy Polishing Pad
Polish: Menzerna Super Finish (PO 106 FA)
Glaze: Britemax Black Max
From what I understand, you start with the lightest cutting pad, and if it doesn't give the required results, step down. So for the polish, would I start with the blue pad, if its not cuttinge enough, go down to the white pad, and then down to the green pad?
What about for the glaze, I'm assuming blue? Correct
3. If I use the same pad with different chemicals, Do I need to clean imbetween? If so what's the best way of doing it. I did get some pad cleaning tool with my polisher that has metal spikey cogs on it? wash in fairly liquid is all I do. Pad cleaning tool is for use inbetween polishing sets so the pad doesn't get clogged
4. Working areas. I've been watching videos of making "passes", at the moment I'm thinking of breaking each panel into say 4 (e.g the bonnet), so I have manageable sized areas to work on, is this okay? When polishing try and stick to 12" square areas to work. you can go larger than this though when using a glaze
Sorry for all the questions, and I have been doing a lot of research in preperation, but if anything I've said is wrong, or you have any other tips that would be very very much appreciated!
Golf GT & A4 Avant
GTechniq 500ml l1 fabric guard & 500ml w2 cleaner concentrate
Yea I know I'll need to rewash after claying anyway, maybe didn't make that clear.
Just when I rinse off the de-iron prior to claying!
Do the pads need to be moist when using them?
Cheers for the tips.
Just when I rinse off the de-iron prior to claying!
Do the pads need to be moist when using them?
Cheers for the tips.
Golf GT & A4 Avant
as I said, no. it'll add a little extra wetness when starting to clay.
Do a search for priming pads before using them, some people give them a initial quick spritz of water others use the product itself
Do a search for priming pads before using them, some people give them a initial quick spritz of water others use the product itself
Yea I have read about that, just wanted to know what you lot recommended, always better to hear from the horses mouth and what not!
Also, forgot to ask about DA speeds for the Mezerna and the Glaze (using a DAS 6)
High speed for the polish, lower speed for the glaze?
Also, forgot to ask about DA speeds for the Mezerna and the Glaze (using a DAS 6)
High speed for the polish, lower speed for the glaze?
Last edited:
Yea I've read that, but I couldn't really see anywhere it mentions about speeds!
Unless I'm being blind..
DIMINISHING ABRASIVES
As discussed above, the abrasives in many machine polishes on the market are diminishing abrasives. This means that they need to be worked through their stages of cutting from high to finishing. Here we look at how this would be done in practice. This is just a generic technique and guide to working such polishes – each polish will have its own characteristics and only through experimenting will you be able to find the best possible working methods that suit your technique.
Key to getting the best out of the abrasives in a polish, both in terms of cut and in terms of finish, is to work on a small area at a time – of around 12” – 18”square. Once the pad is initially primed with polish (a 3 – 4” line is enough for this), only a couple of skittle sized beads of polish are typically required.
With the machine switched off, spread your polish around the area you plan to work. You can either dab the pad on the paint, or drag it across the paint. The switch the machine on a slow speed (PC: 2-3; UDM: 2; G220: 2) and spread the polish with one or two fast passes across the area as shown in the picture below. You can see that the residue of the polish is white and cloudy looking.
Once the polish is spread, step the machine up to a higher speed (PC: 5; UDM: 4-5; G220: 4-5). Now increase the amount of pressure over the head of the machine as appropriate, ensuring that the pad is still rotating.
Move the polisher across the area at a slow speed of about 1” – 2” per second. Make three or four passes at this speed to begin working the polish. With certain polishes, for example Meguiars #83 Dual Action Cleaner Polish, keep the machine at this speed for the duration of the polishing set until the abrasives have fully broken down. The picture below shows the polish beginning to be worked.
For many other polishers, step the machine up to a high speed (PC: 6; UDM: 5.5; G220: 5.5), maintaining the pressure from above. Continue to ensure the pad is rotating. Don’t be tempted to speed up the movement of the machine (you’d be surprised how easy this is!) – keep it to 1” – 2” per second. Keep going until the polish residue goes clear as shown in the picture below. The residue will look like thick water has been spread across the paint and the white cloudiness will have vanished.
When the polish is at this stage the abrasives have fully broken down as described above, allowing you to get the best from the available cut and also the best finish the abrasives have to offer. The finish will be free from micromarring as discussed above (unless an aggressive compound has been used on softer paint).
NB: The Cyclo machine polisher is only single speed. In this case, spread the polish around with a single pass moving the machine quickly and then slow the machine movement down to work the polish as described above until the residue goes clear.
So in summary:
Spread or dab polish around the panel with the machine switched off.
Spread the polish with one or two passes at slow speed (between 2 and 3).
Begin to work the polish in for three or four passes at medium speed (around 4).
Thoroughly work the polish until the residue goes clear at high speed (between 5 and 6).
Buff off residue and assess result.
WORKING A FILLER HEAVY GLAZE
Unlike polishes which contain abrasives, filler heavy glazes such as Clearkote Red Moose Machine Glaze do not need to be thoroughly worked to “break them down”. Instead, they simply need to be worked long enough to work the fillers into the swirls.
As for an abrasive polish, the glaze should be dabbed around the area intending to be worked before the machine is switched on. This area can be a little bigger than for a polish with mechanical abrasives as we do not need to focus the effort down as much as before - 2’ square or a little more is acceptable. The glaze should be spread as before at a slow speed (PC: 2-3; UDM: 2; G220: 2).
Then the glaze should be worked into the paint with a few passes at a moderate speed (PC: 4-4.5; UDM: 3.5-4; G220: 3.5-4). Light to medium pressure is typically all that is needed for working a filling glaze. Work the glaze for a few passes (experiment to find out what works best).
Fiesta ST200
Cheeky few bits from i4detailing and shinerama.
Faultless service from both of them, trying the products and various others on the 13th with a mate of mine, he has a panther black fiesta st.
Should be some lovely looking cars at the end of that day
Faultless service from both of them, trying the products and various others on the 13th with a mate of mine, he has a panther black fiesta st.
Should be some lovely looking cars at the end of that day
Attachments

Golf GT & A4 Avant
keen to know how the DJ crudzilla works as I've been considering it
 well I will give it a whirl and see how it goes, hopefully not too bad
 I really like Red Mist, might invest in some more because the shine was amazing and beading not far behind on my red car.
Also, thinking back, the Dodo juice guy with the beard and glasses told me to use it as a wheel cleaner LOL.
That was at FCS and I don't think they had any wheel products out at the time.
That was at FCS and I don't think they had any wheel products out at the time.
That's right. They say it's a QD / spray sealant.
")
Yep.
Asked him what I could use to clean the wheels without washing and rinsing.
He suggested RM because it has similar properties to a QD.
Asked him what I could use to clean the wheels without washing and rinsing.
He suggested RM because it has similar properties to a QD.
172 Sport
My new rotary is here! ")
I had an EP800 a few years back but lost it in a house move, so just ordered up a Silverline cheepie. It is here and it looks good enough to me, so whoopie. Going to try it out on Friday
Iron X is here, Dodo Juice Purple Haze is too so will be trying those two for the first time.
I had an EP800 a few years back but lost it in a house move, so just ordered up a Silverline cheepie. It is here and it looks good enough to me, so whoopie. Going to try it out on Friday
Iron X is here, Dodo Juice Purple Haze is too so will be trying those two for the first time.
I did the wash stage of my detail today
Washed, De-tar, De-iron, Clayed (with washes inbetween and after)
Now just gotta hope it stays dry so I can start using my DA on it over the next few days
Washed, De-tar, De-iron, Clayed (with washes inbetween and after)
Now just gotta hope it stays dry so I can start using my DA on it over the next few days
Gavin.
ClioSport Club Member
im going to have a busy weekend 

Awesomw!
I need, my car, and haven't managed to get round to polishing it.
Although I'm guessing driving it after detar/deiron/claying will undo all my work and I'll have to redo it all again before I polish?
And driving unprotected is a bad idea?
I'm not talking long term, just one journey and back?
Although I'm guessing driving it after detar/deiron/claying will undo all my work and I'll have to redo it all again before I polish?
And driving unprotected is a bad idea?
I'm not talking long term, just one journey and back?
Similar threads
- Replies
- 0
- Views
- 901
- Replies
- 11
- Views
- 2K