
ClioSport.net
-
When you purchase through links on our site, we may earn an affiliate commission. Read more here.
You are using an out of date browser. It may not display this or other websites correctly.
You should upgrade or use an alternative browser.
You should upgrade or use an alternative browser.
Clio 182 Turbo
- Thread starter Yarp
- Start date
Yarp
ClioSport Club Member
182 Turbo, E46 M3
If you want to mod it, go for it. You can always take the bits off if you're not keen. It's not like you're putting chameleon wrap on the screen and eBay canards on the bumper.
Yeah, this is true. I put black grilles on my last few and I do like them.
I’m just not sure about a splitter, I think it might look stupid with one at standard height. The are cheap enough though and would cover the damage to the bottom edge where I turned a hare into red mist a few weeks back.
Yarp
ClioSport Club Member
182 Turbo, E46 M3
Nothing too much exciting today. I need a few more bits to build the engine and just haven’t pulled my finger out to order them so had a look at the engine bay.
There are a few bits with some rust showing so thought I’d tackle them with a wire wheel to see where I’m at. The plan is to clean the bay as best I can and then paint it up. I will say I’m not remotely bothered about it being perfect, but it really makes sense to get it as good as I can when the engine is out and it’s easy access. It’ll hopefully keep this end rust free ish for a good while longer.
First step was a clean of the engine bay. Totally pointless pic because it’s black and doesn’t photograph well. The more eagle eyed viewers will see where I’ve bashed the bulkhead a bit above where the scuttle drain comes out. The turbo hits there, so I’ll be bashing that a hell of a lot more now the engine isn’t in the way and I’ve got room to swing a hammer. It’ll be hidden by heat shield so no need for it to be pretty.
I also spotted that the wiring loom that goes to the brake fluid reservoir and driver side front ABS sensor has been a bit melted. That probably explains the ever present ABS fault I’ve had, despite replacing every sensor and ring

Next was just a couple of obvious areas to see how easily they cleaned up. The answer was very easily. I’ve given them a quick coat of rust proof stuff just for now. Pics below are under driver’s engine mount and where the slam panel mounts.


The only bits that are slightly more concerning are the chassis legs. This is the driver side, the passenger is much better

It was wet from where I’d washed it, but after a very quick blast I think this will come up ok too. I need to be sat in the engine bay to do it, but it was too wet and dark tonight.

I think once this is done and the engine back in, I’ll slowly work my way backwards along the rest of the underside. The rear beam looks like it’s been in the sea. The jacking points are knackered and may need a bit of welding but that’s a job for a different day.
Irritatingly Halfords have changed all their paint stuff round too. Instead of buying a can of “Renault Black Gold Metallic” I now need to buy a can with a code that apparently is the right colour. In the process they now no longer stock BG. I also couldn’t see Rover anthracite grey which is the same colour as the wheels. Bit of a shitter as now I’ll have to apply some basic level of thought as to where I get the paint from.
There are a few bits with some rust showing so thought I’d tackle them with a wire wheel to see where I’m at. The plan is to clean the bay as best I can and then paint it up. I will say I’m not remotely bothered about it being perfect, but it really makes sense to get it as good as I can when the engine is out and it’s easy access. It’ll hopefully keep this end rust free ish for a good while longer.
First step was a clean of the engine bay. Totally pointless pic because it’s black and doesn’t photograph well. The more eagle eyed viewers will see where I’ve bashed the bulkhead a bit above where the scuttle drain comes out. The turbo hits there, so I’ll be bashing that a hell of a lot more now the engine isn’t in the way and I’ve got room to swing a hammer. It’ll be hidden by heat shield so no need for it to be pretty.
I also spotted that the wiring loom that goes to the brake fluid reservoir and driver side front ABS sensor has been a bit melted. That probably explains the ever present ABS fault I’ve had, despite replacing every sensor and ring
Next was just a couple of obvious areas to see how easily they cleaned up. The answer was very easily. I’ve given them a quick coat of rust proof stuff just for now. Pics below are under driver’s engine mount and where the slam panel mounts.
The only bits that are slightly more concerning are the chassis legs. This is the driver side, the passenger is much better
It was wet from where I’d washed it, but after a very quick blast I think this will come up ok too. I need to be sat in the engine bay to do it, but it was too wet and dark tonight.
I think once this is done and the engine back in, I’ll slowly work my way backwards along the rest of the underside. The rear beam looks like it’s been in the sea. The jacking points are knackered and may need a bit of welding but that’s a job for a different day.
Irritatingly Halfords have changed all their paint stuff round too. Instead of buying a can of “Renault Black Gold Metallic” I now need to buy a can with a code that apparently is the right colour. In the process they now no longer stock BG. I also couldn’t see Rover anthracite grey which is the same colour as the wheels. Bit of a shitter as now I’ll have to apply some basic level of thought as to where I get the paint from.
See if hycote do a black gold can
I stocked up on Monaco blue years ago because they threatened to stop making all the old Renault stuff
I stocked up on Monaco blue years ago because they threatened to stop making all the old Renault stuff
Yarp
ClioSport Club Member
182 Turbo, E46 M3
See if hycote do a black gold can
I stocked up on Monaco blue years ago because they threatened to stop making all the old Renault stuff
Good should that. I’ll see if I can find some.
If not there’s a place called auto panels in Birtley that’s only a couple of mins away from me. They mix paints and do it with the little chart thing so the colour match is normally decent.
It’s just a chew on not being able to grab a tin off a shelf.

RENAULT 267 Black Gold Basecoat Car Paint Lacquer Primer Aerosol Kit | eBay UK
Find many great new & used options and get the best deals for RENAULT 267 Black Gold Basecoat Car Paint Lacquer Primer Aerosol Kit at the best online prices at eBay UK! Free delivery for many products!
ebay.us
Auto paints have always been reasonably decent from mates that have used their cans
How much do ya need? Think I've a can.Nothing too much exciting today. I need a few more bits to build the engine and just haven’t pulled my finger out to order them so had a look at the engine bay.
There are a few bits with some rust showing so thought I’d tackle them with a wire wheel to see where I’m at. The plan is to clean the bay as best I can and then paint it up. I will say I’m not remotely bothered about it being perfect, but it really makes sense to get it as good as I can when the engine is out and it’s easy access. It’ll hopefully keep this end rust free ish for a good while longer.
First step was a clean of the engine bay. Totally pointless pic because it’s black and doesn’t photograph well. The more eagle eyed viewers will see where I’ve bashed the bulkhead a bit above where the scuttle drain comes out. The turbo hits there, so I’ll be bashing that a hell of a lot more now the engine isn’t in the way and I’ve got room to swing a hammer. It’ll be hidden by heat shield so no need for it to be pretty.
I also spotted that the wiring loom that goes to the brake fluid reservoir and driver side front ABS sensor has been a bit melted. That probably explains the ever present ABS fault I’ve had, despite replacing every sensor and ring
View attachment 1767020
Next was just a couple of obvious areas to see how easily they cleaned up. The answer was very easily. I’ve given them a quick coat of rust proof stuff just for now. Pics below are under driver’s engine mount and where the slam panel mounts.
View attachment 1767021
View attachment 1767022
View attachment 1767023
View attachment 1767024
View attachment 1767025
View attachment 1767026
The only bits that are slightly more concerning are the chassis legs. This is the driver side, the passenger is much better
View attachment 1767027
It was wet from where I’d washed it, but after a very quick blast I think this will come up ok too. I need to be sat in the engine bay to do it, but it was too wet and dark tonight.
View attachment 1767028
I think once this is done and the engine back in, I’ll slowly work my way backwards along the rest of the underside. The rear beam looks like it’s been in the sea. The jacking points are knackered and may need a bit of welding but that’s a job for a different day.
Irritatingly Halfords have changed all their paint stuff round too. Instead of buying a can of “Renault Black Gold Metallic” I now need to buy a can with a code that apparently is the right colour. In the process they now no longer stock BG. I also couldn’t see Rover anthracite grey which is the same colour as the wheels. Bit of a shitter as now I’ll have to apply some basic level of thought as to where I get the paint from.
Maybe.
Yarp
ClioSport Club Member
182 Turbo, E46 M3
RENAULT 267 Black Gold Basecoat Car Paint Lacquer Primer Aerosol Kit | eBay UK
Find many great new & used options and get the best deals for RENAULT 267 Black Gold Basecoat Car Paint Lacquer Primer Aerosol Kit at the best online prices at eBay UK! Free delivery for many products!ebay.us
Auto paints have always been reasonably decent from mates that have used their cans
I might just order that, easier than having to haul my carcass out the car at the shop
How much do ya need? Think I've a can.
Maybe.
At this stage not much at all, a can will probably do. Although the s**t paint job with primer showing all over the bay is going to get to me and need dealt with so could end up a bit out of hand.
Yarp
ClioSport Club Member
182 Turbo, E46 M3
More rust attacking/bay tidying today.
Still not found anything too scary but the passenger side chassis leg took some cleaning up. The inner wing on the drivers side around where the arch liner should clip was pretty spicy too. I think any longer and it would have needed cut out and replaced.
Rust treatment on driver side


Back of crash bar


Passenger side


That came up ok ish

Driver side looked good after a coat of rust eating stuff.

I gave that a very quick dust of rust proof primer

The rust stuff on the passenger side wasn’t quite dry enough for paint so I’ll do that tomorrow.
Still not found anything too scary but the passenger side chassis leg took some cleaning up. The inner wing on the drivers side around where the arch liner should clip was pretty spicy too. I think any longer and it would have needed cut out and replaced.
Rust treatment on driver side
Back of crash bar
Passenger side
That came up ok ish
Driver side looked good after a coat of rust eating stuff.
I gave that a very quick dust of rust proof primer
The rust stuff on the passenger side wasn’t quite dry enough for paint so I’ll do that tomorrow.
Attachments
JamesBryan
ClioSport Club Member
I’ve done a search but got conflicting results. Does anyone have info for:
Meg 250/2x5 piston ring gap
Meg 250/2x5 rod bearing torque and sequence
Meg 250/2x5 rod bearing clearance
F4R head bolt torque and sequence
Thanks in advance!
For the head bolts it's 20Nm from the middle outwards. Usually do the first 20Nm and let it settle for a bit and then recheck. Then do 180° if you haven't got a torque angle wrench.
Yarp
ClioSport Club Member
182 Turbo, E46 M3
For the head bolts it's 20Nm from the middle outwards. Usually do the first 20Nm and let it settle for a bit and then recheck. Then do 180° if you haven't got a torque angle wrench.
View attachment 1768226
Awesome. I’ve got an angle wrench so can do that

Upper gaps (using same ring) I’ve got
1- 0.3mm, 2- 0.43mm, 3- 0.40mm, 4- 0.31mm
The 2 central notes have the drill mark in the head so are the bigger 2.
Are the pistons makes B or C the bigger ones? They seem so close I can’t tell the difference and the vernier callipers don’t go to enough decimal places to tell the difference.
MAXRUNDOWN
ClioSport Club Member
C pistons are the bigger ones.
Those ring gaps are a bit tight for forced induction, I'd be aiming for .45 for the top ring and .54 for the second ring.. I'd always err on the side of caution with ring gaps, nobody will ever know if they're slightly over, but everyone will know if they're too tight and you knock a ring land off.
ARP rod bolt torque is 44ft/lb (60nm) using the ARP lube.
JamesBryan
ClioSport Club Member
Awesome. I’ve got an angle wrench so can do that
Upper gaps (using same ring) I’ve got
1- 0.3mm, 2- 0.43mm, 3- 0.40mm, 4- 0.31mm
The 2 central notes have the drill mark in the head so are the bigger 2.
Are the pistons makes B or C the bigger ones? They seem so close I can’t tell the difference and the vernier callipers don’t go to enough decimal places to tell the difference.
Not sure on ring specs, I'll see if I've got any documentation on it.
Yarp
ClioSport Club Member
182 Turbo, E46 M3
C pistons are the bigger ones.
Those ring gaps are a bit tight for forced induction, I'd be aiming for .45 for the top ring and .54 for the second ring.. I'd always err on the side of caution with ring gaps, nobody will ever know if they're slightly over, but everyone will know if they're too tight and you knock a ring land off.
ARP rod bolt torque is 44ft/lb (60nm) using the ARP lube.
Legend, ta!
Having a bit mooch online, that sounds right and you make a very good point about the ringlands. I’ll file them down and get them to that. The lower ones are all measuring around .50 so much closer, although the are easier to measure with them being a bit thicker and staying in place more easily.
I’ve eventually found the table below which sits nicely with the above. I’ve gone .45 as suggested for top, I’ve got .55 in the middle and the oil ring was .6 out of the box so fine with that.
I did go to put some of this into action but dropped my torque wrench and it literally exploded. The top popped off and all the important bits in the middle decided to missile around the garage. That put an end to that but I’ve ordered a new one from Halfords to pick up at work tomorrow. I’ve had the old one for years and I’m sure it was under 50 quid. The smaller one now that does 20nm to 100nm is 100 quid on trade. Needs must though!
With that out the window I decided that I would ruin the 5 series after all. I got a 36 quid front splitter off flea bay. This is without doubt the best fitting bit of car I’ve ever got off eBay. The alignment is perfect around the fogs and underneath, and it mounts using a few of the OEM screws for the bumper. I think it looks canny. Next door being for sale and empty remains useful for additional parking!
Yarp
ClioSport Club Member
182 Turbo, E46 M3
Armed with my new torque wrench I decided to fit the pistons tonight. Got to say, I hate the new design compared to the scrolling numbers on my old one.
Anyway, checked the ring measurements one last time for good look. 0.43, 0.55 and 0.6 was the result. Although the oil rings are a nightmare to measure with how thin they are so that could be +/- a little bit.
I aligned the rings, compressed it and tapped it into the bore. That’s it sat waaaaaay down there

I put the new bearings in, a dob of plastigauge and went to torque up. Didn’t get far as the dickhead ARP bolts are 3/8ths 12 sided. Ideal. I’ve got a 6 sided but not a 12 sided. I gently nipped it with a 10mm and will have to see if I can find a 3/8ths 12 sider from somewhere tomorrow. I’ve got Halfords, tool station and screwfix within half a mile of work so hopefully one of them will have one.
Plans abandoned for tonight and this is how I’ve left it. I’m using the old ARP bolts to check and will use the new ones for final torque down.

Anyway, checked the ring measurements one last time for good look. 0.43, 0.55 and 0.6 was the result. Although the oil rings are a nightmare to measure with how thin they are so that could be +/- a little bit.
I aligned the rings, compressed it and tapped it into the bore. That’s it sat waaaaaay down there
I put the new bearings in, a dob of plastigauge and went to torque up. Didn’t get far as the dickhead ARP bolts are 3/8ths 12 sided. Ideal. I’ve got a 6 sided but not a 12 sided. I gently nipped it with a 10mm and will have to see if I can find a 3/8ths 12 sider from somewhere tomorrow. I’ve got Halfords, tool station and screwfix within half a mile of work so hopefully one of them will have one.
Plans abandoned for tonight and this is how I’ve left it. I’m using the old ARP bolts to check and will use the new ones for final torque down.
ARP bolts are reusable
Also, you should have bought yourself some 12 point sockets Steve, that was silly of you
Also, you should have bought yourself some 12 point sockets Steve, that was silly of you
Yarp
ClioSport Club Member
182 Turbo, E46 M3
ARP bolts are reusable
Also, you should have bought yourself some 12 point sockets Steve, that was silly of you
Aye, but I’ve bought new ones so I’ve made my bed and lying in it. Although with the teeniest bit of attention to detail I would have noticed them in the rod caps and not bought them again.
I’ve got plenty of 12 point sockets and I hate the b*****d things - pretty much every set other than impact insists on using them now. Unfortunately they are just metric ones like a normal person who isn’t in the US and didn’t start collecting tools in 1954 would have
. There’s no finer way to round a tight bolt than with a 12 point. Just Sod’s Law that the stuff I want as 6 point is 12 and vice versa.Yarp
ClioSport Club Member
182 Turbo, E46 M3
Good old yank imperial fasteners. Arp are always a pain.
Yep. There’s just no need. No-one needs to do a maths lesson to work out whether the next size socket up is 11 42ths or 23 eleventyseventyths. s**t system.
They could at least make them all X/16ths or X/32ths so at least you can ignore the end number and use the start.
Yarp
ClioSport Club Member
182 Turbo, E46 M3
And then there were pistons. Bought myself a lovely set of freedom unit sockets to get those stupid yank bolts in.
Tell you what though. Never have I done a more boring task than gapping the piston rings. No need for the levels of dullness of file a bit off, measure, file a bit, measure. Etc etc etc etc etc . So dull.
Anyway. Stated with number 4 just cos. Got it in, torqued, checked spec. All good.

Then onwards. Torqued (60nm) and done

Then just cracked on. Action shot.

I took my time with the pistons. I learned the lesson the hard way many moons back when I bashed one to get it to slide in and cracked the oil ring. I was probably a bit too cautious so it took a little while but I lubed the s**t out of them and they all dropped in with the gentlest of hand pressure.

Then flipped it over and continued with the bearings. Same process - bearings in, torqued on old bolts, check plastigauge, retorque with new bolts. All the bearing measurements were very similar

Then all done

Excuse the scribble but these were the clearances I ended up with

Then threw a load of oil over the mains and gave it a few turns over. All lovely and smooth so very happy with the day’s work. Although excuse the cam quality as it was an inch thick in millers 10w60 by this point and that stuff is thick as f**k and does not come off!
Tell you what though. Never have I done a more boring task than gapping the piston rings. No need for the levels of dullness of file a bit off, measure, file a bit, measure. Etc etc etc etc etc
. So dull. Anyway. Stated with number 4 just cos. Got it in, torqued, checked spec. All good.
Then onwards. Torqued (60nm) and done
Then just cracked on. Action shot.
I took my time with the pistons. I learned the lesson the hard way many moons back when I bashed one to get it to slide in and cracked the oil ring. I was probably a bit too cautious so it took a little while but I lubed the s**t out of them and they all dropped in with the gentlest of hand pressure.
Then flipped it over and continued with the bearings. Same process - bearings in, torqued on old bolts, check plastigauge, retorque with new bolts. All the bearing measurements were very similar
Then all done
Excuse the scribble but these were the clearances I ended up with
Then threw a load of oil over the mains and gave it a few turns over. All lovely and smooth so very happy with the day’s work. Although excuse the cam quality as it was an inch thick in millers 10w60 by this point and that stuff is thick as f**k and does not come off!
Attachments

Brigsy
ClioSport Club Member
T.Turbo
Use the correct settings for the head bolts you are using.
To chuck a spanner in the works, im sure most f4r use the same headbolts..if that is the case id use 250 settings.
I used arp head studs on mine as i got them for free. They go down in ft/lb with no angle tighten. Yank shite
To chuck a spanner in the works, im sure most f4r use the same headbolts..if that is the case id use 250 settings.
I used arp head studs on mine as i got them for free. They go down in ft/lb with no angle tighten. Yank shite
Yarp
ClioSport Club Member
182 Turbo, E46 M3
Use the correct settings for the head bolts you are using.
To chuck a spanner in the works, im sure most f4r use the same headbolts..if that is the case id use 250 settings.
I used arp head studs on mine as i got them for free. They go down in ft/lb with no angle tighten. Yank shite
I’m done with yank shite after the freedom unit ARP rod bolts.
Head bolts are standard F4R so it’s 20/20/265 then. Thanks!
Yarp
ClioSport Club Member
182 Turbo, E46 M3
It’s starting to come back together!
Heed on, torqued and bolts set. I love using the thing to set them to degrees.

I then started to refit some of the other bits. Didn’t take any picture as I was going but this was where I ended up. The pulleys etc all need torqued but the brackets are tight.


I’d lost this bracket for the alternator so gave up there. It needs a clean and a paint before it goes on.

Although the alternator is quite nasty so may replace it. Nothing wrong with it, it’s just not very pretty.

And as for the AC pump, that’s a crime against humanity. Although unlike the alternator I can degrease and paint it.

I have lost my uber expensive sealant for the rocker cover so at the min it’s just plonked on while I wait for a new tube being delivered. Good chance to give the bolts a smidge of love too

I also used man maths level expert. I refuse to pay nearly 3 quid a bolt for the sump bolts because they are absolute shite. Using my expert, instead I spent nearly 4 quid a bolt on titanium ones. They are much prettier. Although I maybe should have got 20mm instead of 25mm

That’s all for today
Heed on, torqued and bolts set. I love using the thing to set them to degrees.
I then started to refit some of the other bits. Didn’t take any picture as I was going but this was where I ended up. The pulleys etc all need torqued but the brackets are tight.
I’d lost this bracket for the alternator so gave up there. It needs a clean and a paint before it goes on.
Although the alternator is quite nasty so may replace it. Nothing wrong with it, it’s just not very pretty.
And as for the AC pump, that’s a crime against humanity. Although unlike the alternator I can degrease and paint it.
I have lost my uber expensive sealant for the rocker cover so at the min it’s just plonked on while I wait for a new tube being delivered. Good chance to give the bolts a smidge of love too
I also used man maths level expert. I refuse to pay nearly 3 quid a bolt for the sump bolts because they are absolute shite. Using my expert, instead I spent nearly 4 quid a bolt on titanium ones. They are much prettier. Although I maybe should have got 20mm instead of 25mm
That’s all for today
MAXRUNDOWN
ClioSport Club Member
Looking good , have you got a target for getting it in and running? Give me a shout if/when you want a loan of the timing tools
, have you got a target for getting it in and running? Give me a shout if/when you want a loan of the timing toolsYarp
ClioSport Club Member
182 Turbo, E46 M3
Looking good
Ah yes, a loan would be very much appreciated!
No real target set. It’s been broken since September 24, and last moved before that in about May 24 maybe, so it’s not a time sensitive project. However, I’m really enjoying it and want to keep the momentum up when it’s there. I’d liked the idea of ready before Christmas but time will be difficult with all the stuff going on in the buildup so probably off the cards now.
Theres nothing huge left really, just lots of reasonable jobs. I need to get on with painting the bay but it’s still too cold and I don’t trust the electric heater to not burn the house down if left unsupervised. Subframe etc needs powder coated - I just need to get round to dropping it off. Engine needs finished but that’s nothing too serious now. I need to order and fit a clutch. Box needs cleaned and fitted. Wiring all needs checked - I’m a bit dubious about a lot of it so I’m going to unpick the loom and check it all then put it back together. The front Brembos could probably do with a refurb and absolutely needs a set of disks and pads. I did consider shocks and springs but I’ve checked and I don’t think they’ve done more than 4/5k miles.
So yeah, lots but not lots. You know how it goes though, things catch your eye and off you go down a rabbit hole.
Yarp
ClioSport Club Member
182 Turbo, E46 M3
I fitted the rocket cover tonight. I couldn’t find my tube of sealant which was a bit of a pain. Euro car parts stock it but it is neatly £50 a tube. Quick call to the local Renault dealer and got a tube for £25.16. Bargain.
Got that everywhere, then torqued the bolts to spec and in the required sequence. I got a fine and even bead of excess sealant round the whole rocker cover so I’m taking that as confirmation that it’s fully sealed. I’ll be fuming if it leaks because it’s such a shite idea instead of a normal gasket.

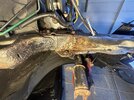
Attention then turned to the turbo. My current oil return is highly genius and also highly pikey. It’s a wiggly radiator pipe fitting (probably has a name but I’m not a plumber) that went to a silicone hose and then to the barb. Looks made to measure but I don’t think it’ll last.

The problem then always comes back clearance. I can clock the turbo and using a random barb I’ve got in stock I can make a lovely straight run. Looks great, even if the drain angle isn’t quite as good.


However it’s then back to square one because there’s no space to run the fitting for the coolant hose.

And standard issues. To get the angle so the actuator bracket doesn’t hit the bulkhead the boost pipe ends up pretty much touching the log manifold.

Ideal is like this but bulkhead problems.

But this is stuff I want to make sure is spot on. While it’s out I can run the oil and water lines really nicely. I just need to work it all out. I feel like I’ve been going round in the same circle for 5 years with this
Got that everywhere, then torqued the bolts to spec and in the required sequence. I got a fine and even bead of excess sealant round the whole rocker cover so I’m taking that as confirmation that it’s fully sealed. I’ll be fuming if it leaks because it’s such a shite idea instead of a normal gasket.
Attention then turned to the turbo. My current oil return is highly genius and also highly pikey. It’s a wiggly radiator pipe fitting (probably has a name but I’m not a plumber) that went to a silicone hose and then to the barb. Looks made to measure but I don’t think it’ll last.
The problem then always comes back clearance. I can clock the turbo and using a random barb I’ve got in stock I can make a lovely straight run. Looks great, even if the drain angle isn’t quite as good.
However it’s then back to square one because there’s no space to run the fitting for the coolant hose.
And standard issues. To get the angle so the actuator bracket doesn’t hit the bulkhead the boost pipe ends up pretty much touching the log manifold.
Ideal is like this but bulkhead problems.
But this is stuff I want to make sure is spot on. While it’s out I can run the oil and water lines really nicely. I just need to work it all out. I feel like I’ve been going round in the same circle for 5 years with this
MAXRUNDOWN
ClioSport Club Member
You should be able to get an angled barb fitting on that drain flange and run some proper push fit hose between that and the fitting on the block, ideally with some fire sleeve over it.

Something like that.
You could try and adjustable actuator bracket too

Failing that the lad that does my ally welding would be able to weld an elbow onto your compressor housing for not much cash.
Something like that.
You could try and adjustable actuator bracket too
Failing that the lad that does my ally welding would be able to weld an elbow onto your compressor housing for not much cash.
Yarp
ClioSport Club Member
182 Turbo, E46 M3
Would a sindwinder manifold be a better option than the log which is giving you clearance issues?
Yes, yes it would. The inner conscience is trying very hard to overrule the man maths that is justifying it as the completely sensible option
Id be modifying the actuator bracket so it’s away from the bulkhead. Chop and weld.
This is the sensible option! I thought this turbo was a bit smaller than the first one when I bought it but it’s even bigger
 .
.Yarp
ClioSport Club Member
182 Turbo, E46 M3
You should be able to get an angled barb fitting on that drain flange and run some proper push fit hose between that and the fitting on the block, ideally with some fire sleeve over it.
View attachment 1769194
Something like that.
You could try and adjustable actuator bracket too
View attachment 1769195
Failing that the lad that does my ally welding would be able to weld an elbow onto your compressor housing for not much cash.
That adjustable bracket could be just the job actually.
And that angled connector could be good too. Although looking at the pics again, I think I’m going to have clearance issues with the downpipe. I’ll have to mock it up properly tomorrow and try again!
BoringFit a smaller turbo, you'll get plenty enough power from one with none of the hassle
Yarp
ClioSport Club Member
182 Turbo, E46 M3
Overnight parts from Japan Poulton-le-Fylde. That’s not a made up place.
I went with the adjustable actuator bracket and it’s a stroke of genius. I also got some banjo fittings for the water feed/return which will sort the clearance issues out there too


I’ve quickly mocked it up. Eagle eyed viewers will spot the log and turbo have had a lick of paint. I’m trying some extra uber ridiculous high temp stuff so we’ll sharp see if it is good to 1200C.
Clearance from everything is now good. I will need a couple of washers on the side of the actuator closest to the block just to angle it slightly. I may have to tickle the hole for the arm just to widen it ever so slightly for some extra space for it to move freely.

Banjo fittings will work but are maybe 4/5mm too long so I’ll need to chop a little bit off them. The beauty of this is that I can do a really nice job of the coolant lines. I can drop them into the space behind the block, into a 90 degree bend and then run them neatly together along the back of the block and then off up to where they need to be. It’ll make the joints nicer and take the stress off the hoses compared to how they were.

I checked the oil return with the downpipe on and clearance is fine. It’s miles away

I had a rethink of the oil feed too and will use the 90 degree end at the turbo side too. Again, that will allow me to run it down and under and round the back of the block and I can clip it up and out of the way. Theory is, it’ll make everything much tidier and look more like it was designed to be there rather than thrown together

I went with the adjustable actuator bracket and it’s a stroke of genius. I also got some banjo fittings for the water feed/return which will sort the clearance issues out there too
I’ve quickly mocked it up. Eagle eyed viewers will spot the log and turbo have had a lick of paint. I’m trying some extra uber ridiculous high temp stuff so we’ll sharp see if it is good to 1200C.
Clearance from everything is now good. I will need a couple of washers on the side of the actuator closest to the block just to angle it slightly. I may have to tickle the hole for the arm just to widen it ever so slightly for some extra space for it to move freely.
Banjo fittings will work but are maybe 4/5mm too long so I’ll need to chop a little bit off them. The beauty of this is that I can do a really nice job of the coolant lines. I can drop them into the space behind the block, into a 90 degree bend and then run them neatly together along the back of the block and then off up to where they need to be. It’ll make the joints nicer and take the stress off the hoses compared to how they were.
I checked the oil return with the downpipe on and clearance is fine. It’s miles away
I had a rethink of the oil feed too and will use the 90 degree end at the turbo side too. Again, that will allow me to run it down and under and round the back of the block and I can clip it up and out of the way. Theory is, it’ll make everything much tidier and look more like it was designed to be there rather than thrown together
MAXRUNDOWN
ClioSport Club Member
New actuator bracket looks good  , you could bend the rod by a few degrees which would remove the need to stack washers and/or clearance the hole. VHT paint looks decent too..
, you could bend the rod by a few degrees which would remove the need to stack washers and/or clearance the hole. VHT paint looks decent too..