ClioSport.net

This is a sample guest message. Register a free account today to become a member! Once signed in, you'll be able to participate on this site by adding your own topics and posts, as well as connect with other members through your own private inbox!

  • When you purchase through links on our site, we may earn an affiliate commission. Read more here.

The 182

Car  clio 182
hello folks! thought it was time i put my project thread up.

bought the car about a year and a half ago and now it has turned into a track car with the intention of some hillclimbs/sprints next year maybe!

from the beggining-

bought the car with tinted windows, full yozza including decat, K & N filter, decked on some 60mm springs and smoked rear lights:S

it didnt stay like this long and some raceland coilovers where purchased and some 15" wheels.

4609755140_67259cb915.webp

131 by h3ppy, on Flickr
4609749786_14177de7ec.webp

113 by h3ppy, on Flickr

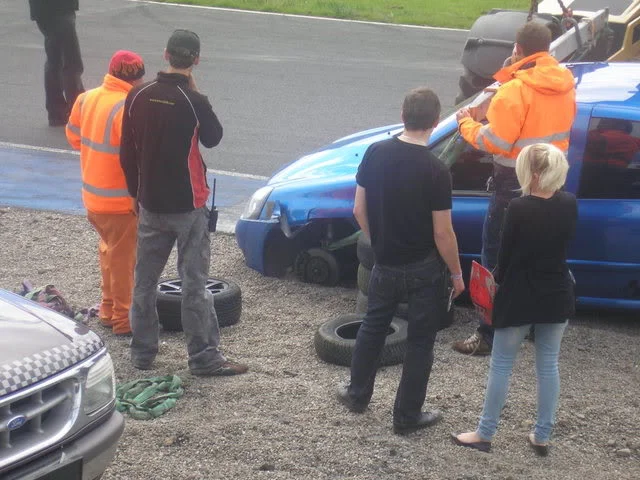
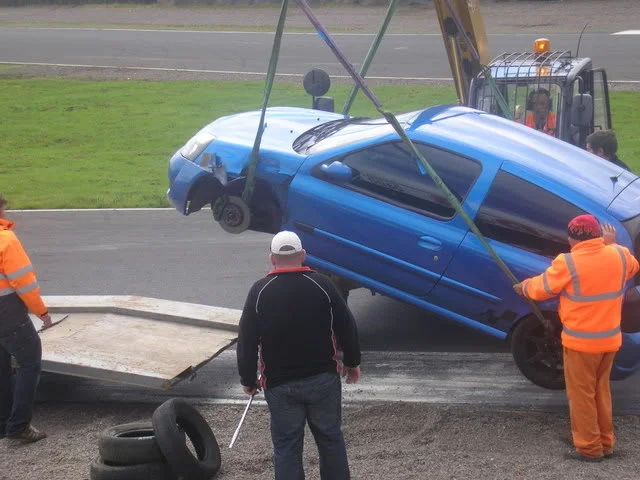
i attended my first track day with the car like this, and disaster struck. i lost a wheel going into the hairpin at knockhill
Knockhill010.webp

Knockhill012.webp


it was caused by no spigot rings and spacers, wheel nuts loose, bye bye wheel!

the damage caused meant the car was off the road for a wee while so i got to work turning it into what i really wanted it to be!

5062112998_5221a12717.webp

DSCF1711 by h3ppy, on Flickr
5062112300_b9d995a5ba.webp

DSCF1712 by h3ppy, on Flickr
5061500715_50d3236008.webp

DSCF1713 by h3ppy, on Flickr
5061499317_6cf9099159.webp

DSCF1715 by h3ppy, on Flickr

the spec here is as follows

engine-

standard 2.0 16v
full yozza sport exhaust including decat
modified standard air box with panel filter

suspension, brakes, wheels-

raceland coilovers
ast fully adjustable solid top mounts
mocal braided hoses
EBC red stuff pads
standard discs
OZ superleggeras with hankook rs2 rubber (195/50/15)

interior-

2 x sparco corsa fixed bucket seats
2 x sparco 3 point harnesses
RMD deep dish steering wheel
stripped rear and front carpet
rear half cage(unsure on make)

exterior-

removed fog lights
removed xenon washer jets
removed tints
smoked rear lights

i was more than happy with it like this and went to my next trackday but yet again there was a slight mishap! i lost a brake pad halfway to the track (incorrectly fitted by myself :o newbie schoolboy error) so cue waiting in halfrauds car park for 2 hours to buy a new set

5078042631_1ec4a51bdc.webp

DSCF1721 by h3ppy, on Flickr

i got a set and made it to knockhill and had a great day! no pics though as the camera died :(

after this i decided more weight loss was needed

under bonnet sound deadening

5078039421_180299fbaa.webp

DSCF1723 by h3ppy, on Flickr

door cards

5078623462_00ed04a74b.webp

DSCF1729 by h3ppy, on Flickr

roof lining

5078028625_de0fd1d832.webp

DSCF1730 by h3ppy, on Flickr

i then got my tracking set

5099468569_d97143998c.webp

250 by h3ppy, on Flickr

not bad for a newbie on the driveway!

5114299083_de2c6274cb.webp

001 by h3ppy, on Flickr

the finished article

5114903492_156429255a.webp

002 by h3ppy, on Flickr

and thats how it stands just now!

there is plenty more to do- fit carbon doorcards, loose more weight, paint some bits and bobs in the next few weeks so will keep this updated!

i know this is a rubbish write up but i dont have the time to do a massive one so it will have to do :rasp:

thoughts/opinions welcome!

cheers

craig.
 
racelands are fine just now....they will be upgraded though in the future!

bit of an updatethen.....

i decided i liked the previously black on blue theme so decided to go back to it!

5139752405_a1036d6505.webp

DSCF1753 by h3ppy, on Flickr

5140355014_9378853e88.webp

DSCF1754 by h3ppy, on Flickr

5140351344_e3529fd598.webp

DSCF1756 by h3ppy, on Flickr

colour coded the mirrors and painted the wheels :cool: all done with rattle cans and patience!
will get some better pics up soon, next job is to fit these

5114302899_e8413c1549.webp

003 by h3ppy, on Flickr

then knockhill on sunday!

also ordered a track day camera so will put up my vids and also got some mk1 16v wheels coming for pure track use....any colour suggestions?

thanks
 
update:

had knockhill on sunday so on saturday i got a few jobs done

fitted my trs tow strap

5158825776_58bd8caf40.webp

342 by h3ppy, on Flickr

removed complete airbox and cleanes it out

5158825788_abb3095951.webp

341 by h3ppy, on Flickr

then got started on removing some of the dreaded tar! advice for anyone, do not heat it up, simple hammer and chisel first gets most off without the sticky mess, then for all the little bits left heat it.

5158825796_87b3c21f5f.webp

343 by h3ppy, on Flickr

knockhill went brilliantly on sunday, no dramas and car was perfect, need better coilovers though and 888's on my new valver wheels. no pics of the day as it was bloody freezing! i do have some in car footage though that i will post up.

and for those who use redstuff pads this is the experience i had with them, after 3 10mins session on knockhill

5146578952_1b8df8a5ff.webp

332 by h3ppy, on Flickr

5145976189_63e641c2b4.webp

333 by h3ppy, on Flickr

5146576118_99d40f4b63.webp

334 by h3ppy, on Flickr

as you can see there is still plenty of life in them. take from that what you will but i would need alot of convincing to use EBC again.
 
Well i never update this so thought i would bring it up to speed....

i got to 3 track days last year and the bug has definately bitten! so about a month or so ago i stuck the car in the garage to make some changes....

5384492807_0ef5765efd.webp

008 by h3ppy, on Flickr

Bonnet off ready to be taken to pieces!

5385102850_9c578124ce.webp

012 by h3ppy, on Flickr

Front end removed

5385109340_a65cc9acb0.webp

016 by h3ppy, on Flickr

Radiator out and started removing aircon

5384513119_6556bfbc73.webp

020 by h3ppy, on Flickr
5385119266_cee5c3749e.webp

022 by h3ppy, on Flickr

Top inlet removed

5384520359_c93b2d8156.webp

024 by h3ppy, on Flickr

RS stamp FTW

5385129752_3c7f6c3027.webp

026 by h3ppy, on Flickr

alternator out

5385143292_a83c1077a9.webp

033 by h3ppy, on Flickr

Aircon, PAS and top engine mount out

5384547069_fcd631f3b8.webp

036 by h3ppy, on Flickr

Random weight under engine mount removed

5385151492_9e86d86a99.webp

037 by h3ppy, on Flickr

Suspension removed

5385153328_f29ec422bb.webp

038 by h3ppy, on Flickr

The pile of parts started growing....

5384560929_120cdfebcb.webp

043 by h3ppy, on Flickr

onto the interior....dash out

5385188670_ae8c6f46d3.webp

051 by h3ppy, on Flickr
5385192592_75f7caebb4.webp

053 by h3ppy, on Flickr

sound deadening out

5384593507_bcf86a921a.webp

055 by h3ppy, on Flickr

At this point i decided i would try something a bit different with the dash....i will let the pics do the talking!

5385201322_d85f064c98.webp

058 by h3ppy, on Flickr
5384600467_95a8e4cb93.webp

059 by h3ppy, on Flickr
5397823699_6905a44f91.webp

005 by h3ppy, on Flickr
5397829961_6912b9616d.webp

009 by h3ppy, on Flickr

the dash is fitted with some brackets i made, im not too happy with the switch panel i cut out but apart from that it serves its purpose! will do until the stack dash and MK1 dash top go in later on in the year

some new goodies...

5398422062_bfe979878e.webp

003 by h3ppy, on Flickr

Also picked up some volvo brackets from the scrappy and tried fittin them with the PAS, failed miserably!

5398438306_ec837208b2.webp

013 by h3ppy, on Flickr

so i scrapped that and got myself a DCI rack!

5398447530_265b3d02aa.webp

018 by h3ppy, on Flickr

so cup alternator it was, volvo brackets work a treat!

5448681008_e972bf9937.webp

201 by h3ppy, on Flickr

New vibratechnics mounts

5398457710_d0087e3f79.webp

023 by h3ppy, on Flickr

Powerflex bushes for the front end

5448077447_d1a3a9e9e4.webp

212 by h3ppy, on Flickr
5448081493_1a658df596.webp

216 by h3ppy, on Flickr

Swapped the 182 track on the DCI rack, fair old weight saving here

5448080523_b94c7545eb.webp

215 by h3ppy, on Flickr

New plugs and leads

5448078443_12304c2068.webp

213 by h3ppy, on Flickr

Inlets back on

5448698862_f0e65a3844.webp

226 by h3ppy, on Flickr

Radiator back in place

5448701270_f192ce63c1.webp

228 by h3ppy, on Flickr

Suspension built back up

5448095485_e9db791348.webp

230 by h3ppy, on Flickr

and thats how it stands just now!

there is still so much to do, and i will update this thread as i go now instead of doing it like that crap above (sorry:rasp:)

comments/thoughts/questions welcome!

and i would like to thank everyone on here that i have pm'd when stuck for helping me out!

thanks all!
 
When i seen the bay stripped i was hoping for trumpets :( !

Looks good though mate should be seeing you on track this year in the meg as im wanting to get into it this year !
 
Trumpets would be lovely, not just yet though! Sorting the chasis and weight out this year, power is nothing without control!

Will be good to see the meg on track, for being such a good car you dont see many on track! well at knockhill anyway!
 
Just need to get my brakes sorted and pick up a helmet n ill be heading along ! Most stay away due to the amount of junk that goes round knockhill !
 
its a DCI steering rack which is a manual steering rack. Removes the PAS. simple as that!

thanks for the comments guys!
 
Gto the ECU securely fixed down last night, picked up my 172 airbox and ITG filter (huge thanks to Gogsie!) and started building the front end back up again!

Pics to follow.

Thanks for all the comments guys, hopefully wont be much longer until its back on track!
 
its a DCI steering rack which is a manual steering rack. Removes the PAS. simple as that!

thanks for the comments guys!

O sorry mate looked at the pic and thought it was the subframe you've changed lol
 
Update

When removing the battery and the standard airbox the brackets that hold the ecu are removed as well so i had to devise a way to fix it down again. Loads have people have done this, so heres what i done...

it naturally wanted to sit like this so thats how its going in!

5453353251_42a0c19b10.webp

001 by h3ppy, on Flickr
5453354267_7eef787887.webp

002 by h3ppy, on Flickr

firstly i found a bolt that fits into an old thread for the battery mount, on the gearbox mount

5453970716_b0bd797fda.webp

005 by h3ppy, on Flickr

i then found that the fuse box was in the way a bit so trimmed a few mm off, rubbish picture but you can just make out where i trimmed it

5453967756_ef1242d06e.webp

003 by h3ppy, on Flickr

i then made a small bracket to hold the other side of the ecu and bolted it down

5453972054_17dd38b6f5.webp

006 by h3ppy, on Flickr
5453361367_de9dcb362a.webp

007 by h3ppy, on Flickr

Job done! i also put some foam like material i found lying about underneath it to take some of the vibration just incase!

next i built the front end up a bit more, radiator now fixed in properly

5453364021_a125bb1c06.webp

010 by h3ppy, on Flickr
5453976498_3fdc8bace5.webp

011 by h3ppy, on Flickr

Carbon canister also removed

5453363171_4f1dcc5982.webp

009 by h3ppy, on Flickr

Then i went and picked up a few bits....

New induction setup courtesy of Gogsie :approve:

5453365709_073caf8e91.webp

012 by h3ppy, on Flickr

and my carbon doorcards, pish picture again!

004-1.webp


Thoughts/comments welcome

thanks
 
Great work mate, Are you going to be running the airbox straight off the TB? I had that set up and it was great :)
 
I know I know, its a decent camera as well! I'm just useless! Lol if I had the patience I would do it properly and thos thread would be better, but I'm lazy when it comes to these things :rasp:

Cheers chris, its getting there slowly! Yea I will be running it of the throttle body with cold air ducts! Much better than the standard airbox :approve:

I'm leaving the engine at that with the decat and exhaust until I'm happy with the rest of the car, then I will have to decide if its n/a or boost ;)
 
I usually work on once the belt is tightened you should be able to turn it a quarter to half turn about 2 inch away from the bottom pulley if that makes sense!

I have a retired mechanic next door so I got him to check mine and he said it was fine :approve:
 
I weighed everthing I removed from the engine bay last night, aux set up, air con, pas pump, pas rack etc............

30.1kg!

That's just the engine bay as well, still got all the dash and interior to weigh! I'm chuffed!

more updates this week ;)
 
em.....yea......:o

in my defence they were torqued up correctly, but against me i was using s**t spacers and no spigot rings! You live and learn as they say!

cheers
 
i did wonder if it could have been spigot rings. They catch soo many people out. No major harm done which is a bonus.
 
Good lad!! 30kg is very good weight reduction espicaly from the front of the car. Mine won't be as much as I removed some bits earlier on last year. Can't wait to weigh
My car lol. So when's your car coming back on the road? I can't remember if I've asked you!
 
Thanks, I'm surprised it was that much! Hoping to weigh the whole car soon!

It will hopefully be on the road in the next few weeks, maybe a trackday on the 19th of march!
 
Ali- im out in banchory, dont go to town much in the car!

cheers for the comments everyone else!

Few pics

The pile of stuff removed

5471617835_48ba16fd2e.webp

037 by h3ppy, on Flickr

and the weight

5472213064_f9c9aff11d.webp

040 by h3ppy, on Flickr

very happy with that weight lost :approve:

New brakes fitted

5472202926_d058a2252e.webp

030 by h3ppy, on Flickr

EBC blue stuff pads and Godspeed discs, some good reviews so thought i would go away from the DS2500 crowd and try them out! Will let you know how i get on with them!

The to do list....

5471609457_4936f8514a.webp

029 by h3ppy, on Flickr

still massive but its all little bits! Hopefully starting it next week :D

comments/opinions welcome!

(and i know my pictures dont work on the first page, i exceeded my limit on flickr :o)
 
They cost the same as what i got all that for!

If these arent that good thats what i will be getting!
 
Have a look in the Godspeed section mate, they sent out free sets for people to review and alot of the scooby/evo lads are apparently running these! We will soon see though, once i have been round the hill again i will post up a review!
 
update time

relocating battery using aquamarine box and odeyssey 25

hole through bulkead and cables moved in engine bay fuse box (excuse the marks around it, worlds worst holesaw was used)

5499785348_5e23e93b93.webp


Aqua marine joint box mounted

5499189265_23059074da.webp

014 by h3ppy, on Flickr

Cables all joined up

5499786240_f069303e7f.webp

016 by h3ppy, on Flickr

Battery fitted behind passenger seat (tar will be removed at a later date)

5499800794_c679e5ea72.webp

030 by h3ppy, on Flickr
5499802612_0164c5994b.webp

032 by h3ppy, on Flickr

Carbon doorcards on, i used self tapping screws and black caps so i can get into the door again. Rubber door handle FTW!

5499807646_fd6d38aeac.webp

037 by h3ppy, on Flickr
5499201295_acc72d68a7.webp

026 by h3ppy, on Flickr

Induction set up on, 172 airbox with ITG filter! (poor pics i know)

5499203535_248e88aa73.webp

028 by h3ppy, on Flickr
5499790646_ca2fdd6c73.webp

020 by h3ppy, on Flickr

And out the Garage!

5499210353_82e2b77e5d.webp

035 by h3ppy, on Flickr

Next up was fitting my aerocatches in the bloody snow! Will let the pics do the talking, i may write a guide on it if i get time!

002-2.webp

009.webp

012-1.webp

025-1.webp

023-1.webp

026-1.webp

030-1.webp

031-1.webp

038-1.webp

040-1.webp

043-1.webp

050-1.webp

057-1.webp

055-1.webp

054-1.webp

058-1.webp

052-1.webp


Did i say it was snowing when i was doing this!!

029-1.webp


Anyway they are all done and im happy!

Car is back on the road and going well, it had a small missfire but seems to have cleared itself! Geo setup this weekend then good clean and a proper photo shoot with the car and i will put up some feedback on having no PAS etc!

thoughts/opinions welcome

cheers
 
Back
Top