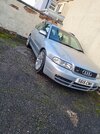
ClioSport.net

Register a free account today to become a member!
Once signed in, you'll be able to participate on this site by adding your own topics and posts, as well as connect with other members through your own private inbox!

  • When you purchase through links on our site, we may earn an affiliate commission. Read more here.

Clio 172 Phase 1 - Barn find


Jack1998

ClioSport Club Member
  Renault Clio 1.6 Rsi
Well. I'm sure we all saw it coming. Almost 2 years sat in wet hay hadn't really done my sills any favours.
Upon initial inspection the light bubbling didn't look too bad, gave it the obligatory quick smack with my fist, seemed solid enough.
IMG-20200604-WA0004.jpeg
DSC_0174.JPG

Then I found a flathead screwdriver and felt brave, so gave it a poke and this happened...
IMG-20200604-WA0009.jpeg
IMG-20200604-WA0012.jpeg

All part of the fun though! Luckily only the sills are rotten, the floor pan and underbody of the car is in good shape.
 

Crayola

ClioSport Club Member
Well. I'm sure we all saw it coming. Almost 2 years sat in wet hay hadn't really done my sills any favours.
Upon initial inspection the light bubbling didn't look too bad, gave it the obligatory quick smack with my fist, seemed solid enough. View attachment 1503330View attachment 1503331
Then I found a flathead screwdriver and felt brave, so gave it a poke and this happened...
View attachment 1503332View attachment 1503333
All part of the fun though! Luckily only the sills are rotten, the floor pan and underbody of the car is in good shape.
Like you say, at least it wasn't as bad as a PH1 i saw for sale on here (£2500) where both sides of the car were completely rotten, all the way around the arches up to the rear lights and all the sills were gone

The seller of that must have been on some very substantial opiates
 

DomP182

ClioSport Club Member
  ph1 172, Arctic182
Well. I'm sure we all saw it coming. Almost 2 years sat in wet hay hadn't really done my sills any favours.
Upon initial inspection the light bubbling didn't look too bad, gave it the obligatory quick smack with my fist, seemed solid enough. View attachment 1503330View attachment 1503331
Then I found a flathead screwdriver and felt brave, so gave it a poke and this happened...
View attachment 1503332View attachment 1503333
All part of the fun though! Luckily only the sills are rotten, the floor pan and underbody of the car is in good shape.
Put the skirts back on and pretend you never saw it!
 

Jaff.

ClioSport Club Member
To be clear, I was expecting it. Just not the scale of the issue.

I was always expecting to pull the rear arches off which meant fiddling with the sills.
The car is very much still a prototype though, so luckily my work costs FA.

OP - you’ve got off lightly with that rust by the looks of things. Spend some time to fix it and get it right first time and you’ll be grand
 

Jack1998

ClioSport Club Member
  Renault Clio 1.6 Rsi
Like you say, at least it wasn't as bad as a PH1 i saw for sale on here (£2500) where both sides of the car were completely rotten, all the way around the arches up to the rear lights and all the sills were gone

The seller of that must have been on some very substantial opiates
Was that the silver one with 180k up it? [emoji23]
Strong opiates indeed, by that logic mines worth at least 3k in current form!

Sent from my J8110 using Tapatalk
 

Jack1998

ClioSport Club Member
  Renault Clio 1.6 Rsi
To be clear, I was expecting it. Just not the scale of the issue.

I was always expecting to pull the rear arches off which meant fiddling with the sills.
The car is very much still a prototype though, so luckily my work costs FA.

OP - you’ve got off lightly with that rust by the looks of things. Spend some time to fix it and get it right first time and you’ll be grand
The rust gets worse, more pictures are to follow! [emoji51]

Sent from my J8110 using Tapatalk
 

Kenich.

ClioSport Club Member
  172 PH1
Well. I'm sure we all saw it coming. Almost 2 years sat in wet hay hadn't really done my sills any favours.

I assumed it was parked up for some length of time, if its only been sat for 2 years I would of thought they were long gone when it was still on the road.

Be good to see the repair process as most Ph1 will need this going forward I guess...
 

Jack1998

ClioSport Club Member
  Renault Clio 1.6 Rsi
I assumed it was parked up for some length of time, if its only been sat for 2 years I would of thought they were long gone when it was still on the road.

Be good to see the repair process as most Ph1 will need this going forward I guess...
More than likely. It did spend 10 or so years with the previous owner at the farm (working and not parked up) so it's fair to assume a good amount of sludge and mud would have collected in those plastic will covers.
It's currently in the process so hopefully someone else can find it useful!

Sent from my J8110 using Tapatalk
 

Jack1998

ClioSport Club Member
  Renault Clio 1.6 Rsi
Reyt then. I've decided I'm not allowed an angle grinder anymore. Unveiled some good crispyness behind the seemingly not so bad sills!
Everything is going to be cut out. It's going to be cut along the floorpan and new sills made up and welded in, front middles and back. Then have it sprayed, unsure if to have the full car hit or just the sills for now.
Oddly enough though with how bad the sills are, the floorpan is immaculate, the filler cap has a very small bubble, about 2mm across, just by the bolt that holds the cover on.
DSC_0197.JPG
DSC_0199.JPG
DSC_0198.JPG
 

Jack1998

ClioSport Club Member
  Renault Clio 1.6 Rsi
Fresh metal in now. Removed the entire sill panel, front back and rear, basically cut it from the floor pan so I had clean metal to go to. No rot treatments or converter has been used just fresh metal which I thought was best.

First things first though. Got the interior stripped out, didn't want to run the risk of setting something on fire!
DSC_0343.JPG
DSC_0341.JPG

Rear bench is stuck in! The middle of the three bolts I decided to make into a circle so it was left in.
DSC_0344.JPG

After some more poking and prodding there wasn't too much too much left of the sills!
IMG-20201008-WA0004.jpg
IMG-20201008-WA0005.jpg
IMG-20201008-WA0006.jpg

Sodded it all off and got fresh metal in all around, no rot left behind!
IMG-20201008-WA0000.jpg
IMG-20201008-WA0001.jpg
IMG-20201008-WA0002.jpg

The middle part of the will probably could have been fabricated neater but it does the job nicely I feel!
Next step is getting the outer sills on and prep for paint. Purchased the sills pre made as attempting that isn't something I fancied doing.
 

Darren S

ClioSport Club Member
Great work - great find.

It always amazes me with the skill and patience of people out there when on the face of it, it looks like a disaster! I think I'd cry looking at those cills originally... :LOL:
 

Clio_fool

ClioSport Club Member
Good work on the sills.👍 It got to be easier and better to just chop the lot out and fit a replacement panel like that. Rot free for another 20 years hopefully.
 

Jack1998

ClioSport Club Member
  Renault Clio 1.6 Rsi
Cheers for the replies lads, much appreciated.
Far easier to just cut it all out and go again, plus i would much rather spend the extra time now rather than see the rust re appear in a few years time!

Sent from my J8110 using Tapatalk
 

Jack1998

ClioSport Club Member
  Renault Clio 1.6 Rsi
All welded up and done. No more rot in sight, my painter decided to do the quarters for me, wasn't the original plan but he decided to do them so I just let him get on with it!
DSC_0348.JPG
DSC_0349.JPG
DSC_0350.JPG
DSC_0351.JPG

He's sandblasted the fuel cap area as there was only a tiny scab of rust and that's been repainted I just forgot to take pictures.
The underside and the lower part of the sill was sealed with some sort of yellow spray, he did tell me the name but I've forgotten. He assured me that that's what is used from the factory and creates that wrinkle finish so again I left him to it!
DSC_0356.JPG
DSC_0357.JPG
DSC_0359.JPG
DSC_0361.JPG
DSC_0360.JPG

I think the results speak for themselves on this one. Properly pleased with the result.
Next stages are going to depend on when I can get time on our lift. I intend to get the engine and box out, put the car on the lift remove everything from the vehicle so it's just a shell and make some form of cart I can put the car on so I can roll the shell between garages. This is so I can scrape all the old underseal off the car and take care of any rust scabs forming anywhere followed by an epoxy primer and probably a dinitrol underseal, undecided on the product yet.
 

Attachments

  • DSC_0358.JPG
    DSC_0358.JPG
    685.4 KB · Views: 106

Jack1998

ClioSport Club Member
  Renault Clio 1.6 Rsi
Evening all,
Made a bit of movement on the Clio this evening. Took advantage of the race car being away and off the ramp to shove the clio on and get a poke around underneath for the first time.
Quite pleased, considering the state of the sills I expected it to be rather a state. Not a spec on the mid/front underside, the only notable crispyness comes at the rear of the car, a few surface scabs on the rear rail looking portion where the bumper mounts, some around the rear beam mounts and some along the spare wheel well. All been prodded with a big screwdriver and seem solid, or I've not poked hard enough.
Took the undertray off to have a nose and to my surprise there is a slight weap from the sump gasket but other than that its totally dry. Whilst poking that area I noticed some rust scabs on the chassis legs and a bit on the firewall, again, poked it with a big screwdriver and just seems to be surface.
20201212_163753.jpg
20201212_171819.jpg
20201212_163804.jpg
20201212_171824.jpg
20201212_171832.jpg
20201212_171842.jpg


Next I thought I would chance my hand at the beam bolts. Mainly because mates said there was no chance they would ever come off and we were talking about dropping the tank and angle grinders and all sorts of stuff. So I thought sod it, nothing to loose, lets see if they go or not.
Got the wire brush on them, plenty of penetrating fluid and a massive 1/2" bar, all of them came off. Wound them all up and down the threads individually as im not ready to remove the beam yet but at least now I know they are good to go when I do.
20201214_190123.jpg


Next steps then.
The plan from now onward is to make up a dolly for the car so I can remove everything from it down to a shell and still wheel it between the garages (one has the lift in and one stores the car).
Once everything is stripped off im going to knot wheel all the factory under seal off and that yellow crap my sprayer put on, sand blast a the rust spots so everything is back to metal, epoxy primer and them underseal the lot.
After that every parts being replaced, everything will be fresh oem Renault.
Whilst the engine is out im going to be following in @Big_Steve_T footsteps, need my bay looking as fantastic as his.
Unfortunately the project is being put on hold until I have saved up the funds to buy all my parts. I was planning on getting it smashed before chsitmas but the clio fund has been spent of a B5 S4, just couldn't help myself, just look at itttttt.
20201205_152225.jpg
 

Attachments

  • 20201205_152225.jpg
    20201205_152225.jpg
    2.9 MB · Views: 98

Big_Steve_T

ClioSport Club Member
Thanks for the shout-out @Jack1998 👍👍

As @Coops Mk1 will testify, I would love an Oddy Ph1 to have restored for myself and kick myself that I sold my wife’s one some years ago that was in good order.. 🤦🏼‍♂️

But, I proper love my RB 18💩 
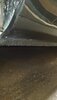
now and looking forwards to using it more in 2021
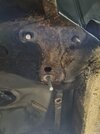
Look forwards to see your progress with this build mate 👍👍
 

Jack1998

ClioSport Club Member
  Renault Clio 1.6 Rsi
Evening all.
Making some movement on the old dear this weekend.
Got it up on the ramp to strip the rear and treat the rust spots.
Firstly to drop the rear beam. Shock bolts came out easy, springs popped off easy. All in all, no dramas at all. Figured I was in for an easy ride, even the brake lines came off with little persuasion just a bit of penetrating fluid.
20210115_162909.jpg

I was wrong. Rear beam bolts cracked off and gave me a few turns which was quite encouraging however that was it. Got a few turns on them and heard a ping and then they just spun. Managed to get two out in one piece (the ones with the least thread sticking out).
Chucked the wheels back on and lowered the car back down so it had a little bit if weight on the wheels. Then got inside, used a pick to snap the retaining clips from the top of the bolts. Let the car lower a touch further and then buzzed the heads off the top of the bolts. Easy! Right? Wrong.
20210115_193113.jpg

Went to lift the car back up to find I may had snipped the head off but there was still the square element of the coach bolt left meaning it wouldn't come out the circle hole at the bottom. Passenger wide was able to be cut with a grinder on my back (not a fun job) and the driver side I ended up hacksawing out (an equally in fun job).
20210115_193921.jpg

Many many swear words later and it came off. Wouldn't like to try this with only jack stands like I know folk have!
20210115_204904.jpg

Next step was to get the fuel tank out. Quite easy to get off, 4 bolts, two fuel lines and a return line. The two bolts on the outer edges snapped pretty much immediately. They have both now been drilled. The one thing I forgot to unplug was the connector on top of the pump, so that's been ripped out, managed to do that and spill a big glug of petrol all over myself, definitely remove it with a helper next time.
20210115_204953.jpg

All stripped back its in remarkably good condition. Half think I shouldn't haven't bothered!
20210116_165558.jpg
20210116_165628.jpg

Ground back the spring mounts which had light surface rust, got various sizes of wire wheel on the bits of box section to scrape off the old under seal and take off the surface rust. Luckily all solid metal underneath! I didn't picture it but I took the shocks off to check the mounting points and other from a 10p sized scab on the passenger side its all clean.
Once ground back I coated the underside in Dinitrol RC900 which is a rust converter and epoxy primer. Should all be dry for tomorrow ready for undersealing.

To shove two questions at the end of this as hopefully someone will know.
1. Where do I get new beam bolts from? Can I just use coach bolts with a tensile strength of 8.8 or above?
2. Would undersealing where the beam mounts too make any difference to the mounting of the beam? As in, will it move because of the couple of MM of under seal present between the body and the mount?
 

Jack1998

ClioSport Club Member
  Renault Clio 1.6 Rsi
Pictures I forgot to add of the rusty patches before I ground and treated them.
20210115_204910.jpg
20210115_204919.jpg
 

Attachments

  • 20210115_204910.jpg
    20210115_204910.jpg
    1.3 MB · Views: 85
  • 20210115_204910.jpg
    20210115_204910.jpg
    1.3 MB · Views: 88

DomP182

ClioSport Club Member
  ph1 172, Arctic182
I priced up Genuine Renault bem bolts, came to over £60 from memory so I bought high tensile 10mm caphead bolts with washers and unlocks from Kayfast on Ebay for under £15
 

KitsonRis

ClioSport Club Member
I replaced the rear beam bolts on my old Ph1 with generic coach bolts that my brother machined. Were better than the original ones as you could put a spanner on the top of them and not rely on the weak mounting thing they use.
 

Jack1998

ClioSport Club Member
  Renault Clio 1.6 Rsi
Stage 2 began today.
After leaving the rc900 to dry overnight went ahead an hit the underside with the dinitrol 3125 HS. The only way I can describe the consistency of this is like a runny gravy, slightly thicker than water, not so much that it drips, but just enough that it runs into all the creases and the sorts.
I have also decided to do behind the bumper too with this being a common rot point, didn't picture it but I will once I have applied the finial coat tomorrow.
20210117_124344.jpg
20210117_160806.jpg
20210117_124339.jpg

Used the Dinitrol 1000 clear cavity wax for the sills. Used a long nozzle for the sills, it comes with about 3 foot of hose that you can feed into drain holes. Fed it into the drain holes, pressed on the trigger and slowly removed to in theory get an even coverage. It will coming out off all the drain holes so im assuming its fairly coated in there. Will be prodding the drain holes tomorrow to make sure they haven't sealed up with the wax.
20210117_130701.jpg

Leaving it all to dey overnight. It does say 2 hours it enough but for piece of mind im leaving it.
Shall follow up tomorrow providing I get time after work with the Dinitrol 4941 to finish it all off.
 

Jack1998

ClioSport Club Member
  Renault Clio 1.6 Rsi
How does Dinitrol etc compare to Bilt Hamber range like Dynax
Haven't used those products so I couldn't compare however I rate this dinitrol stuff quite highly.
Applications easy, the rc900 rust converter/epoxy primer is brilliant.
It all sets hard when its fully cured too, doesn't drip or anything.
Put the final layer on last night just haven't written it up yet. It looks so fresh underneath now!
 

Jack1998

ClioSport Club Member
  Renault Clio 1.6 Rsi
Evening all.
Final coat of Dinitrol 4941 was put on the other evening. Waited an extra day for the 3125 to go off fully as the garage the cars stored in is like a freezer so was still a bit tacky.
The 4941 sets hard with a really slight tack to it, im assuming this goes in time as its only been on 2 days and the temperature hasn't really been above freezing in that time. Minty fresh underneath now, properly happy with it.
Engine was destined to be pulled this evening, however the engine cranes hydraulic oil decided to make its exit out of the ram and discontinue working so its just sat balanced on the subframe at present! Tomorrow's a new day though.
20210118_195645.jpg
 

DomP182

ClioSport Club Member
  ph1 172, Arctic182
Did you struggle to clean up the rail sections running to the rear? The one that has the spare wheel well tight up to it is really tricky to get to.
 

Jack1998

ClioSport Club Member
  Renault Clio 1.6 Rsi
Did you struggle to clean up the rail sections running to the rear? The one that has the spare wheel well tight up to it is really tricky to get to.
Not hugely, used a die grinder with a loads of different flap wheels, wire cups/wheels and the sorts to get into it all. Its just massively time consuming, ive easily spent 10 hours plus grinding all the rust scabs back on the underside, would have been less if I just gave it a quick brush over and rust converted it but I wanted to grind it down as far as I could to clean metal then put the rc900 rust converter/primer on it.
To be honest the biggest pain in the arse part was the rails that have the outer fuel tank bolts in, its just a little unprotected little dirt shelf and im pretty sure you can't get to it without the tank out, few more years of winter use and im pretty sure it would have needed welding.
 

DomP182

ClioSport Club Member
  ph1 172, Arctic182
Yeah rails that the fuel tank outer bolts go into were the bit I meant, those and the triangle areas
 

Jack1998

ClioSport Club Member
  Renault Clio 1.6 Rsi
Triangle areas were really easy, weren't actually that rusty on mine, just very light surface.
Worst bits were those ledges where the fuel tank bolts too, I ended up dropping the car on the ramp so I could just stand up underneath it and my head was where the fuel tank was and just went at it with little die grinder bits for houuurrrss.
Other nasty bit was the rail by the spare wheel, similar story with that bit, big light on a stand is a must for those bits too


Top