ClioSport.net

This is a sample guest message. Register a free account today to become a member! Once signed in, you'll be able to participate on this site by adding your own topics and posts, as well as connect with other members through your own private inbox!

  • When you purchase through links on our site, we may earn an affiliate commission. Read more here.

BIGASH/FF-Racing X85 Clio Cup Racer Project

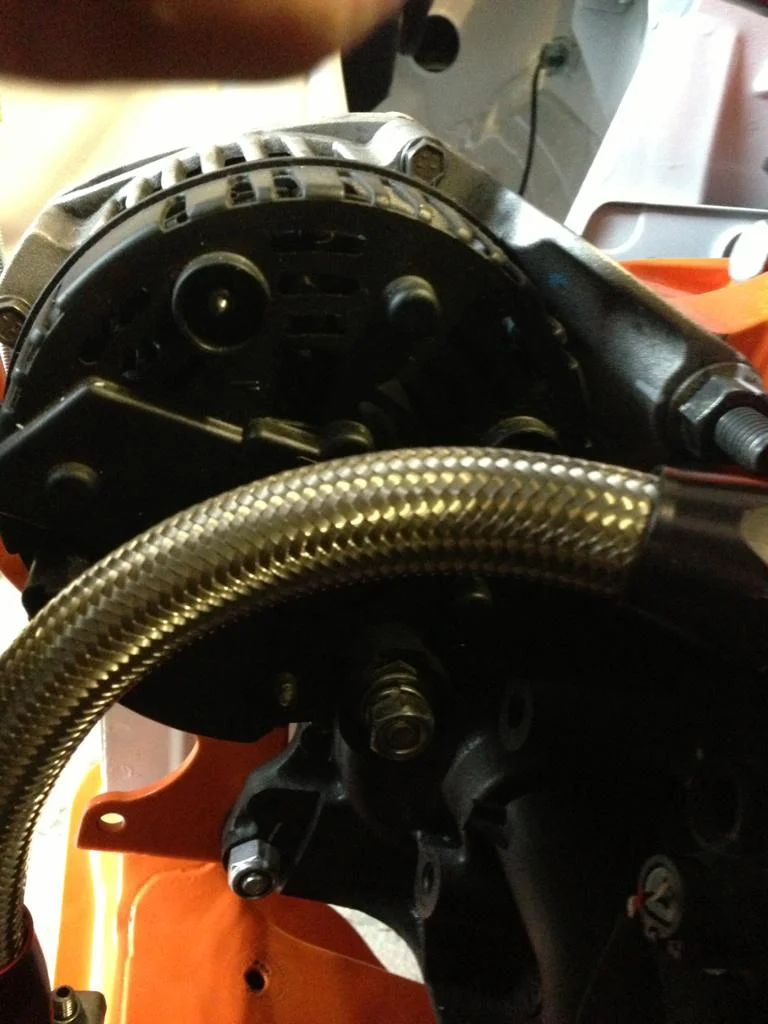
Can anyone help please? I need to know which pin on my alternator to wire my alternator warning light to? The dash says it wants to know 0v when its not charging so any of those metal studs okay?

Thanks
gyhe7aty.webp


If it's a Cup alternator, it uses one of the two pins in the small rectangular (might be square) plug, which can just be seen behind that braided hose on the left of the picture.

I've got the plug cut out of my old loom so I know what pin to use but it's at the workshop, I'm at home, can check first thing in the morning if it's of any use?

The FF alternators just have the main output terminal 8mm stud, and a 5 or 6mm stud so they're easy to wire up.

On a 2 wire alternator, like the Cups have, the charge light needs to be a lamp, not an LED, if your using an LED you'll need to put a resistor in parrallel with it so there is sufficient current flow for the exciter circuit. I've used a 10w 33ohm aluminium clad type, which will result in about 4-5watts at 12v, most warning lights arent anymore than 5w
 
Last edited:
It worked all last year without any warning light as it wasn't wired in so if I just left it then it'd be as it was last season.
If it's a Cup alternator, it uses one of the two pins in the small rectangular (might be square) plug, which can just be seen behind that braided hose on the left of the picture.

I've got the plug cut out of my old loom so I know what pin to use but it's at the workshop, I'm at home, can check first thing in the morning if it's of any use?

The FF alternators just have the main output terminal 8mm stud, and a 5 or 6mm stud so they're easy to wire up.

On a 2 wire alternator, like the Cups have, the charge light needs to be a lamp, not an LED, if your using an LED you'll need to put a resistor in parrallel with it so there is sufficient current flow for the exciter circuit. I've used a 10w 33ohm aluminium clad type, which will result in about 4-5watts at 12v, most warning lights arent anymore than 5w
Yes Kenny it's the cup alternator, unfortunately the braided hose won't really shift so can't get access to the connector. Thanks for the offer mate :) My dash says to activate the warning light it want's to see 0V so I was hoping the 3 metal studs around the alternator would show 12v when running and obviously 0v when not but I guess i'm out of luck
 
Not quite sure how it manages to charge without the warning light connected up, I guess once it's spinning fast enough it must manage to get it's self going.

Is that hose really that close to the alternator you couldnt get a wee plug in there? I'll be at the workshop soon, will dig it out anyway and let you know.
 
these alternators don't need an exciter like earlier ones (williams etc). The charge light output it literally that, just an output to turn a light off.
If you look at a standard loom, one of the wires on the plug is blanked.
 
Not quite sure how it manages to charge without the warning light connected up, I guess once it's spinning fast enough it must manage to get it's self going.

Is that hose really that close to the alternator you couldnt get a wee plug in there? I'll be at the workshop soon, will dig it out anyway and let you know.
Yes its probably 1mm away and -10 so is pretty rigid :( Thanks Kenny!
these alternators don't need an exciter like earlier ones (williams etc). The charge light output it literally that, just an output to turn a light off.
If you look at a standard loom, one of the wires on the plug is blanked.
That explains why it worked last year then without thanks Dan.

Do you know if the 3 metal studs see 12v when alt is running or earths?
 
Yes its probably 1mm away and -10 so is pretty rigid :( Thanks Kenny!

That explains why it worked last year then without thanks Dan.

Do you know if the 3 metal studs see 12v when alt is running or earths?

And it's also made by Peugeot/Citroen. ;) bit of pointless info I found on mine when looking.

Thanks for the reply the other day ash may fire some more questions your way when building mine up. When is your first meeting/race.
 
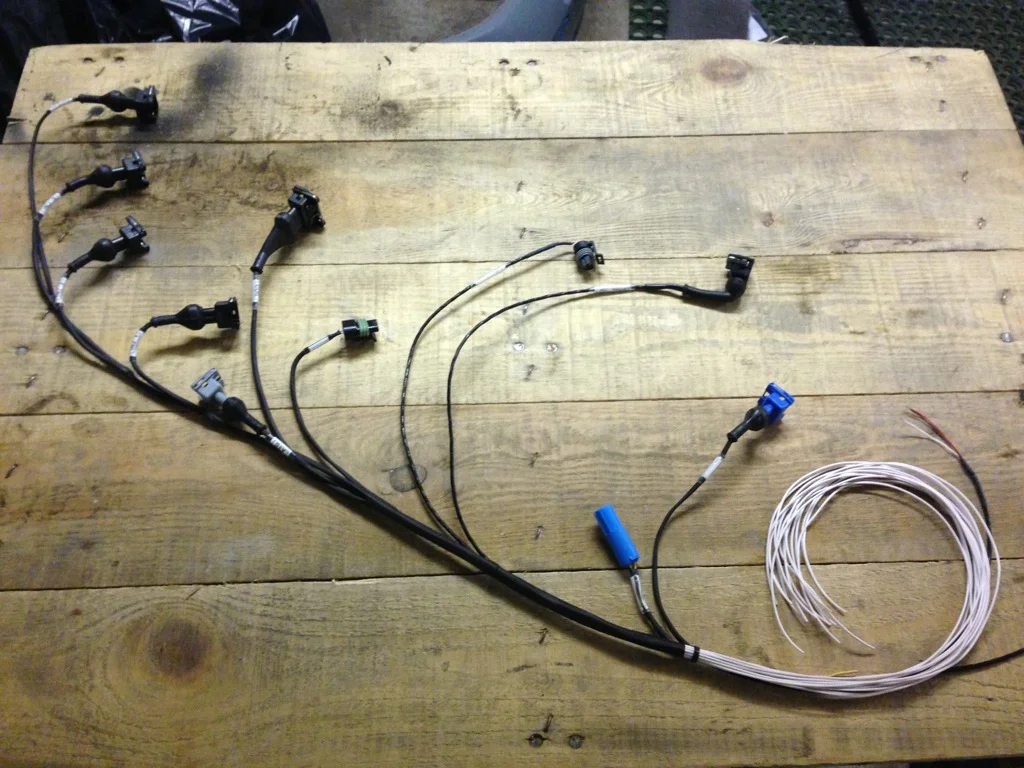
Engine loom finished other than it needs the bulkhead connector putting on the end :)
file_zpsfe46de67.webp


Car is pretty much finished now, few odd's and ends to finish tomorrow and then next week when I have a few more days off I will take it down to Freds, connectors on and mapped and then good to go!
 
these alternators don't need an exciter like earlier ones (williams etc). The charge light output it literally that, just an output to turn a light off.
If you look at a standard loom, one of the wires on the plug is blanked.

Ahhaa, didnt realise these where a single wire type. I've wired my car to take a 3-wire if needs be but it can easily be changed to suit a single wire. May go for a smaller (lightweight) alternator at some point.
 
Engine loom finished other than it needs the bulkhead connector putting on the end :)

file_zpsfe46de67.webp


Car is pretty much finished now, few odd's and ends to finish tomorrow and then next week when I have a few more days off I will take it down to Freds, connectors on and mapped and then good to go!

Looking good, what type of wire have you used, Raychem 44 or 55 ?
 
Looks very tidy James!
Thanks Dan :) Still might be dragging it with me to the Ring can't decide
Looking good, what type of wire have you used, Raychem 44 or 55 ?
Thanks Kenny! I didn't use Raychem in the end looked at it fairly extensively but just chose thinwall pvc wire in the end, for what i'm doing it should be fine (I hope ;))

I wish I had used Raychem heatshrink for the engine loom though although it only took a few hours to do so could always make another and keep this as a spare.
 
Why do you wish you'd used different heatshrink?
DR25 is the mainstay of Motorsport looms but its very expensive and probably overkill for most applications.

I've been using a tyco heatshrink (not sure who owns who but they're linked with Raychem anyway) can't recall the part number off hand but its pretty reasonably priced and it's good quality. I tested some of in a tub of petrol, left it for 2 days and its still ok so I'm sure it'll cope fine with the odd splash of fuel, oil etc.
 
Why do you wish you'd used different heatshrink?
DR25 is the mainstay of Motorsport looms but its very expensive and probably overkill for most applications.

I've been using a tyco heatshrink (not sure who owns who but they're linked with Raychem anyway) can't recall the part number off hand but its pretty reasonably priced and it's good quality. I tested some of in a tub of petrol, left it for 2 days and its still ok so I'm sure it'll cope fine with the odd splash of fuel, oil etc.
TDF did my original engine loom in DR25 and it just seem to remain a little more flexible and also shrinks down in a uniform shape. The motorsport electronics guy who's doing the connectors for me uses tyco for all his stuff so i'm sure you'll be fine :)
Bring it to the ring James, you know you want too ;)
I want to but not sure I can be bothered with all that towing lol
 
The difference in flexibility could also be down to how the loom is built, ideally all the cores want to be laid in concentricly twisted layers, each one in the opposite direction from the previous. If your a professional loom builder then this will be second nature but for your average Joe, quite tricky and time consuming.
I've done small sections like this before but I dont think I'll attempt it for all the looms i've got to do for this car.
I have another plan which should result in a flexible loom, be fluid proof and be easier to assemble.
I'll wait and see what it turns out like before I disclose anymore ;)
 
The difference in flexibility could also be down to how the loom is built, ideally all the cores want to be laid in concentricly twisted layers, each one in the opposite direction from the previous. If your a professional loom builder then this will be second nature but for your average Joe, quite tricky and time consuming.
I've done small sections like this before but I dont think I'll attempt it for all the looms i've got to do for this car.
I have another plan which should result in a flexible loom, be fluid proof and be easier to assemble.
I'll wait and see what it turns out like before I disclose anymore ;)
Could be although the old engine loom was just laid in the same way I have done this one but I suppose the Raychem wire TDF used could of also added to the flexibility. Will be good to see what you do :) Getting rid of the stock loom was definitely the way to go.
warning light on a race car - if it comes on, you've already lost the race, therefore a bit pointless no?

Pointless for it helping to finish a race but if it saves other damage that costs money then no :) I didn't bother with the alternator warning light though
these look epic
Thanks hopefully they are as good as the ones I had last year as they were very good!
 
I've not raced my Clio, but when I'm in the zone on a trackday and driving quickly I would be too busy to look at a dash!

Looking forward to seeing the next update!
 
I've not raced my Clio, but when I'm in the zone on a trackday and driving quickly I would be too busy to look at a dash!

Looking forward to seeing the next update!

You'd be surprised, I waved to Dan and his mate, as I picked them out at Combe going into Camp corner lol.
 
Update time!

Right so it was the end of February since I did a proper update on here so sorry if you have seen this stuff on facebook as I know thats been busy recently which is great :)

The main things that have been going on are the slow jobs of making little brackets and the wiring. I'm going to let the pictures do the talking but I will warn you there certainly are alot of photos!

Critical controls on small control panel
file_zpsa95ff841.webp

Bracket made for oil catch tank
file_zps41937ab8.webp

Bracket made for switch panel
file_zpsac4e809f.webp


Wraping the new bumper courtesy of BTM ;)
file_zps14f05063.webp


file_zps0b3b3d45.webp

Fibreglass boot fitted and wrapped
file_zps7e29814e.webp

Switch panel powdercoated and labelled
file_zps9204b409.webp


Gearbox mount cut down
file_zpsbca5b94b.webp

Catch tank mounted
file_zps85de68cc.webp


False floors for electronics on passenger side and to give flat floor for drivers side
file_zps2cd41f05.webp


Making a start on running the looms
file_zps6a77bf0d.webp


file_zps44f37418.webp


file_zps69a4b9e1.webp


Lots of time spent planning and writing out what wires go where etc
file_zps94ddea6a.webp


Fibreglass doors thanks to CMComposites
file_zps97e1563c.webp


Fancy bleed valves to try and avoid the need for new callipers
file_zpsfc6c5d00.webp


file_zps1e99deb5.webp


New door cards supplied by CMComposites
file_zpsa36e4a8a.webp


More looming
file_zpsf54f6bd3.webp


file_zps90b41ece.webp


file_zpsedd08e01.webp


file_zpsbfc224b1.webp


file_zpsea836ce3.webp


file_zpsd251a3ba.webp


file_zpsf07a915b.webp


file_zpsa461074d.webp


file_zpsa56bc0f2.webp


file_zps3766fc61.webp


file_zps3a6cedfd.webp


Connectors for heated screen
file_zps606c60e9.webp


Earths
file_zps1a84d5e3.webp


Connectors to make the dash simple to remove
file_zps3c44c19c.webp


file_zps4cb2292e.webp


file_zps0afb9faa.webp


Pit to car radio arrives
file_zps11595c2d.webp


False floors laquered
file_zpsa4f1ae72.webp


Finally time to get the car outside
file_zpsc0499553.webp


file_zpsa7e6ddb2.webp


file_zps85251c56.webp


file_zps021a370e.webp


Making battery cables
file_zpscca561e1.webp

Fuse and relay board
file_zps42d5a428.webp


Mess in progress
file_zps4cf731a4.webp


Working out the best layout
file_zps90c0525d.webp


Fitting pit to car radio
file_zpsd2292ca0.webp


Fitting fibreglass doors
file_zps43da4715.webp


Got to keep well fed on BBQ's ;)
file_zpsfdb3e0c6.webp


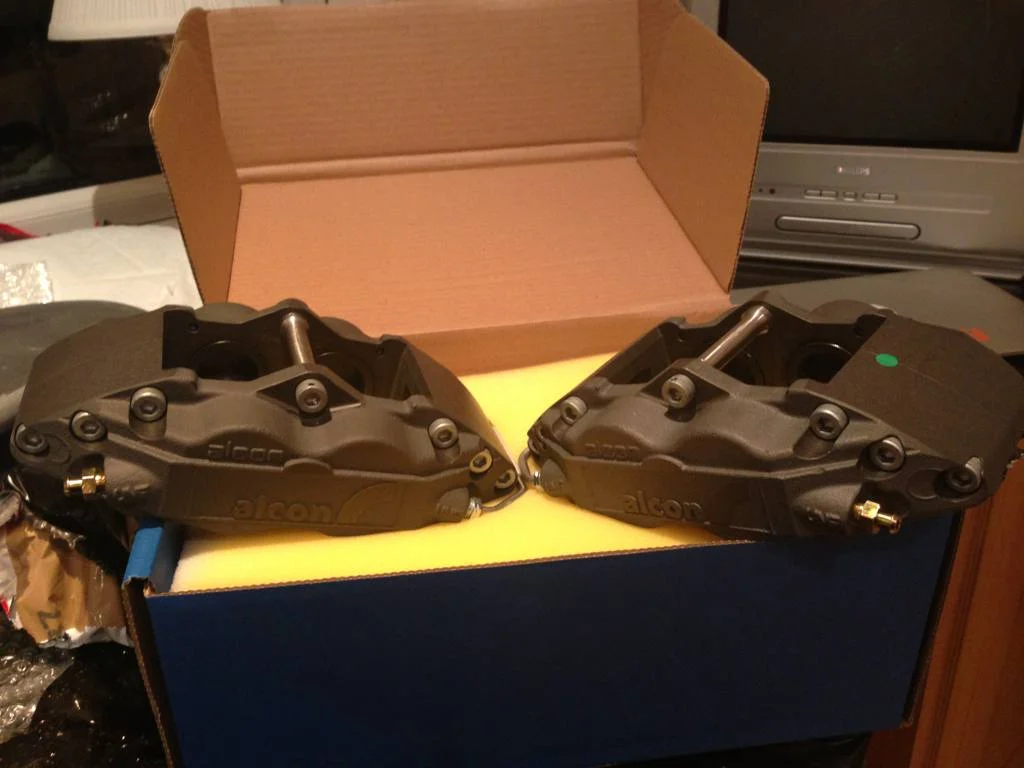
Had to resort to buying new callipers
file_zpsa14122bd.webp


Helmet kit for pit to car radio
file_zpsd36d48c1.webp


Rivnutting floor to allow quick and easy access to change any components
file_zps4957cfa8.webp


file_zpsce6bf35c.webp


file_zps21c77a40.webp


Fitting the transponder
file_zps9cd6c47f.webp


file_zps06858a3b.webp


file_zpsc2908f71.webp


Engine loom
file_zps34a0efd5.webp


file_zps7e5c229b.webp


Repairing the car
file_zps00daaed2.webp


file_zps4aaafc38.webp


file_zps58046692.webp


file_zps44922182.webp


file_zpsd2081d2d.webp


file_zpsc4027ee6.webp


file_zps84245903.webp


Battery cables
file_zps28eeb525.webp

Making a proper bracket for the datalogger instead of using sticky tape like last year
file_zps703ee29f.webp


file_zps8bfda5b0.webp


file_zps656fcfc1.webp


file_zpsb9ebd8af.webp


file_zpsc7b107fe.webp


Fibreglass doors wrapped
file_zpsc4b68b70.webp


Sprayshack bonnet on :) Has to be on of my favourite parts on the car!
file_zps78dc67c6.webp


file_zps5d415c7f.webp


Door cards fitted
file_zpsaeb3087e.webp


Cleaning off all the months of dust
file_zpsbe4e5f72.webp

Inside complete bar wiring connectors
file_zps2ae951cd.webp


file_zps241c57d8.webp


file_zps254ed802.webp


So that's the car pretty much finished! It will get the connectors fitted onto the loom in the next couple of weeks and then can be mapped. Sprayshack are just doing a few bits for me and then hopefully RiadArianeMedia can get some great shots of the car complete before I go and have some fun in it! Mapping/shake down should happen at either an airfield or Teeside and then onto Cadwell to learn the circuit/ test the car ready for the first race.

It has taken alot longer than I planned and cost more than I wanted to spend but I just wanted to be right! I'm really happy with the final outcome and a massive thanks to all the support and also the help along the way to name just a few, Fred@BTM, Simon@Sprayshack, Rob@RGEngineering, Chris@CMComposites, Jay, Mark, Chip, Mick and many many others I look forward to seeing you all out there for the rest of the season and fingers crossed it goes much smoother than last year.

Just a reminder the racing calendar for the car this year is a mixture of CSCC Tintops and also French trophy events and goes as follows:

30th June Cadwell Park CSCC
3rd August Mallory Park French Trophy
24th August Donington CSCC
31st August Cadwell Park French Trophy

21st September Oulton CSCC
28th September Oulton French Trophy

Cadwell should be great, i'm taking a few days off work and really making a weekend of it so all are welcome to come and join in will be taking the BBQ and having a good catch up and I know lots of people are coming along so will be a good to see even more faces along if you fancy it!


Finally time for me to go on holiday for a few days and have a break (Don't worry still car orientated ;)) Thanks for reading as always really appreciate the support and feedback whether good or bad.

James :)
 
Amazing work there James, the attention to detail is out of this world. It seems a shame to drive it on track lol

Good luck for the racing season mate, hopefully get to see this car in the metal prior to Spa at some point.

 
Really nice James. Attention to detail is superb (if a little over the top) but that's up to you and obviously gives you pride and satisfaction, so fair play to you mate.
 
Back
Top