ClioSport.net

This is a sample guest message. Register a free account today to become a member! Once signed in, you'll be able to participate on this site by adding your own topics and posts, as well as connect with other members through your own private inbox!

  • When you purchase through links on our site, we may earn an affiliate commission. Read more here.

MK 1 Old School... Turbo

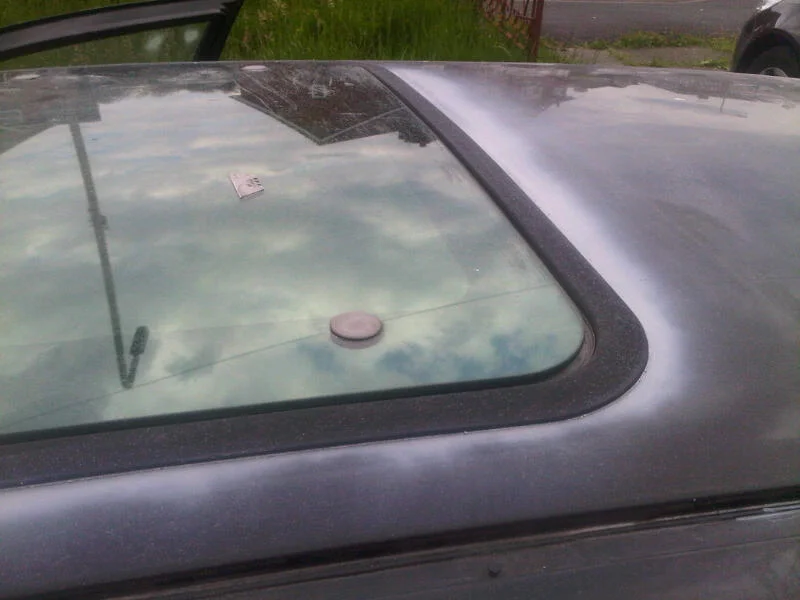
sunroof bonded in

IMG00614-20120620-1716.webp


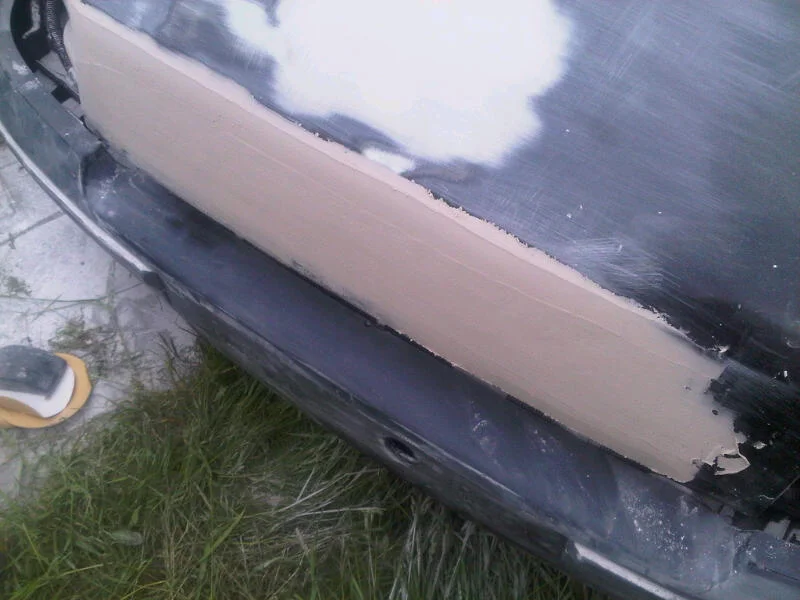
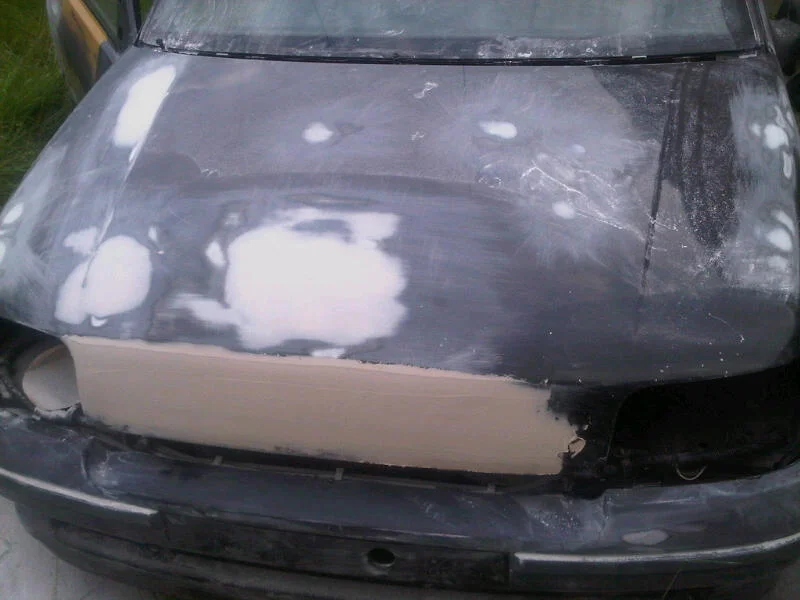
bonnet filled

IMG00613-20120620-1716.webp


IMG00612-20120620-1716.webp


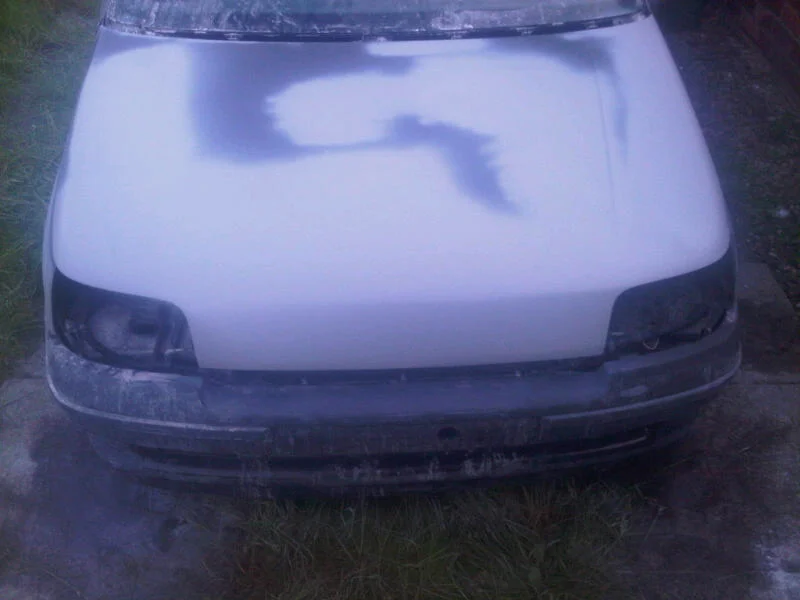
bonnet primed, just needs guidecoating and the line straightening up, few pin holes to fill in aswell

IMG00618-20120620-2007.webp
 
bit of work today before the football. making sure everything fits properly now, so when i come to rebuilt it when its painted, i aint gonna scratch anything messing about.
adjusted bonnet,
fit hockey sticks,
ph2 grille ive had to modify slightly as i have no way of mounting it with the angel eyes. ive had to fabricate a couple of little rubber mounts to go on the bumper, then it will be screwed and fixed to the bumper.
headlights all working fine,
sunroof aint leaking,
centre console in roof all fit back together and painted black.

considering spraying the top dash black and the A pillar trims too along with the sil trims. i want all the inside as black as possible! few pics i took today, its getting there! back bumper needs mounting properly tomorrow, i know its on the piss

DSCF2822.webp


DSCF2824.webp


DSCF2826.webp


DSCF2832.webp


DSCF2837.webp


DSCF2841.webp


DSCF2842.webp


DSCF2843.webp


DSCF2844.webp


DSCF2845.webp


also anyone know what make of springs these are?

DSCF2831.webp
 
pmsl aint my house, its the old mans, only moved in last sunday, ive done the back garden and the front garden, just aint touched the side as its rained all week :\
 
pmsl it still leaked??? what you do, rivet and bond it?

i did have a sheet of perspex i was gonna cut down to size and bolt/bond it down, but i just went for cutting it all out and resealing it, ill probably need to do it again next year!

Tiger seal and rivets yup, still leaked !
 
just got back from matbrowns yard, pretty f**king epic back garden tbh! lol, cheers for the stuff mate

few progress pics from today, managed to get 1 side done ready for painting. the yellow primer had been on for a couple of years and not flatted, my god it was such a b**ch to wetsand!

bought me a new tube of stopper aswell, £12, bye pinholes!

DSCN0809.webp


rear quarter flatted n cleaned

DSCN0797.webp


inner door scotched n scratches sanded out, primed, flatted

DSCN0799.webp


door flatted, nightmare to do, ended up putting a bit more primer on as there was scratches to flat out

DSCN0802.webp


quarter done

DSCN0810.webp


door done

DSCN0811.webp


wing done

DSCN0812.webp


stuff i bought today

- battery
- carpet
- boot carpet
- inner quarter plastics
- inner arch carpets
- boot carpet
- parcel shelf
- subframes for seats

tomorrow i gotta hoover the carpet, fit that, fit subframes n seats, fit boot carpet, quarter plastics, parcel shelf. then if i get time ill flat the bonnet, other side of the car and the roof. wednesday ill do the bumpers and just go over everything. should be ready to paint by wednesday if the weathers good
 
looking good my friend, when i saw that that yellow primer hadnt been flatted i felt like commenting there and then but i thought i would carry on reading lol take it you do body repair and prep? currently what im doing. coming along nice tho matey looking forward to seeing it in paint
 
cheers dude. yeah body repairer since i left school 12 years ago, can paint too, but most places ive worked ive mostly done repairs. how long you been doing bodywork?
 
monster day, im knackered!

new stuffs

DSCF2850.webp


DSCF2851.webp


DSCF2852.webp


DSCF2853.webp


DSCF2854.webp


carpet cleaned

DSCF2855.webp


DSCF2848.webp


DSCF2856.webp


DSCF2865.webp


dirty console, cleaned with no bucket method, tea towel and flash spray

DSCF2858.webp


DSCF2863.webp


alloy footrest plate removed and old one cleaned up, looks better i think

DSCF2864.webp


seats in carpet in

DSCF2869.webp


DSCF2868.webp


DSCF2867.webp


DSCF2870.webp


DSCF2871.webp


carpet has no marks or real wear and tear tbh, comes up immaculate, same with seats, no signs of wear, no rips or anything, interior looks good!, just need to tidy the dash up, gonna paint top dash black i think along with sil section trims and A pillar trims

bit sketchy going under there to do up the subframe nuts lol

DSCF2866.webp


rear quarter plastics in, belts in,although i have no idea where it anchors down

DSCF2874.webp


DSCF2876.webp


where the f**k does this bolt too??? i looked under seats, on rear quarter, couldnt see it?

DSCF2875.webp


hooked the new battery up too to test stuff and everything is working as it should except the clock, dunno wtf is up with it, makes a noise but dont move :S

tommorrow im gonna carry on with the wetsanding, hoover the boot carpet and fit that with the arch carpets

 
i must have sat in my boot for about 30 minutes trying to get the rear belt to open up for me so i could thread it though the quarter plastic. the buckle was like an inch away from the actual reel and no matter what angle i put it, it just would not reel out -.- nightmare
 
I can't help you there mate, i've never touched a rear belt in a mk1.

pm Russ16v. iirc, he stripped his mk1.
 
where the f**k does this bolt too??? i looked under seats, on rear quarter, couldnt see it?

DSCF2875.webp


hooked the new battery up too to test stuff and everything is working as it should except the clock, dunno wtf is up with it, makes a noise but dont move :S

tommorrow im gonna carry on with the wetsanding, hoover the boot carpet and fit that with the arch carpets[/QUOTE]

If you look just infront of the rear seat upright with the lower part lifted/removed you will see the mounting point, even more noticeable if you had the rear doorcards as it goes though them.
 
actually! im guessing its behind my ally quarter sheet if it goes through original plastic trim? does it bolt to the inner arch skin? and come up through the quarter plastic?
 
been doing repair and prep work for about a year now mate, all i work on tho is prestige vehicles, mercedes, porsche lambos that type of thing
 
haha only way ive learnt mate is being thrown in at the deep end, im a fully tained technician aswell longed it out at college for all that shizzle, left school a year early to do that, and never thought having all the grades etc for mechanical i would end up body shop but oh well moneys money i spose, i enjoy it just not endless amounts of filler work pin holes to ruin all your flatting etc, Dash wise what paint you thinking of using might join you on painting that?
 
gonna just give it a grey scotch in some soapy water, get rid of any silicone. panel wipe, then i reckon itd be alright using just satin/matt black paint. parts aint gonna be moved at all, rarely touched. think the only movement from the dash will be from bumps in the road and engine vibration, should be fine!

ill be using these on my trim pieces and top dash http://www.ebay.co.uk/itm/x2-SIMONI...ssories_Car_Care_Cleaning&hash=item43a8d411e9

gave a nice finish on my centre console in the roof
 
done a bit of work today, just the bonnet, started late n i was volunteered to cook the tea, for 8! spag bol it was :P

ran out of primer so could only go over bits of baremetal and a few other places, couple more tins ordered


how it was

IMAG0002.webp


wetflatting progress, sanding out scratches, lots of scratches

IMAG0003.webp


getting my line straight

IMAG0004.webp


IMAG0005.webp


flatted

IMAG0006.webp


stone chips filled with stopper

IMAG0007.webp


primering

IMG00765-20120627-2057.webp


and how i left it for tonight

IMAG0009.webp


busy tomorrow, so friday ill hopefully have the primer and ill be able to finish that off and the front where the badge was, then sand the side. the side looks alright tbh, hoping it will sand down nicely, definatly wish id have just put a new bonnet on it now, but then again id still have had to fill dents and took out chips, so i guess the effort was worth it

pic of my daughter playing with my sisters new cat, Boo!

IMAG0001.webp
 
Really good read mate! The new carpet came up really nicely too, and I cant wait to see more :)

(im also jealous of the kitten)
 
woahh lots of stopper, ive only ever been taught to use stopper very very finely just as to fill in the chip, ( call it chipping up ) then wet flat, yours looks so thick :S progress is good tho man
 
woahh lots of stopper, ive only ever been taught to use stopper very very finely just as to fill in the chip, ( call it chipping up ) then wet flat, yours looks so thick :S progress is good tho man

yeah you should only really use it as a really tight skim, and you put in 2 or 3 tight skims to fill a chip. but it was getting late + im lazy and i just wanted it filled in 1 go, so made it a little thicker
 
goodies

new spray gun, bargain at £23, pots big too (600m). fully adjustable, 1.4 nozzle, filter pot inside the cup.
new exhaust rubber mount
couple cans of black spraypaint for painting topdash, other plastics, scuttle, door handles, boot lock etc
and few tak rags for when im painting

IMAG0017.webp
 
another monster day -.-

----

top dash out

IMAG0030-1.webp


quarter plastic out

IMAG0031-1.webp


dash painted

IMAG0033-1.webp


colour compared to original colour (same as quarter plastic)

IMAG0032-1.webp


refit, i think it came out mint tbh, looks awesome, freshens the dash up

IMAG0037-1.webp


IMAG0038.webp


IMAG0040.webp


IMAG0044.webp


shoulda cleaned my window really lol

IMAG0045.webp


quarter plastic painted and fit, again, looks great i think

IMAG0052.webp


IMAG0050.webp


from grey

IMAG0053.webp


to black

IMAG0055.webp


how the boot looked

IMAG0056.webp


side carpet in, battery earthed

IMAG0058.webp


carpet in, other side carpet in, parcel shelf in

IMAG0060.webp


then i went onto the prepping

appature prepped ready to paint

IMAG0069.webp


door flatted, i remember i only put 1 coat of primer on this so it rubbed off so quick :\

IMAG0070.webp


wing flatted

IMAG0071.webp


both reprimed, literally just gonna scuffpad them over and they will be ready to paint

IMAG0072.webp


tomorrow gonna flat the quarter, tailgate, 2 bumpers and roof, then itll be ready to paint
 
cheers dude!

ok, FINALLY, the car is ready to paint :D finished everything off today

quarter flatted, chips filled

IMAG0080.webp


roof flatted

IMAG0082.webp


IMAG0083.webp


IMAG0085.webp


roof scratches filled n couple of chips

IMAG0086.webp


quarter reprimed

IMAG0088.webp


bonnet primed

IMAG0091.webp


back bumper flatted and chips filled

IMAG0092.webp


bumper reprimed, has been flatted n its ready for paint

IMAG0095.webp


front bumper flatted n primer, has been flatted aswell ready to paint

IMAG0099.webp


entire car gone over with P500 scuffpad wet just to get rid of any overspray from primer and to scuff any bits i'd missed previously

IMAG0103.webp


car cleaned, 1 bowl with fairy liquid method

IMAG0105.webp


IMAG0106.webp


IMAG0107.webp


IMAG0108.webp


IMAG0109.webp


paints being bought next week, vauxhall glacier white. need to get few other bits aswell, hardener, panel wipe, thinners, masking paper, masking tape. then its going to my cousins not this friday, next friday and ill be painting it all over the weekend, excited!
 
heater matrix came today, rapid delivery from GSF car parts and also the cheapest around!

IMAG0128.webp


dash out n pulled forward following the guide on williamsclio. never really done anything as extensive as this before, but i managed it. was a ballache to get it out, but it went back in nice n easy, just gotta get some coolant now and flush the system properly

IMAG0131.webp


IMAG0132.webp


old one out, compared to new one

IMAG0135.webp


in total, probably took me an hour n 15 minutes to take the old one out and put the new one in, aint fitted the dash back together yet as i wanna run boost pipes through the dash
 
oh and the sunroofs still f**king leaking haha

ive found that its coming in at the actual glass, it dont sit flush with the rubber seal, theres a small gap and its running down to the inside. dunno what im gonna do yet
 
Back
Top