Thought i had better start to make a progress report, i have about 200 hundred pictures so far so need to find somewhere to upload them LOL!
1. looking around for a sutiable car had to be a psh1 172 didnt want to spend too much but wanted a lower mile chasis in a genral good condition, looked at a few then found a black 172 phs1, 50k on the clock, good price and no rust, excesivle worn parts etc,
2. got the car brought it home and started to strip it down, first off the wheels, sold on ebay then other odds and sods, cd changer etc.
3. at first i had decided to go for a light engine tune, cams, inlets and a remap.....so i didnt want to take the car down to AWT so decided to strip the engine out, that way i could give the bulk head a good clean etc!
so engine out;
1. Get a suitable work space, using a cracker bar loosen but do not remove the wheel nuts, then take your 21 mm swan neck spanner and crack the top mounts of the suspension, jack the car up at the front end and secure with axel stands giving a decent amount of height.
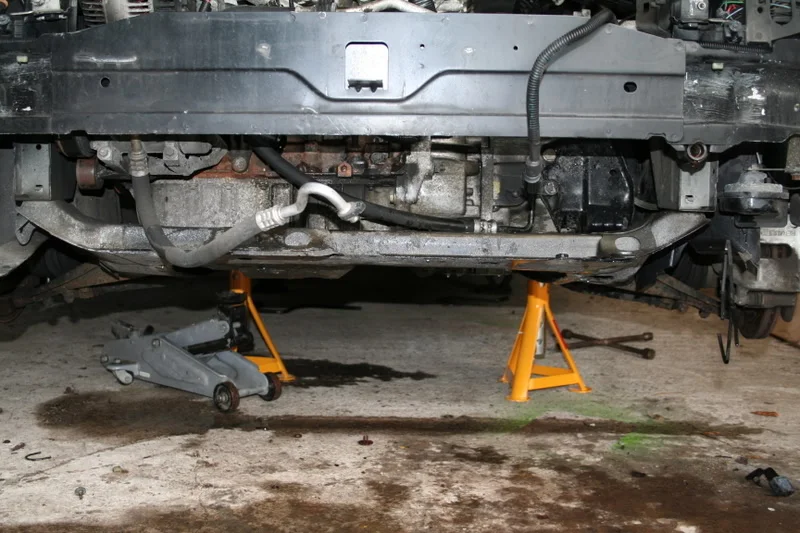
Remove the front bumper. to do this firstly remove the top grill which is held in by two push pins, then under the front of each wheel arch there is a 10mm bolt (its hard to find but common sense would lead you to it) then under the car remove the sump cover (4 x 10 mm bolts) then there should be a further two bolts holding the bumper on attached the sub frame. ***note if you have an mrk1 172 there is two extra 10mm bolts holding the bumper on just below the lights.
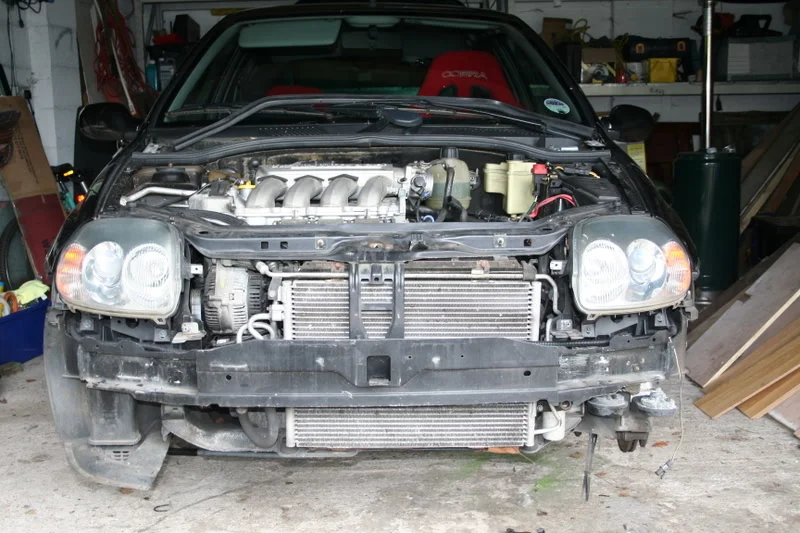
then i removed both radiators,
With the bumper off return to the engine bay and remove the air box, induction bend and vacuum hose, mrk2 172 there is 3-4 10mm bolts holding the box in place and the mrk1 172 is just a rubber strap holding it of, the vacuum hose will pull put and the elbow is secured via a Jubilee clip.
Then remove the battery (this is held in by a 16mm bolt on the right-hand side (you will need an extension bar for your socket) once that is removed remove (or move right over the ECU bract and ecu (this is held down by a number of 10mm bolts remove them all and whip ALL THE BLACK BRACKETRY out.
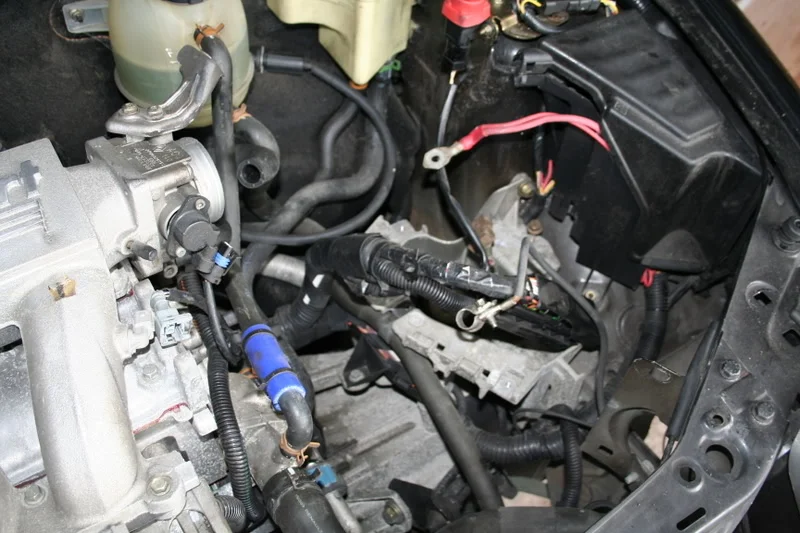
Now (with the engine stone cold) get a pair of mole grips and remove the clip holding the water hose to the lower part of the radiator, the water should empty for about 30 seconds, I removed the other water hose around the gearbox too just for ease of access. The this bit is a pain in the arse = look in the pic at fig 2 these are the in and out for the heater matrix the pipes are held in buy clips that need depressing on either side (there hard but once there both in the hose will pull out.
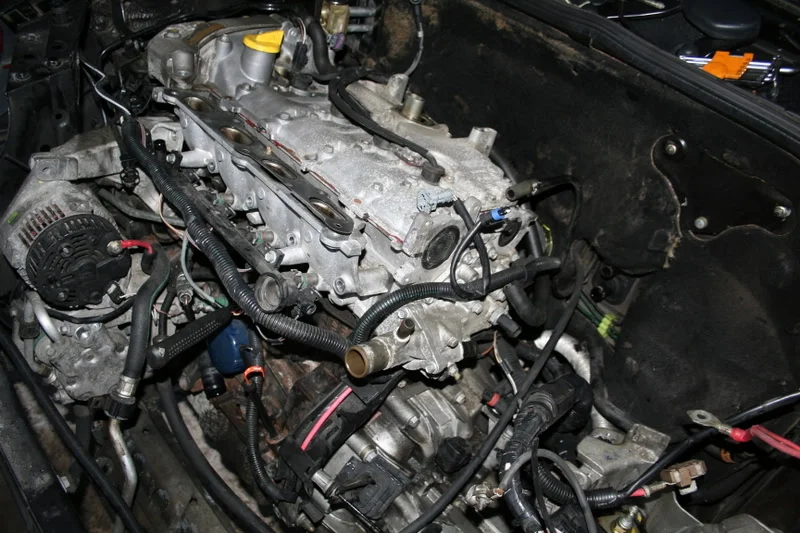
Next remove the Dog bone mount on either side 13 or 16mm bolts then just leave it to hang (the dog bone mount is under the engine and is bolts to the gearbox and sub frame)
Back under the car – remove the exhaust from the cat back (DO NOT REMOVE THE CAT AS THERE A PAIN TO DO)Then remove the gear selector rod (13mm bolt and it just pulls off)
Then at the back of the engine is the exhaust manifold. This held on buy around 8-10.... 10mm bolts remove all these (people all ways get stock on the driver side one as it a bit to find let alone remove) once there all off the manifold should just come of with ease if not a little tap to free it, if it doesn’t then don’t force it you will have missed a bolt!
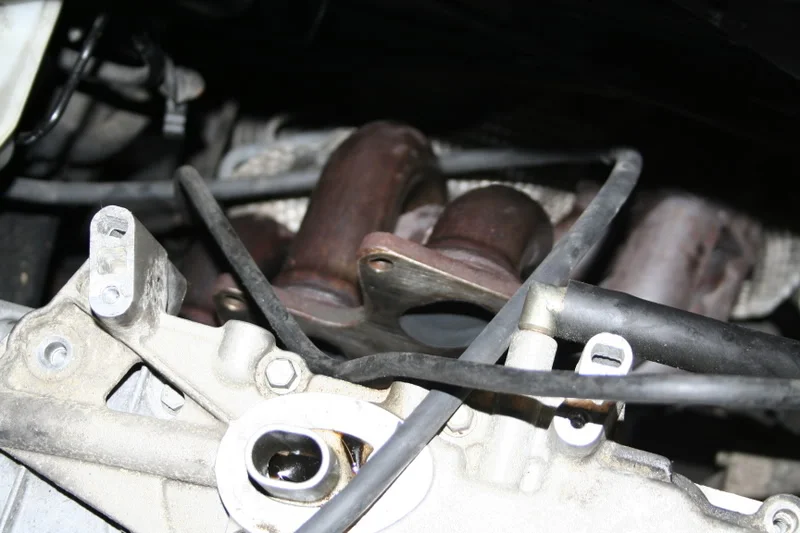
Back under the car take an oil pan and a your 8mm sump key to drain the gearbox oil and the engine oil.
Then remove the 4 16mm nuts on the top mount don’t remove the whole mount just the 4 nuts
Back down the hubs now remove the track rod arms (13mm) bolt to do this either take a trolley jack and jack the base of the joint where it mounts the hub (DO NOT JACK THE METAL ROD) this will allow you to remove the 13mm bolt if you don’t jack it up the bolt will just spin and spin!
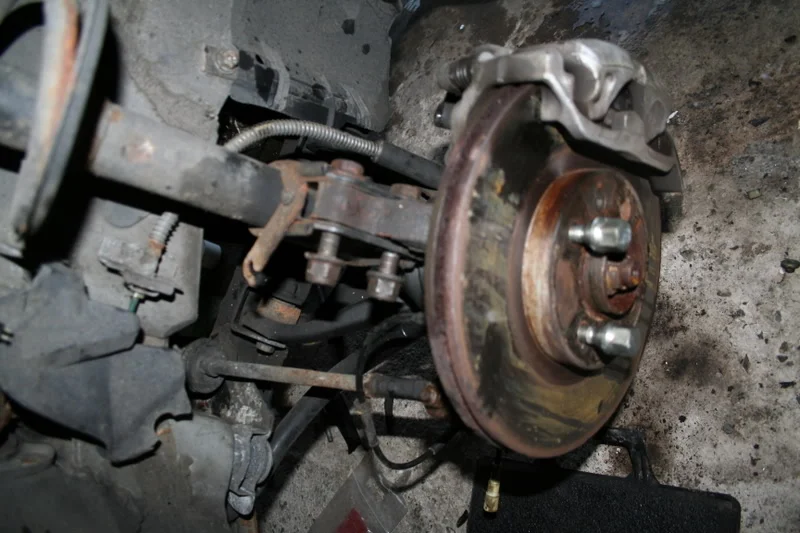
Now remove the brake calliper and the brake disk and unclip the ABS plug (you must know how to do this ) just leave the calliper dangling on the hose it should be fine you can remove it if you want but you will have to bleed the brakes.
Then remove both sides of the suspension (2x 19 or 20mm bolts on each side) and the top nut that you previously crack will just spin off. Pull the shocks out and leave it assembled.Then under the hub there is two 17 or 18 mm bolts remove these and remove the drive shaft (on the drivers side it will just slide out) BUT DO NOT REMOVE THE HUB ON THE PASSENGER SIDE UNTILL YOU HAVE REMOVED THE 3 10MM OR 13MM BOLTS HOLDING THE SHAFT SEAL TO THE GEARBOX!!!
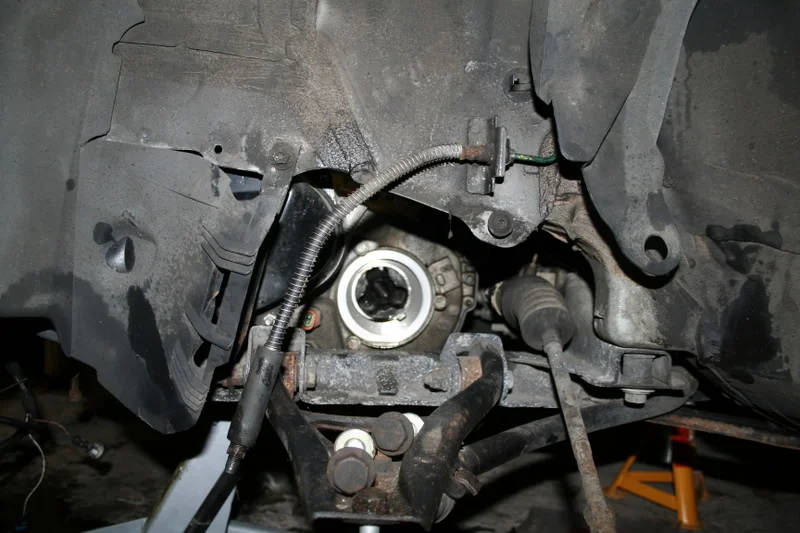
Now take a bit of wood 20cm by 20cm is fin, place the wood onto of the trolley jack and support the underside of the gearbox DONT PUSH IT UP JUST TAKE A TINY BIT IF THE WIEGHT!
Now remove the lower gearbox mount, it bolts through the bottom of the sub frame into a bracket on the box. Remove the nut from under the frame and then remove all the nuts holding it to the box. The mount won’t come off yet as the thread will be going though the sub frame but later on all will come clear. But make sure all the bolts are off and the earth strap is removed.
then remove all the loom clips etc, any hoses, PAS lines, i also removed the AUX belt, alternator, air-con etc.
then i got a tow rope and wrapped it round the engine.
took my trusty clarke engine crane and started lifting the block out, once it was out i removed the box then dropped the engine on a sheet of wood!
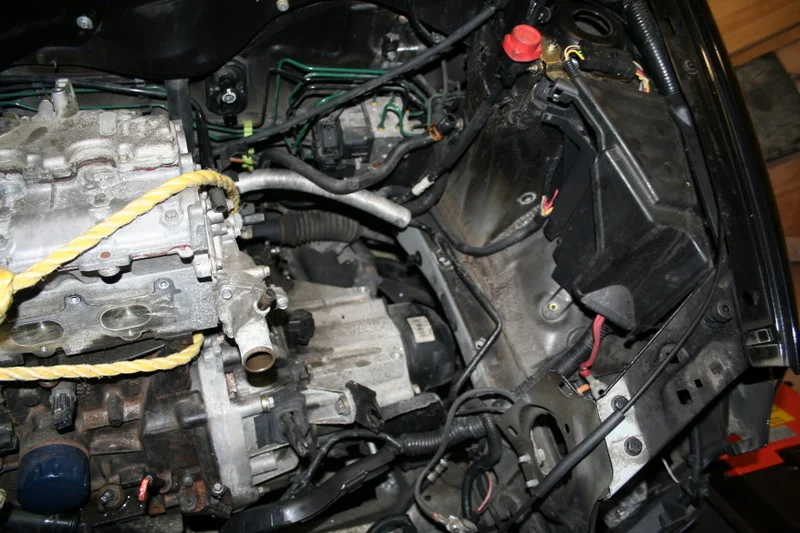
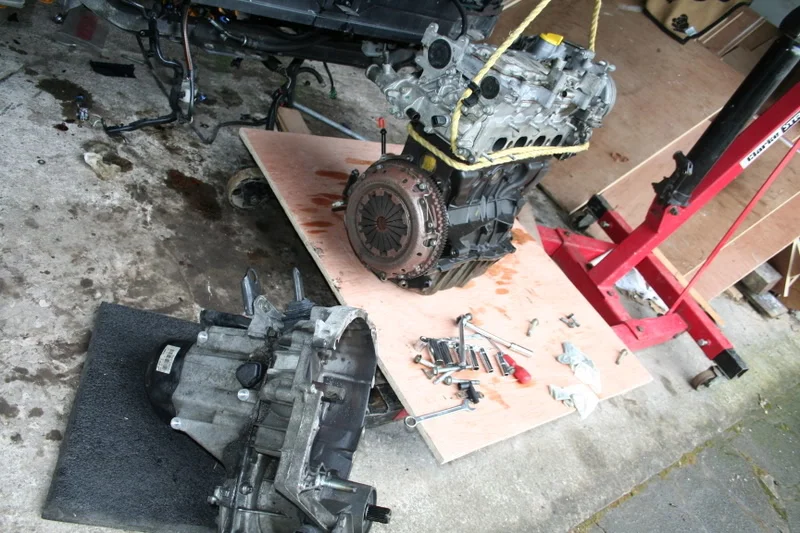
woooohooo!
next
1. looking around for a sutiable car had to be a psh1 172 didnt want to spend too much but wanted a lower mile chasis in a genral good condition, looked at a few then found a black 172 phs1, 50k on the clock, good price and no rust, excesivle worn parts etc,
2. got the car brought it home and started to strip it down, first off the wheels, sold on ebay
then other odds and sods, cd changer etc.3. at first i had decided to go for a light engine tune, cams, inlets and a remap.....so i didnt want to take the car down to AWT so decided to strip the engine out, that way i could give the bulk head a good clean etc!
so engine out;
1. Get a suitable work space, using a cracker bar loosen but do not remove the wheel nuts, then take your 21 mm swan neck spanner and crack the top mounts of the suspension, jack the car up at the front end and secure with axel stands giving a decent amount of height.
Remove the front bumper. to do this firstly remove the top grill which is held in by two push pins, then under the front of each wheel arch there is a 10mm bolt (its hard to find but common sense would lead you to it) then under the car remove the sump cover (4 x 10 mm bolts) then there should be a further two bolts holding the bumper on attached the sub frame. ***note if you have an mrk1 172 there is two extra 10mm bolts holding the bumper on just below the lights.
then i removed both radiators,
With the bumper off return to the engine bay and remove the air box, induction bend and vacuum hose, mrk2 172 there is 3-4 10mm bolts holding the box in place and the mrk1 172 is just a rubber strap holding it of, the vacuum hose will pull put and the elbow is secured via a Jubilee clip.
Then remove the battery (this is held in by a 16mm bolt on the right-hand side (you will need an extension bar for your socket) once that is removed remove (or move right over the ECU bract and ecu (this is held down by a number of 10mm bolts remove them all and whip ALL THE BLACK BRACKETRY out.
Now (with the engine stone cold) get a pair of mole grips and remove the clip holding the water hose to the lower part of the radiator, the water should empty for about 30 seconds, I removed the other water hose around the gearbox too just for ease of access. The this bit is a pain in the arse = look in the pic at fig 2 these are the in and out for the heater matrix the pipes are held in buy clips that need depressing on either side (there hard but once there both in the hose will pull out.
Next remove the Dog bone mount on either side 13 or 16mm bolts then just leave it to hang (the dog bone mount is under the engine and is bolts to the gearbox and sub frame)
Back under the car – remove the exhaust from the cat back (DO NOT REMOVE THE CAT AS THERE A PAIN TO DO)Then remove the gear selector rod (13mm bolt and it just pulls off)
Then at the back of the engine is the exhaust manifold. This held on buy around 8-10.... 10mm bolts remove all these (people all ways get stock on the driver side one as it a bit to find let alone remove) once there all off the manifold should just come of with ease if not a little tap to free it, if it doesn’t then don’t force it you will have missed a bolt!
Back under the car take an oil pan and a your 8mm sump key to drain the gearbox oil and the engine oil.
Then remove the 4 16mm nuts on the top mount don’t remove the whole mount just the 4 nuts
Back down the hubs now remove the track rod arms (13mm) bolt to do this either take a trolley jack and jack the base of the joint where it mounts the hub (DO NOT JACK THE METAL ROD) this will allow you to remove the 13mm bolt if you don’t jack it up the bolt will just spin and spin!
Now remove the brake calliper and the brake disk and unclip the ABS plug (you must know how to do this
) just leave the calliper dangling on the hose it should be fine you can remove it if you want but you will have to bleed the brakes.Then remove both sides of the suspension (2x 19 or 20mm bolts on each side) and the top nut that you previously crack will just spin off. Pull the shocks out and leave it assembled.Then under the hub there is two 17 or 18 mm bolts remove these and remove the drive shaft (on the drivers side it will just slide out) BUT DO NOT REMOVE THE HUB ON THE PASSENGER SIDE UNTILL YOU HAVE REMOVED THE 3 10MM OR 13MM BOLTS HOLDING THE SHAFT SEAL TO THE GEARBOX!!!
Now take a bit of wood 20cm by 20cm is fin, place the wood onto of the trolley jack and support the underside of the gearbox DONT PUSH IT UP JUST TAKE A TINY BIT IF THE WIEGHT!
Now remove the lower gearbox mount, it bolts through the bottom of the sub frame into a bracket on the box. Remove the nut from under the frame and then remove all the nuts holding it to the box. The mount won’t come off yet as the thread will be going though the sub frame but later on all will come clear. But make sure all the bolts are off and the earth strap is removed.
then remove all the loom clips etc, any hoses, PAS lines, i also removed the AUX belt, alternator, air-con etc.
then i got a tow rope and wrapped it round the engine.
took my trusty clarke engine crane and started lifting the block out, once it was out i removed the box then dropped the engine on a sheet of wood!
woooohooo!
next