ClioSport.net

Register a free account today to become a member!
Once signed in, you'll be able to participate on this site by adding your own topics and posts, as well as connect with other members through your own private inbox!

  • When you purchase through links on our site, we may earn an affiliate commission. Read more here.

Old Crusty - restoring my rotten BG 182


  Clio 182
Welcome to my 2005 Black Gold 182 track car I've owned since mid 2021. Some people see these cars as cheap disposable track toys, but I haven't been able to own/run a fun car before, so this little 182 has become my pride and joy. And then I found the rust... :oops:

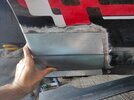
This winter I've replaced the rear end of both sills, but they were nothing compared to the O/S front jacking point. I reeaally should have picked up on this when viewing the car before purchase, as the sills were clearly mashed up, but the side skirt did mask some of the horror:

IMG_20221204_113057.jpg


It's not easy to see from the pic above, but that whole chassis box section was caved in thanks to people assuming it was solid enough to jack the car on - wrong. Bending the metal in like that had allowed the underseal to come unstuck, leaving a void behind and a moisture trap, leading to this:

IMG_20221204_113553.jpg


At this point a wiser man would have probably thought: F* it - re-shell time. But I've already invested a lot of time sorting out this shell, so I didn't want to give up on it. Let's find out how far the rust had spread...

IMG_20221204_122324.jpg


Balls. The main problem here is all the rot extending from the sill pinch weld up into the shell, across several layers of metal - a right arse to reconstruct. The rot you can see in the floorpan above was also deeper than surface rust - it failed the screwdriver test and had to go too.

So after gradually chopping out more and more rotten metal, I decided to call it a day at this point, before I had no car left:

IMG_20221206_131453.jpg
IMG_20221206_131533.jpg


Any remaining rust was surface rust, cleaned back and treated with Hydrate 80. Then it was time to get fabricating and welding. Full disclosure - before tackling these sills, I'd never welded anything before, so I know my attempts are shabby. But I imagine the cost to get a professional to do this job would be huge, so I didn't have much choice but to give it a go myself.

IMG_20221219_173212.jpg


First layer of the metal sandwich ^^

IMG_20221220_152536.jpg


Then another layer stacks in front, plus that curving section that extends up out of sight towards the bulkhead. This seems to be the strongest part of the jacking point, so I reinforced the repair with a small plate across the joint.

IMG_20221223_172044.jpg


Now tackling the inner side. A tapering section of metal was needed to link the box section on the right of the above photo to the almost flat panel on the left. I drilled a couple of drain holes in this just in case water ever gets into that area.

IMG_20230102_172742.jpg


More to follow - I didn't just leave it as a Flintstones car....
 

Cads

ClioSport Club Member
  Elise, Merc C180 Est
I wish I had the minerals to attempt something like this!
Great job mate!
 

Mr Underhill

ClioSport Club Member
Love it!

A mate took his BG to Croft Circuit. He’d spent endless hours polishing it and it looked stunning. A few laps in the back end had collapsed. The rear spring had gone through the chassis leg 🙈

He knew it was a little bit crusty in places but had no idea it was rotten. Sadly there are a lot of polished turds around.

I applaud you for saving yours 👏
 

Louis

I Park Like a C**t
ClioSport Club Member
Love it!

A mate took his BG to Croft Circuit. He’d spent endless hours polishing it and it looked stunning. A few laps in the rear chassis leg collapsed 🙈

He knew it was a little bit crusty in places but had no idea it was rotten. Sadly there are a lot of polished turds around.

I applaud you for saving yours 👏
What do you mean the rear chassis leg? The beam?

Gonna have to see photos of that
 

Mr Underhill

ClioSport Club Member
😂 Oh hello you.

C16EAD43-CB30-4F17-916E-0BC1E713AD2E.jpeg


Probably not the right description but that box section above the spring. This is mine. His is on the FB group somewhere. 2020 around October.
 
  Clio 182
Love it!

A mate took his BG to Croft Circuit. He’d spent endless hours polishing it and it looked stunning. A few laps in the back end had collapsed. The rear spring had gone through the chassis leg 🙈

He knew it was a little bit crusty in places but had no idea it was rotten. Sadly there are a lot of polished turds around.

I applaud you for saving yours 👏

Yikes! I think mine wasn't far off that point. Muck, water and grit collects on top of the rubber spring seat, then the chassis plate rots fast, like this:

IMG_20220309_173733.jpg


The metal is actually quite heavy gauge, so it'd take a while to rot through. Does make drilling out the spot welds quite a faff in order to remove the plate.

IMG_20220415_093119.jpg


Sorry I don't have a pic of the whole new plate. It's tiger sealed and riveted on, as I couldn't weld when I did that part of the resto
 
  Clio 182
Back to that knackered jacking point. Here it is ready to be closed off by the outer sill panel. The repair panel had a curved flange around the bottom right edge which didn't match the square corner of the car. It was was also thin and quite rippled from the pressing, so I cut the flange off and used some thicker metal along the bottom edge instead:

IMG_20230108_104511.jpg


The replacement outer sill was also missing the little bracket at the leading edge where the arch liner attaches to, so I saved that from the old sill and welded it back on, along with the curved section of the new sill:

IMG_20230108_120839.jpg


Ground back and seam sealed:

IMG_20230108_121701.jpg


And below is the big panel that bridges between the outer sill and the main chassis rail. A bit tricky to form, as it runs straight along the sill side (left of pic), but curves up ariund the chassis rail (right). It also needed to be angled at 90 degrees at the sill edge to reinforce the pinch weld:

IMG_20230106_174617.jpg


I've left a drain hole at each end of the rear (lowest) edge, in case water manages to collect in there.

IMG_20230115_111029.jpg


Painted and undersealed on the outside, cavity waxed inside. Not bothered about the weld seam being visible on the outer sill as it's covered by the side skirt. Plastic bracket which the skirt attaches to refitted with a rivnut:

Yup, I know the front suspension components and ARB are looking scabby. I'm gradually working my way from the back of the car forward with this resto. Fun fact, this whole damned process started with me just wanting to align the exhaust tips centrally in the bumper cutouts! Then once I got underneath to fiddle with the exhaust hangers, I really saw all the rot around the rear beam and the rear of the shell, and that's when the resto really started.

IMG_20230115_111354.jpg


And finally, that little section of the footwell floorpan welded in:

IMG_20230115_111545.jpg


Job done.... 6 weeks later! I can see why the pros charge what they do for work like this, as fabricating and fettling all those repair patches takes bloomin ages, and you really have to take your time with the welding to avoid heating up and warping the metal.

If you're wondering, the N/S jacking point was in much better shape, though the large panel further inward was also caved in from being used for jacking, like on the O/S, so when I took out the rubber bungs rust flakes poured out. That's also been cut out and replaced with new metal. The section that got chopped out:

IMG_20221111_124202.jpg
 

Mr Underhill

ClioSport Club Member
Yikes! I think mine wasn't far off that point. Muck, water and grit collects on top of the rubber spring seat, then the chassis plate rots fast, like this:

View attachment 1628714

The metal is actually quite heavy gauge, so it'd take a while to rot through. Does make drilling out the spot welds quite a faff in order to remove the plate.

View attachment 1628715

Sorry I don't have a pic of the whole new plate. It's tiger sealed and riveted on, as I couldn't weld when I did that part of the resto
Yes, this is exactly what happened to his.

He noticed smoke coming from the rear tyre when cornering, so pulled over, then noticed the spring had forced its way through it. You've managed to sort yours by the looks of things, he just gave up on his. Sadly, you can no longer glance underneath at these cars anymore.

Looking forward to see how you progress with yours.
 

martynrg

ClioSport Club Member
  Clio 182
Great work so far!

There's something about seeing rust photos that make my skin crawl o_O

What are other areas on the car like - offside arch/behind petrol cap and inner sills?
 

Louis

I Park Like a C**t
ClioSport Club Member
Looking great! Can always remove those rivets and spot weld them now you're able.

Have you been painting the inside with weldable spray prior to welding tbe plates in?
 
  Clio 182
Looking great! Can always remove those rivets and spot weld them now you're able.

Have you been painting the inside with weldable spray prior to welding tbe plates in?
I did try some cold zinc primer on the inside, but it seemed to be messing with the weld arc. Might have bought the wrong stuff. Instead I left the metal clean and once in place sprayed all the cavities with Dinitrol ML and a cavity lance with a 360 degree spray pattern so the wax went everywhere. Damn stuff manages to penetrate everything and drip out the drain holes for ages - very runny. It does seem to leave a film on the metal itself though (y)
 
  Clio 182
Great work so far!

There's something about seeing rust photos that make my skin crawl o_O

What are other areas on the car like - offside arch/behind petrol cap and inner sills?
Petrol cap seems ok - just some scabs forming right below the cap itself (sorted now). I should probably get up in the arch behind and take off the underseal around it though to do it properly 😬

Plenty of rust elsewhere though - chassis above the rear wheels was nasty, and even round the fuel tank. Dropped the rear beam and tank last winter. Replaced the beam as it was so bad I was chipping off the rust to the point I was making holes in it, and that's some thick metal there.

I do also have some pics of that work, but then your skin's gonna crawl even more 🤣
 
  Clio 182
Fixing the O/S sill rust! Just affected the back end, so I didn't need to replace the whole length of the sill. I see on the forum that this is a fairly common issue. The drain holes here get blocked, or closed off thanks to the sill bottom edge getting distorted when jacking, then water collects in the sill. Advice here is to make sure those drain holes are clear. I found drilling up inside each drainage channel soon clears out the crud - easier than poking them clear. Anyway, here's the extent of the rot. Barely visible from the outside thanks to the side skirt, but with the interior trim panel next to the rear seat removed, you can see this:

IMG_20221003_182211_2.jpg


Then with the outer sill opened 🤮:

IMG_20221016_155929.jpg


Inner sill cleaned up:

IMG_20221016_172712.jpg


Rust treated:

IMG_20221016_174756.jpg


Painted:

IMG_20221020_180906.jpg


And welded:

IMG_20221129_133222.jpg


N/S sill was much the same, but I was too tight to buy a new sill for that side, so adapted a section of my O/S replacement sill to fit on the N/S:

IMG_20221028_174028.jpg
 

Attachments

  • IMG_20221019_161056.jpg
    IMG_20221019_161056.jpg
    1.7 MB · Views: 44

DaveL485

ClioSport Club Member
  21T, 9T, Meglio, V6
Great work for a beginner, really really good.

Good job you caught all that before it got serious/terminal. Believe me!

20181223_163113.jpg
 

DaveL485

ClioSport Club Member
  21T, 9T, Meglio, V6
Renault 21 quadra passenger side chassis leg/inner arch, recognise one anywhere 🧐

:ROFLMAO::ROFLMAO:
Not far off, correct save its front drivers (note the steering rack fitting top left).

Blimey - is that a Clio II?! Can't work out which bit that could be from 😮
You can look at the entire shambles in this thread, you'll be amazed how comprehensively it turned itself to iron oxide.

 
  Clio 182
Some nice work there chaps.
Fancy fixing mine? Lol.

Hopefully mine aren't that rotten. But the front Jacking points are absolutely mullered. Definitely rust in rear ns jacking point.
Not looking forward to the investigation...
 
  Clio 182
Nothing new I'm afraid. Car's currently laid up as my mortgage repayments are about to skyrocket, so I can't afford to keep running the Clio. But after all the hours I've spent doing it up it I'm pained to sell it. Maybe in 20 years time Jonny Smith will end up featuring it in his barn find series... 🤔

This is what the car looks like when it's not up on stands and on the receiving end of a welding torch!
52970145696_c00f1cf8cd_o--a.jpg
 
Last edited:


Top