ClioSport.net

Register a free account today to become a member!
Once signed in, you'll be able to participate on this site by adding your own topics and posts, as well as connect with other members through your own private inbox!

  • When you purchase through links on our site, we may earn an affiliate commission. Read more here.

Fred and James’ Clio 182 Racecar Project


FrogJam Motorsport

ClioSport Trader
Great updates, have been reading for a while. No joy with the wheel bearings, is it just the heat/load causing the driveshaft nut to back off?
Hi mate. Thanks!

Haha, not at all. Getting good at changing them now at least. Must have done about 6 front bearings now in a year and a half.
That’s the only thing I can think it is, tried different bearing brands, same problem. GKN drive shaft, same problem. But like I said, since using the loctite the nuts haven’t come loose so I’ll certainly be using it every time now.
 

FrogJam Motorsport

ClioSport Trader
Post number 42.

Bit of work on the car before our next race at Anglesey.

First thing to sort was the gear shifter. Wanted to improve both the gear change and the constant rattle at idle.
Don't understand why but none of the self centring shifters do one specifically for the Clio Mk2 and the only one I am aware of is the PMS shifter which doesn't have a self centring spring.
After a good search on the internet I decided to start with a Coolerworx shifter which I thought would be able to match a similar geometry to that of the pms one.

After lots of measuring I CADed up the first attempt. Tried to make it a similar size to the standard base so it should fit a standard Clio.
image001.jpeg


This is another great thing about the vinyl cutter. Create a drawing of all the different pieces. Cut them out and then you have perfect templates to stick on the sheet metal and then a combo of the bandsaw and angle grinder to cut them out. Pretty much the poor man's CNC laser cutter!

IMG_2832.jpeg

IMG_2835.jpeg

IMG_2837.jpeg


With the parts cut out I tacked them together and checked it was still looking like it would work. So far so good!

IMG_2839.jpeg

IMG_2843.jpeg


Fully welded the base ready for paint.

IMG_2846.jpeg


Made the lower section of the shifter which bolts up directly to a pms linkage.

IMG_2848.jpeg


And this is the finished item.

IMG_2863.jpeg

IMG_2865.jpeg


Had to modifying the centre control panel as the fire extinguisher clashed with the shifter. So took the opportunity to add the steering EPAS adjustment knob to the panel too.
 

FrogJam Motorsport

ClioSport Trader
Post number 42 continued.

IMG_3043.jpeg

IMG_3046.jpeg


One of the front shocks started to have a bit of play in them so were sent to cooksport to be serviced. Should have done this over the winter really.

IMG_3013.jpeg


To make sure we weren't left needing a wheel bearing changed at the track again we sorted a spare pair of Laguna uprights to carry with us for Trackdays and races (Luckily we haven't needed to use them yet, but no doubt the day we don't take them a wheel bearing will go).

IMG_3048.jpeg


Although the gearshifter could easily be swapped back to the pms one we wanted to test it before the race at anglesey so we booked a trackday at our local circuit Croft for a bit of testing.

IMG_3246.jpeg

IMG_3237.jpeg

IMG_3222.jpeg


So regardless of looking good the proof was in the pudding, it was amazing! So much more confidence you were going to slot it perfectly into gear especially 5th to 4th and as an added bonus there wasn't a hint of rattling. So really pleased with putting the effort it to making it.

So I really don't understand why not one has made a Clio mk2 self centring shifter before to be honest. Is it just down to the cost? Not sure. But I am keen to give it ago on a standard Clio which has a pms shifter fitted and see if it really can be a direct swap. It certainly will be close to fitting. No idea if there would be any interest in making a batch of them either. But for us its night and day better than the alternative.

A bit of a wash after Croft and it was all ready for Anglesey the following week.

IMG_3171.jpeg

IMG_3261.jpeg
 

FrogJam Motorsport

ClioSport Trader
Post number 43.

Trackday Championship Round 3 - Anglesey.
Hopefully the worst post I'll ever have to do!

Booked in for the testday and the race, was the Wednesday and Thursday of the jubilee weekend.

Not to bad a drive to Anglesey for us really 275 miles or so. Not as bad as brands was.

Found a bar/restaurant near by which was right on the coast to stop at on the Tuesday night before heading to the track to setup the gazebos and tents. We were hoping for an uneventful testday so we could sit and relax and have a few drinks in the evening before the race unlike Silverstone where we were rushing around sorting the wheel bearing.

IMG_3287.jpeg

IMG_3288.jpeg


So literally 2nd lap of the morning there was a horrid sound coming from the engine bay. Got worse pretty quickly. So swapped over with James so he could have a listen, he was pretty certain it was gearbox. So I had done 3 laps and James literally a single lap.

Decided to get the car up on stands to have a good look. Drained the gearbox oil and sure enough, lots of metal so gearbox was toast.

F3FF0DEB-4A9D-46BA-84DE-510D4F3A694E.jpeg


Went to speak with the unique racing guys (they run 2 Mk4 clios and a Mk2 Clio) to say we were done for the weekend. Made a joke by saying don't have a spare gearbox in the back of the van do you. They replied yes we do, and with out hesitation offered it to us to use for the weekend! We'd only met these guys once before at Silverstone so massive respect and appreciation to them for giving us a life line.

So then we started on our first paddock gearbox swap. Was also the first time we had dropped the box out the bottom of the car. James and I work really well together (he puts up with me being stroppy and only happy to do things my way and I am happy to tidy up after James to keep things in some sort of order/system) so we had the box out and the spare box back in the car pretty quickly.

IMG_3296.jpeg

IMG_3301.jpeg

6E582561-33EF-4689-82BB-1F2ADD325AAD.jpeg


So with the spare box back in and most parts re attached it was time to try starting the engine and give the gearbox a run. All in time to get out for the last hour of testing. No luck!! Engine sounded awful turning out and wouldn't start. We were worried something had happened to the engine so decided to call it a day so we didn't do any further damage.

So basically drove nearly 6 hours to spend a night in a tent, roll around on the tarmac of a paddock for a day to drive home again but hey! Suppose that's racing clios for you 😂

Think it was nearly a couple of weeks before I touched the car again, was pretty gutted really.
So started to investigated what was wrong, turned out it was a simple problem when we swapped the boxes over the starter motor dowel stayed in our gearbox hence when replacing the starter motor it was slightly misaligned so it was binding on the flywheel hence the starter motor wasn't able to spin fast enough to start the engine. If only be tried bump starting it, if only we replaced the dowel we could have been racing. But more importantly the engine was fine so nothing to sort there.

So gearbox was packaged up to be sorted. Clutch was also toast so sent that away to have the pads replaced.

IMG_3423.jpeg


Those are literally the only pictures I had from Anglesey so all in all not the best of weekends but had already started planning how we could make sure it woudn't happen again. Onwards and upwards!
 

frayz

ClioSport Club Member
Great updates as always chaps. My PMS is silent but its taken a lot of work to get it there but im very interested in the prospect of a quality shifter thats silent out of the box without the need to add mass to the shift tube etc. Keep me posted if you explore this avenue please. :)
 

FrogJam Motorsport

ClioSport Trader
Post Number 44.

To give the gearbox the best possible chance of surviving we decided to sort a gearbox oil cooler out, a little more involved compared to an engine oil cooler unfortunately. Gearbox oil temps creep past 125 degrees after 30-40 minutes so towards the end of the race you either back off a little of hope for the best with high temps, so surely can only be a good thing to bring the temps down to 110-120?

As we already have the Laminova water heat exchanger engine oil cooler we wanted to stick with the same system. Theres a kit which combines a 92mm and 182mm core length unit. However, this was out of stock and I am rather impatient so made our own.

IMG_3654.jpeg


By cutting the pipe off the inlet fitting and sandwiching two of them together with some gasket paper you end up with a combined unit. Also need to run a drill down the smaller extrusion body to allow the long cap head bolts to go all the way through the 92mm core body.

IMG_3653.jpeg


Modified the existing laminova bracket to move the unit along to keep the outlet in the same place.

IMG_3758.jpeg


Not pretty but does the job. By gaining the extra 20-25mm it means the outlet is perfectly lined up with the outlet of the radiator. A 32mm 90 degree silicone hose will do the trick to connect the two up.

IMG_3760.jpeg


The more complicated part is dealing with the oil. Need a bottom drain out of the gearbox, through a filter (to protect pump), external oil pump, through the oil cooler and back into the gearbox.

Bottom drain out the gearbox. Rather tight so used a banjo fitting with a 45 degree AN6 fitting. Needed to cut part of the gearbox off to gain some extra clearance.


IMG_3920.jpeg

IMG_3929.jpeg


Attached the filter and pump onto the PMS top gearbox mount so the pump and filter can all be attached to the engine/gearbox before going into the car. Was using an old gearbox casing (the original cracked box from a few years back) for mocking up.

IMG_3928.jpeg

IMG_3941.jpeg


Bit of a combination of hardline to save spare and flexible lines at the front for some ease and it was all connected up and looked pretty neat.

IMG_4037.jpeg

IMG_4063.jpeg


We had a trackday booked at croft to check the car was all happy again after anglesey and to see how the cooler performed before our next race at brands hatch. Thankfully the car this time fired straight up after remembering to replace the start motor dowel!
 

FrogJam Motorsport

ClioSport Trader
Post Number 45.

Croft trackday / TDC Round 5 Brands Hatch GP

We booked a trackday at croft as a bit of a test before the race at brands. Rebuilt gearbox, new cooling setup and we hadn't driven the car in a while. So check over the car and checked the alignment before heading to croft.
Trackday went well, unfortunately was damp but it served its purpose. Coolant temp a little higher as we expected due to now cooling the gearbox oil.
We managed to give some different rear springs ago. Changed from 80 to 110. Certainly made a good improvement. Much more neutral than previous (previous was too understeery), however not the best to try it on a wet track, had a little moment. Never really looks much on camera but certainly made my bum twitch.


IMG_4177.jpeg

52255809129_70a50b0a0a_o.jpeg


During the day we tried adding spacers to the bonnet hinges to allow better airflow through the engine bay, seemed to make a decent difference, assuming that lack of any radiator ducting isn't helping.

Bit of a clean up, pack up all the kit again and it was time to head off to brands hatch. Oh and obviously it was during the heatwave at the start of August!! Also updated the EcuMaster ADU display to make the temperature gauges clearer and less cluttered.


IMG_4619.jpeg

IMG_4287.jpeg

IMG_4291.jpeg


Man brands hatch is a long way! We had a decent trip down but still took 7.5 hours.

IMG_4375.jpeg


I pulled the trigger on hiring a garage for the test day on the Friday, we were in the garages on the Saturday for race day and didn't fancy being stuck in the sun all day. Turns out it was a great call. Got up to 36 on the test day and 38 on Raceday so rather toasty!

Shooting some flames on the test day with Russ in one the Unique Racing cars following behind. We were certainly off the pace but kind of expected as it was our first time at the track. James was certainly getting more in the groove of the track than I (Fred) was, this is what usually happens. For some reason I take a while to learn the tracks.

IMG_3948.jpeg


The test day was on the Indy track and the race the GP. So Qualifying was going to be the first time we drove the GP track. We Qualified 28th, 7th in class, 4-5 seconds off the leaders and James was a good few seconds quicker than myself. I got frustrated in the race for my lack of pace. Luckily a safety car came out early so James took over and brought the car home 20th overall, 6th in class. Which looking back on it was great to finish and for our first trip there shouldn't have expected anything more. But much more importantly a good weekend, the car was all in one piece and we haded melted. Next race at Donington where we had been a couple times before so hoping for better things.

MLBH_220813_135022_1911.jpeg
 

adir

ClioSport Club Member
  clio 172
How did you find the Epas work for you over mechanical steering?
 

FrogJam Motorsport

ClioSport Trader
Post Number 46.

Donington Trackday/Testday/Race.

This one is rather eventful! So not only did we cheat and do the test day the day before the race we also booked a trackday a couple weeks beforehand too. We were determined to be up the front so thought we'd go for broke.

Opentrack trackday at the end of August. Stayed the night before at Irondale pub which is close by to Donington, 3rd time we stayed there so would recommend!

IMG_4655.jpeg


A few red flags at the start of the day but unlike Javelin and MSVT Trackdays they actually tried to deal with it, still was pretty busy though. All going smoothly until James came in with a long brake pedal just before lunch. Changed the rear pads as they were getting low, bleed the brakes and pedal seemed better but as soon as you tried the brakes with the engine running it was still long, so had a further look and found a leak. Turned out the line to the rear going through the bulkhead had split. Shame we missed the afternoon but were pleased with our times and felt we got up to speed quickly as we had been to Donington the year before (apart from the Melbourne Loop on the GP track). Atleast the brake line broke now rather than the race weekend!

IMG_4663.jpeg

IMG_1800.jpeg

IMG_1730.jpeg


Donington Park Testday. Well this was an interesting one. Our experience on test days have been mixed so far. Being allocated a 30 minute slot just doesn't really work for us. Sharing being two drivers means limited running and not ideal having an annoying amount of time between the sessions. Added into the mix was a lot of cars on track for those 30 minutes and a massive mix too. From cars in classes below ours all the way to GT3 and BTCC cars. This ended in red flags and very limited running. James managed a semi decent session after lunch but my first session was busy and the last session might as well not existed, ended up with 2 flying laps in 30 minutes, 2 red flags and the session ending early. Here are two bad moments probably caused by the quicker cars getting frustrated but also just being tits.


IMG_4892.jpeg

IMG_4902.jpeg

IMG_4883.jpeg

IMG_4885.jpeg
 

FrogJam Motorsport

ClioSport Trader
Post Number 46 continued.

TDC Donington GP Race Round 6.

For once we could have a chilled Friday night, went for a curry in Castle Donington which was excellence. Felt like this is how a race week is meant to go.

Qualifying was great. I went out first and stayed out for a while to get a lap in. Managed our fastest time from all of the track day and test day so we were really pleased. James went out after and was right on the same pace too but just didn't get a lap in because of a bit of traffic. Ended up qualifying 3rd in class which we felt was a great achievement. Now we just needed a clean and straight forward race..... does that exist??

Here is the lap from Qualifying.


Prior to the race the gearbox was starting to crunch even more and the clutch was starting to slip ever so slightly so we were praying it was how up for the race.

I started and made a good start of the line but then had a couple poor corners. Slightly hesitant into the first corner and then had to slam the brakes on as a car drifted over to avoid another, this meant a number of D class cars got past me. Didn't want a repeat of Silvetstone to happen so was determined to get past them quickly. There were a couple of spins on the first lap so a couple of double waved yellow sections whilst they were snatching the cars off track. However still managed to clear the slower cars pretty quickly.

Made a highlight video as well as the full race video so here they are:


So if you watched the highlight video you'll know what happened. Gearbox went again! Not only did it go but it went as James were chasing down 3rd position in class pretty quickly, so we were confident we could have had a good opportunity at racing for 3rd place but we'll never know.

Although we were gutted at missing out on a chance for a podium it was a great weekend and we were right up the top on pace so we were certainly getting there with the car. Unfortunately this was going to be the final outing for the car this year.

Not sure whether I should feel this way or not but I still loved the weekend and felt proud of what we achieved in only our first season.

IMG_1834.jpeg

IMG_1828.jpeg

IMG_1844.jpeg

IMG_1829.jpeg

IMG_0003.jpeg


Now I can continue on some more interesting posts over the winter! Lots planned and as usual it continues to escalate!
 

FrogJam Motorsport

ClioSport Trader
Post 47 - Engine Build

This update is a bit delayed as we wanted to see how the engine held up over the course of its first season before making too much of a song and dance. Back in Jan/Feb 22 we decided it would be a good idea to refresh the engine as we didn't know its history, and wanted to minimise the chance of any failure cutting short races.

The original plan was simple - engine out, strip it down, reassemble bottom end with new new bearings/rings/oil pump and arp rod bolts - a relatively proven recipe for a reliable F4R. What we ended up with was slightly different to this original plan...

Here is the engine on its way out - as per most F4R engines, a right grubby oily mess.
IMG_0351.jpeg


First up was stripping it all down - had a bit of a disaster with the dephaser covering plug - so much for the 'reputable' mechanic who did the belts for us back when we first bought the car - they either cross threaded it or torqued it up to the same as the actual dephaser bolt as it was stuck fast - ended up having to take it off with a slit disc, ruining the dephaser in the process.

IMG_0417.jpeg

IMG_0456.jpeg

66275308849__EC0125FB-557F-45D3-9CF0-AAFE9DD7440E.jpeg


Having stripped it all down it appeared to be in pretty good condition - bores looked in good condition with the cross hatching still visible and the head/valvetrain didn't have any hidden horrors other than and abundance of sealant in places it shouldn't be and a fair bit of mild scoring to the cam journals (which is again pretty common).

IMG_0413.jpeg

IMG_0360.jpeg


After getting it all apart it was time for some preliminary checks and measurements to confirm that all was order (as it appeared visually). This is where having the right tools, and James being a bit of a data nerd, is invaluable...

From the cleaned up piston markings and lack of markings on the block you can determine which production category the engine falls into (Renault group the blocks/pistons into two categories based on manufacturing tolerances/sizes). The 'B' on the piston crown and no marking on the block mean this engine's nominal bore diameter is 82.71-82.72mm. The images below show ours was measuring ever so slightly over this at 82.725mm (from memory the rest of the measurements were all around this mark too) - just down to wear having done 100k+.

The pistons measured up ok too but I now can't find any photographs of this process to share.

IMG_0583.jpeg


IMG_0570.jpeg


IMG_0572.jpeg


So, with the block measuring up nicely, and the head just needing the expected refresh it was time for things to take a bit of a detour from the original plan. With the engine apart (and knowing we would need a remap in any event as the original map was pants) it all of a sudden became a bit of a no brainer to try and squeeze a bit more power and out of the thing. A popular upgrade is to fit the pistons and cams out of a MK3 RS which increases the compression ratio due to the increased piston dome volume (the mk3 combustion chambers are bigger so overall the compression ratios are similar between the two 11.2 vs 11.5) and the cams have a slightly higher lift too - they're also pretty darn cheap so we thought we would look into this.

Having sourced a decent set of used pistons and cams we set about checking the clearances - something thats not particularly common knowledge with most seemingly throwing them in and hoping for the best.

Images below and on the next post show the setup to quickly check the valve to piston clearance with VVT engaged, and as you can see it gets close on the inlet side - to a point that we weren't really happy with the clearance given the engines going to see high rpm for most of its life (and this is pre-skimming of the block & head faces too).

IMG_0670.jpeg
 

FrogJam Motorsport

ClioSport Trader
post 47 continued

IMG_0671.jpeg

IMG_0672.jpeg


So after that little interlude, and having now got quite keen with the idea of more power, it was sort of back to the drawing board for what turned out to be a fairly drastic rethink on the build plans. We had given up on the idea of the 197 cams/pistons due to the clearance issue and the idea of 'simply' putting new rings on the original pistons was feeling like a bit of a half arsed job, so, in the usual fashion with this car, it was now in our heads to 'do it right'.

Enter from left field the 'new' build spec (and the fairly wooly justifications for the same):

- some wossner forged pistons - these are available in high compression (12.8:1 nominal) and a 82.72mm bore size meaning we could hone the block (instead re-bore) and be happy with the running clearance, also they have nice deep valve pockets for plenty of clearance to allow future cam upgrades if desired.
- PEC forged rods - basically because they were really cheap if bought with the pistons and came with arp bolts already - they're not the best but supposedly rated to 220hp per cylinder or something stupid, so we were fairly confident they'd do the job for us.
- ported head with supertech valves - we had been in touch with MS Custom Engineering to have various engine parts painted and decided to 'future proof' the head with getting it ported, Max also skimmed it for us and lapped in the new valves, cracking job and photos of the same below. The valves were basically a bit of insurance against a dropped valve destroying our now rather nice bottom end.
- cat cams 421 - a set came up cheap on ebay
- 197 valve springs - ever so slightly stiffer than the mk2 springs to help with the more aggressive cams and managed to bag a brand new set for a good price
- fully balanced rotating assembly
- new oil squirters
- mix of king racing/KS bearings
- new Renault oil pump, oil chains, timing belts etc etc

So, with that all now decided we got the head and block off to the machine shop and had a bit of a wait whilst the work was done. When we got some progress updates from Max we were chuffed with the decisions we had made:
024AB83E-6BFD-4DFB-AB83-FCC1FB257E0D.jpg

D761F5DA-B7B9-440B-A718-C298AF7315CA.jpg


And after a small wait, we had a lovely looking honed and skimmed block back, and all the parts from Max:
IMG_1088.jpeg

IMG_1285.jpeg


Time to start reassembling!

First off was obviously giving everything a thorough clean and measure of oil clearances (sorry no photos of this), then its bearings in the block and crank in to check the end float which was within tolerance.
IMG_1123.jpeg


IMG_1125.jpeg


After that, the next job is to measure oil clearances again, this time for the rods/pistons and get them all sorted by weight and assembled

66706197456__4F71E58F-A2A6-46CF-8235-CE704DF052A8 2.jpeg


Rod bolts torqued up by stretch

IMG_2735.jpeg
 

FrogJam Motorsport

ClioSport Trader
post 47 continued

everything checked, re-checked and torqued to spec, we could now have another check of the valve to piston clearance (which we knew would be fine by just looking at the pistons, but always good to be sure!)
IMG_1407.jpeg

IMG_1370.jpeg


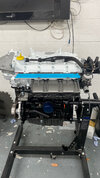
Following this step, it was time to bolt the head down and install the new tappets/rocker arms. Then valve cover on and time everything up. Job done! - a bit of an over simplification of the work involved, but detailing every step would take forever!
IMG_1409.jpeg

IMG_2752.jpeg

IMG_2753.jpeg


IMG_2739.jpeg


AF059C0E-DB0B-4EAB-BC7D-0F0A4D625232.jpg


Then following all that get it back in the hole, ready for running in on the dyno and then the acid test of seeing what power it makes...

IMG_1450.jpeg


I've lost track of how long we had to get the car together to get to EFI for mapping but it was a fairly close run thing. Anyway, we made it, and with some part worn tyres on the front it was time to get the engine run in on the dyno and then properly mapped. Having built the engine, James was looking a smidge nervous for the first few runs to high revs (we'd had it ticking over briefly back at base so knew it ran fine), but with hindsight there was no need - he's built a bit of a cracker as the dyno graph on the next post shows.

IMG_1711.jpeg
 

Attachments

  • AF059C0E-DB0B-4EAB-BC7D-0F0A4D625232.jpg
    AF059C0E-DB0B-4EAB-BC7D-0F0A4D625232.jpg
    597.8 KB · Views: 52

FrogJam Motorsport

ClioSport Trader
Post 47 continued

So here it is, the final result of the engine build. On the way to Chris' we were expecting the engine to make something in the order of 200hp, as a result of retaining the factory inlet manifold. We sort of shocked ourselves with the power it made in the end, 219hp, being higher than a lot have achieved with ITB's. The second (reduced power) plot actually shows the final map we settled on as the engine would have produced too much power for the race series we were entering which is limited by power to weight.

Overall a fantastic result and now backed up with a seasons faultless running - happy days!

IMG_1727.jpeg
 

Sir Nancy Flowers

ClioSport Club Member
  M140i
Im always super impressed at the skill level involved in building engines.

I really really fancy giving it a crack one day - any tips on a learning platform? Im sure Youtube is utterly awash with videos but id prefer something more legitimate and dont mind paying.

Fingers crossed my brother blows up his turbo mk2 mx5 so I can forge that at home 🤣
 

Brigsy

ClioSport Club Member
  T.Turbo
Awesome update, new engine looks greatand great power figures. First build ive seen where P2V clearance has been measured, time consuming stuff on an f4r. Out of interest, to check with vvt engaged did you advance the inlet cam to copy full vvt engagement?
 

Robbie Corbett

ClioSport Club Member
Just by closing the throttle body above a set RPM. From memory between 6 and 7.5k the throttle is only 50% open.
I thought that might be how they were doing it! Looks like a fair chunk of power is left on the table and still be under the power limit!

ie) would be nice to have this chunk back:

1682090822608.png


Your dropping nearly 25bhp by the limiter in an area where the car can clearly make power.

Wonder how the graph would look if you disabled (by a switch) the VVT then ran the throttle wide open? Then you could elect to re-enable the cam for other events/track days etc.
 
Last edited:

FrogJam Motorsport

ClioSport Trader
Awesome update, new engine looks greatand great power figures. First build ive seen where P2V clearance has been measured, time consuming stuff on an f4r. Out of interest, to check with vvt engaged did you advance the inlet cam to copy full vvt engagement?
Thanks.
Exactly, hence the timing/angle disc on the crank. Lock the cams off, loosen the cam bolt/nut off, r****d the crank and nip the bolt and nut up. Then both cams have been advanced by however much you want.
 

FrogJam Motorsport

ClioSport Trader
I thought that might be how they were doing it! Looks like a fair chunk of power is left on the table and still be under the power limit!

ie) would be nice to have this chunk back:

View attachment 1639961

Your dropping nearly 25bhp by the limiter in an area where the car can clearly make power.

Wonder how the graph would look if you disabled (by a switch) the VVT then ran the throttle wide open? Then you could elect to re-enable the cam for other events/track days etc.
I might be missing your point but your blue line there is coming off the torque curve.

The line we’re interested is the lower black one which shows pretty much a straight from 6k to redline. I.e. 160whp between 6k and redline. Hence you will get the matching torque curve which needs to be lower at higher rpm.

We’ve never ran in at full power on track before, just wanted to run with the power we were going to be using for the race series.

But if we ever wanted to I can just go into the ecu and change the throttle map back to 100% and then we’d be back to full power. So playing with the throttle map is the best and easiest way of doing it.
 

Robbie Corbett

ClioSport Club Member
I might be missing your point but your blue line there is coming off the torque curve.

The line we’re interested is the lower black one which shows pretty much a straight from 6k to redline. I.e. 160whp between 6k and redline. Hence you will get the matching torque curve which needs to be lower at higher rpm.

We’ve never ran in at full power on track before, just wanted to run with the power we were going to be using for the race series.

But if we ever wanted to I can just go into the ecu and change the throttle map back to 100% and then we’d be back to full power. So playing with the throttle map is the best and easiest way of doing it.
Ahh I apologise! I thought Black was first run and torque was the lower, then Red was second run! Dyno dynamics dynos colour each run different but the power and torque are the same colour. In which case it looks perfect!
 

FrogJam Motorsport

ClioSport Trader
Ahh I apologise! I thought Black was first run and torque was the lower, then Red was second run! Dyno dynamics dynos colour each run different but the power and torque are the same colour. In which case it looks perfect!
Ah! No, sorry should have made that clearer. It’s just shower the different between the 2 maps.

Unfortunately we didn’t have any before and afters. First time round it wasn’t mapped at EFI on the standard engine. Chris spent a considerable amount of time not only making the full power tube perfect but also spent a while getting the lower power map perfect.

Wouldn’t go anywhere else to get it mapped apart from Chris at EFI. The difference between time and care taken was night and day.
 

Robbie Corbett

ClioSport Club Member
Ah! No, sorry should have made that clearer. It’s just shower the different between the 2 maps.

Unfortunately we didn’t have any before and afters. First time round it wasn’t mapped at EFI on the standard engine. Chris spent a considerable amount of time not only making the full power tube perfect but also spent a while getting the lower power map perfect.

Wouldn’t go anywhere else to get it mapped apart from Chris at EFI. The difference between time and care taken was night and day.
Everything I've heard about him is great. It was purely my misunderstanding of the graph colours windyn puts out! Flat bhp to red line is exactly what you need for a power limited class. Would be nice to experience on track with the WOT map though!!! Just a shame the OEM ecu doesn't let you map switch on the fly.
 

JamesBryan

ClioSport Club Member
Everything I've heard about him is great. It was purely my misunderstanding of the graph colours windyn puts out! Flat bhp to red line is exactly what you need for a power limited class. Would be nice to experience on track with the WOT map though!!! Just a shame the OEM ecu doesn't let you map switch on the fly.

This is on ECU Master I think.
 

FrogJam Motorsport

ClioSport Trader
Everything I've heard about him is great. It was purely my misunderstanding of the graph colours windyn puts out! Flat bhp to red line is exactly what you need for a power limited class. Would be nice to experience on track with the WOT map though!!! Just a shame the OEM ecu doesn't let you map switch on the fly.
We’re on an ECUMaster ECU so all is possible!

About to do the next update which includes ITBs and a DBW actuator so will be experiencing full whack on track at some point this year.


Top