post 47 continued
So after that little interlude, and having now got quite keen with the idea of more power, it was sort of back to the drawing board for what turned out to be a fairly drastic rethink on the build plans. We had given up on the idea of the 197 cams/pistons due to the clearance issue and the idea of 'simply' putting new rings on the original pistons was feeling like a bit of a half arsed job, so, in the usual fashion with this car, it was now in our heads to 'do it right'.
Enter from left field the 'new' build spec (and the fairly wooly justifications for the same):
- some wossner forged pistons - these are available in high compression (12.8:1 nominal) and a 82.72mm bore size meaning we could hone the block (instead re-bore) and be happy with the running clearance, also they have nice deep valve pockets for plenty of clearance to allow future cam upgrades if desired.
- PEC forged rods - basically because they were really cheap if bought with the pistons and came with arp bolts already - they're not the best but supposedly rated to 220hp per cylinder or something stupid, so we were fairly confident they'd do the job for us.
- ported head with supertech valves - we had been in touch with MS Custom Engineering to have various engine parts painted and decided to 'future proof' the head with getting it ported, Max also skimmed it for us and lapped in the new valves, cracking job and photos of the same below. The valves were basically a bit of insurance against a dropped valve destroying our now rather nice bottom end.
- cat cams 421 - a set came up cheap on ebay
- 197 valve springs - ever so slightly stiffer than the mk2 springs to help with the more aggressive cams and managed to bag a brand new set for a good price
- fully balanced rotating assembly
- new oil squirters
- mix of king racing/KS bearings
- new Renault oil pump, oil chains, timing belts etc etc
So, with that all now decided we got the head and block off to the machine shop and had a bit of a wait whilst the work was done. When we got some progress updates from Max we were chuffed with the decisions we had made:
And after a small wait, we had a lovely looking honed and skimmed block back, and all the parts from Max:
Time to start reassembling!
First off was obviously giving everything a thorough clean and measure of oil clearances (sorry no photos of this), then its bearings in the block and crank in to check the end float which was within tolerance.
After that, the next job is to measure oil clearances again, this time for the rods/pistons and get them all sorted by weight and assembled
Rod bolts torqued up by stretch


")
 The kids had no luck at all this season.
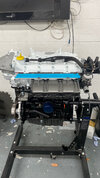

")