ClioSport.net

Register a free account today to become a member!
Once signed in, you'll be able to participate on this site by adding your own topics and posts, as well as connect with other members through your own private inbox!

  • When you purchase through links on our site, we may earn an affiliate commission. Read more here.

Rusty’s Titanium 182 take 2!


RustyMojo

Bon Jovi Officianado
ClioSport Club Member
Well couple of weeks since last update. Car is now back together properly and on its wheels.
I replaced the rear brake pads with a new pair of Brembo’s as the set on the car were pretty grotty.

C12669F3-B398-4C7B-A453-5D218B663590.jpeg
54F7E479-AE59-40F4-B0B9-BBA886EDD39E.jpeg


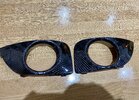
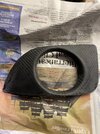
Over the last week I decided to make use of some off cuts of carbon fibre I nabbed off a mate. I have done a bit of carbon layup over the years, so decided to have a go at making my own carbon skinned fog light surrounds. I didn’t want to ruin the frankly minty set that were on the car so set about finding some spares. My usual parts buying frenzy meant I have 3 bloody sets of the things now! So if anyone needs a mint set of surrounds let me know!! Moron!

Started up by using alcohol to remove all the years of silicone and bumper black. Then rubbing the plastic down with a heavy grade sand paper to provide a key. I then filled some of the indents and gouges with plastic padding before rubbing the surrounds down again. A quick blast with black bumper paint (so the filler or faded plastic wouldn’t flash through the carbon weave) we were then ready to skin them.
272E1089-1524-4F78-9CA2-7E58FF2E9816.jpeg
C85A61E5-66C2-4459-945B-727536389FB1.jpeg
6AE04DBB-CE93-4007-92F5-0B692856A276.jpeg


laid down an epoxy base coat and then the carbon fibre before setting out with more epoxy. I had some Peel ply to hand but actually didn’t bother. Left then for 24hrs to set. Once set I laid another epoxy coat to fill the voids made from the epoxy soaking into the cloth.
FC0EC244-D60C-444D-AC0E-79402D94BE2F.jpeg
980E8251-EC03-4F8C-B05D-34D4D3F4C502.jpeg
20DC4403-0A36-4058-A98B-791F92D3E04C.jpeg


Annoying photo limit mean another post sorry
 

RustyMojo

Bon Jovi Officianado
ClioSport Club Member
Another 24 hours last and now the real works starts. I cleaned up the unwanted cloth with a dremel and then flatted the whole surface back so it was smooth. At this point a final coat of epoxy is applied....another 24hrs past and it was time to finish them off.View attachment 1522629
DDFC905C-6015-47FD-B86C-86DC50FD1647.jpeg

View attachment 1522631


So flatted back the epoxy clear coat again and then shot the surrounds with clear lacquer. The reason I do this is epoxy isn’t great at handling UV, regardless of the UV stabilising claims. 2 coats of lacquer and I could flat back through the various grades of wet and dry before polishing up.
34CE5574-D725-4ACC-B07A-4F31AC5CCB7C.jpeg

Popped the old surrounds out earlier today, gave the area a good clean up as it was minging back there
8C7ED3B9-B0DF-4418-89EF-D766EDFB72B3.jpeg

3B204C1B-13E2-40A1-8875-20ACA594C27A.jpeg
E1C609A1-79DC-41DA-B141-537C476F5A8A.jpeg
 

Attachments

  • ACBE15AB-CD6B-4DA5-A8DE-8DE05012D2C5.jpeg
    ACBE15AB-CD6B-4DA5-A8DE-8DE05012D2C5.jpeg
    5.1 MB · Views: 112
  • 10BE99FF-1A46-47F1-9D6D-347EC8B4F031.jpeg
    10BE99FF-1A46-47F1-9D6D-347EC8B4F031.jpeg
    2.3 MB · Views: 128

RustyMojo

Bon Jovi Officianado
ClioSport Club Member
Fitted them today and I have to say I’m happy with the results, not perfect but pretty good and works well with my washer blanks and splitter (which needs clear coating again)

B7A86BDB-9ABB-42F6-98F8-CC73DDB2FE51.jpeg
66C2B2EE-FAA1-46AA-AA52-C644901ED142.jpeg
46761503-05E8-4081-96A5-F6AE1C8577A8.jpeg
4CB52FB9-75C1-40F3-A59D-4FB093D6194D.jpeg
494EE425-8DE9-4D3E-92D7-1A7F73FF7FFC.jpeg


Finished the day off by giving the old girl a bath with my new snow foam Lance.

D57E03DD-0A45-465D-9622-F6FD22CC4461.jpeg
593E34F7-AA18-40A8-A1C7-AE2ECA9C2AAE.jpeg


Will likely be slow with updates now. About to undertake some big building work. So the clio is being kicked out of the garage for a couple of months. I’m tempted to take the time to get the belts and bits done... probably somewhere like Diamond motors. Hassle is getting the car up there and me back! I’m unfortunate to live somewhere a bit far away from the big specialists. Would love to use AW....but that’s a jolly old way away
 
  Clio 182 FF
This is looking awesome. I love the Carbon touches!

Your garage is looking very similar to mine... full of Titanium 182 and mountain bikes!
 

RustyMojo

Bon Jovi Officianado
ClioSport Club Member
This is looking awesome. I love the Carbon touches!
Your garage is looking very similar to mine... full of Titanium 182 and mountain bikes!

It is yes, I need a bigger garage to be honest mine is bigger than a single. But with too many hobbies I am flat out of space! I had to even reduce the bike count. Ironic that I have bikes worth 3 times the clio but I Chuck them on the wall to make way for my little silver baby. Moving house is out of the window now as we are expecting our third child and spending ridiculous money on extending the current house...mainly because we want to stay in the same village and houses don’t come up too often. However when they do it has to have a double garage to be considered. Or a large standalone garage high enough for me to fit a ramp or pit!
 

RustyMojo

Bon Jovi Officianado
ClioSport Club Member
Looks like you are doing a great job mate, especially given the tight area to work on the car.
Thanks mate, the photo is deceptive. I can get all around the car with plenty of space when I need to. It gets parked over to one side to stop my moronic children dragging bikes past it or the wife’s arse as she heads out through the garage.
 

RustyMojo

Bon Jovi Officianado
ClioSport Club Member
Nice little job tonight. Not sure how I hadn’t noticed this before, but the NS wing mirror was loose. Bit of a wobble and the cap fell off..bugger! On inspection it’s clear someone had been there before with a bolt and cheap crappy washer which had rusted through. Mainly because these mirrors are water traps!


9C5620A6-2A2A-487B-83A1-EBDC6DD57ADF.jpeg

Ordered a replacement mirror from BTT via eBay £15 delivered. Artic blue mirror car was removed, Titanium cover fitted.
FD4B2A5C-F35D-405C-AE97-2F8BCBAEDE13.jpeg
63385EE8-1692-42A8-BC78-646F5324022C.jpeg
E919EA5B-E11B-46AF-95A1-20A52FD671D0.jpeg

I did a bit of testing before fitting as I know the temperature sensor is housed in the NS wing mirror. Glad I checked as would’ve been annoyed if I noticed later in the summer! Luckily all good as gold, defo recommend BTT who seem the fairest and easiest breaker to deal with at present. Cleaned all of the crap that had been hidden behind the mirror for some years.
7B08122D-4D4D-48F3-A56E-BD1CC20077BD.jpeg
B8635419-D659-41EA-9DEF-D1FE230F7B4F.jpeg

All fitted and looking distinctly like it should do...silver and shitty
1064A6E3-D376-4868-BBCD-5525F01DE060.jpeg
 

Inferno182

ClioSport Trader
  172 Track M3RS Track
Nice little job tonight. Not sure how I hadn’t noticed this before, but the NS wing mirror was loose. Bit of a wobble and the cap fell off..bugger! On inspection it’s clear someone had been there before with a bolt and cheap crappy washer which had rusted through. Mainly because these mirrors are water traps!
View attachment 1523443

View attachment 1523441
Ordered a replacement mirror from BTT via eBay £15 delivered. Artic blue mirror car was removed, Titanium cover fitted.
View attachment 1523442View attachment 1523444View attachment 1523445
I did a bit of testing before fitting as I know the temperature sensor is housed in the NS wing mirror. Glad I checked as would’ve been annoyed if I noticed later in the summer! Luckily all good as gold, defo recommend BTT who seem the fairest and easiest breaker to deal with at present. Cleaned all of the crap that had been hidden behind the mirror for some years.
View attachment 1523446View attachment 1523447
All fitted and looking distinctly like it should do...silver and shitty
View attachment 1523448

Glad we could help! [emoji1362]


Sent from my iPhone using Tapatalk
 

HaveaCuppa

ClioSport Club Member
I'm only halfway though reading this thread, but top work on this @RustyMojo

I've bookmarked this for reference with the corrosion spots as I'm due to get mine up on jackstands soon to treat under the sideskirts, arches and bumper brackets. What did you use to treat it, Hydrate 80 and then a coat of zinc primer?
 

RustyMojo

Bon Jovi Officianado
ClioSport Club Member
I'm only halfway though reading this thread, but top work on this @RustyMojo

I've bookmarked this for reference with the corrosion spots as I'm due to get mine up on jackstands soon to treat under the sideskirts, arches and bumper brackets. What did you use to treat it, Hydrate 80 and then a coat of zinc primer?
That’s very kind of you, I can never remember the name of what I use. But basically I get as close to bare metal as possible before using a rust converter. Then zinc primer yes. Top coat depends where on the car I’m treating ranges from hammerite to stone chip. Then the same with undersealing. Different coating for different areas.
 

HaveaCuppa

ClioSport Club Member
That’s very kind of you, I can never remember the name of what I use. But basically I get as close to bare metal as possible before using a rust converter. Then zinc primer yes. Top coat depends where on the car I’m treating ranges from hammerite to stone chip. Then the same with undersealing. Different coating for different areas.

Top man, cheers (y)

You're a brave man tackling that fuel filler area. Seems stupidly flimsy!
The car looks great though, those carbon brake ducts are rather nice.
 

RustyMojo

Bon Jovi Officianado
ClioSport Club Member
Top man, cheers (y)

You're a brave man tackling that fuel filler area. Seems stupidly flimsy!
The car looks great though, those carbon brake ducts are rather nice.
Not really mate, if I didn’t tackle it it would’ve needed an inner wing within a couple of years. I’d already done the job on my first 182 so knew what to expect, albeit this one was much worse. I think the worse part is the flimsy metal strip like you point out. Mines ok but rust thins the metal and the fuel filler caps start to stiffen with age so they flex the metal when you open them. Recipe for absolute disaster and a typical Renault half job.

Im a sucker for all things carbon, have been for years. I’m lucky enough to have done my fair share of home boat building and laminating so have some materials and experience. I just got a couple of other areas I want to carbon up and then I’m done! It’s a fine line between nice subtle touches and completely overkill and I’m getting close now!
 

RustyMojo

Bon Jovi Officianado
ClioSport Club Member
Took the car for a quick spin earlier, it’s now been relegated out of the garage ahead of some building work we are getting done. So short of my planned re-lacquer of my splitter tomorrow and my beam coming back from the powder coaters not going to be getting a load done over the coming months. Took some snaps anyway away from the drive 😂
17766599-011A-43D5-9B94-2B0C2CB971D2.jpeg
9E3A6254-74F6-445A-986A-45CBC06ECF08.jpeg
39C49BC6-F39A-4031-A689-10BCBCD506F7.jpeg
 

andy_coops

ClioSport Club Member
  172, VRS, Clio 5
You should make carbon parts commercially mate. They look bang on. Customer right here if you decide to! 👌
 

RustyMojo

Bon Jovi Officianado
ClioSport Club Member
Andy, I can’t imagine it would pay given the time it takes me mate! They would cost a bloody fortune!

I’ll will have a flick through my off cuts of carbon cloth at some point to see if I have enough for another set.

I noticed you fitted a carbon splitter, I have one fitted to mine and have been refurbing it this weekend. As it was looking tired next to the other carbon bits. Should refit it at some point once I have flat and polished it
 

RustyMojo

Bon Jovi Officianado
ClioSport Club Member
Spent some time this week refinishing my carbon splitter. Obviously these get a bit of a kicking where they sit. I rubbed the clear coat down to remove hazing then refinished in lacquer before refitting with stainless hardware. It ties in the fog light surrounds and washer blanks in nicely as the previous matte finish was almost opaque.

Pretty happy with it, I will likely get the front bumper blown in over the summer. It’s in prettt clean condition, but I’m fussy and there are a few marks which twist my chubby melon somewhat!

FCD257E2-14EB-4986-AC1B-FB797A2BF30A.jpeg
648B3957-54C4-4DCE-88D6-2E0EFA6AF906.jpeg
3ECB856B-2837-49DA-9850-51CCEAD13502.jpeg
08C45DAD-AD50-41F7-B3FD-F214C984BB02.jpeg
E8D7942F-778D-424C-B972-6127D61C0D8D.jpeg
0E355FE5-C59F-49A6-944A-80B015C9AA0F.jpeg
3E9FDDF0-1DB7-432A-9DC3-7407C892A230.jpeg
E3311F84-8678-49F1-BC08-5BF1473AF61D.jpeg
B8281EC2-44D5-4B58-898A-CF2E05559247.jpeg
 

RustyMojo

Bon Jovi Officianado
ClioSport Club Member
Got to love the photo limit rule...
Noticed I forgot to add a post around my rear beam! I managed to pick a 182 beam from James at JMRS (with the extra strengthening plate) .
2B3251C5-7B95-41C4-AE2C-EC505B156DC2.jpeg
B32C105C-053E-4DC4-B923-64EB7BB2D345.jpeg
B33C31F7-96F2-4398-93C7-54F8277BF86A.jpeg


I dropped the old bushes out and sent it to the powder coaters, along with the brackets. I’m happy with the results given it was typically a block of rust. House build starts tomorrow, so the car won’t be having this fitted until the summer now I don’t think. But I’ll build it up over the coming weeks so it’s ready

9BB2489B-EDCF-45E0-ABF7-7872C60969E8.jpeg
2D6AA16E-5C80-4E6D-862C-0653917546F4.jpeg
85FF74A1-D22B-441A-82B0-EA6B34AFA1DA.jpeg
3731649C-87D2-4719-89A8-30B2B174065C.jpeg
 

RustyMojo

Bon Jovi Officianado
ClioSport Club Member
Not a great deal to update really. Other than the car has been taxed finally and I have been thrashing it around all weekend...finally! I need to get the car in for an alignment, so will try and sort over the coming week.

I took a trip over to see @DomP182 to collect some interior trim, he had previously collect off me! The drivers side door card on my car had a nasty scratch/gouge and was generally minging.
D1128F09-1DCF-4916-BEC7-A4A5D2D1B2E9.jpeg
994B6A09-AEC0-428D-B1E4-B97E8BB61AE9.jpeg

97707B16-5797-4B0E-B0D6-C3E0745ED0CF.jpeg

I stripped the old door card off, spent a good hour removing the butyl tape residue, cleaned the inner skin of 17 years worth of detritus, bodily fluids and dead skin. Before adding new Butyl tape and refitting. Easy job really but satisfying none the less.
3AED465B-044A-4452-8080-78774A3F3697.jpeg
2DE7407C-0C23-4A8B-BF71-46AB675478CC.jpeg


9D3CC206-928A-4C06-8209-5105B53DDF3E.jpeg

Managed to ruin my drivers side arch liner thanks to my ham fisted spannering (forgot to attach the leading edge) luckily I managed to cable tie it to my front splitter! Oh and The bloody thing drones like f**k at 2500rpm! Need a centre silence for sure

E2182A09-15E4-4004-AC92-B46134CB037D.jpeg
8C1BF8A5-504B-402F-BDEE-6EC2133118D7.jpeg
 

DomP182

ClioSport Club Member
  ph1 172, Arctic182
Not a great deal to update really. Other than the car has been taxed finally and I have been thrashing it around all weekend...finally! I need to get the car in for an alignment, so will try and sort over the coming week.

I took a trip over to see @DomP182 to collect some interior trim, he had previously collect off me! The drivers side door card on my car had a nasty scratch/gouge and was generally minging.
View attachment 1531062View attachment 1531063
View attachment 1531064
I stripped the old door card off, spent a good hour removing the butyl tape residue, cleaned the inner skin of 17 years worth of detritus, bodily fluids and dead skin. Before adding new Butyl tape and refitting. Easy job really but satisfying none the less.
View attachment 1531065View attachment 1531067

View attachment 1531066
Managed to ruin my drivers side arch liner thanks to my ham fisted spannering (forgot to attach the leading edge) luckily I managed to cable tie it to my front splitter! Oh and The bloody thing drones like f**k at 2500rpm! Need a centre silence for sure

View attachment 1531068View attachment 1531069
So clean Russ! good to meet up again, hopefully get that drive up to Rhayader Dams this summer.
 

RustyMojo

Bon Jovi Officianado
ClioSport Club Member
Scraping the barrel with little jobs on the clio at the minute. Annoying as I have a beam ready to fit so I can finish the underside. Anyway, this weekend I replaced the horrible Sparco pedal covers and fitted a set of replica Renault OE pedal covers I purchased the covers off a lad on Facebook, he’s done a lovely job. All apart from the rivers supplied which just seemed to snap.


A95CAA6F-FC6C-41FE-8E09-6E2A4E595650.jpeg

7D1A1893-482D-4594-B12F-A3BC821884E4.jpeg
Anyway, I rubbed the pedals down and coated with zinc primer before black stone chip. Pretty happy with the results.
C5C85AC6-5CB8-4D13-989D-C9DD8BED3B28.jpeg
CD043314-F03F-45AC-8F38-F50D45DC21DE.jpeg
C89A26C1-3A3D-4A13-A520-62D590CB9C53.jpeg
15DAC116-D901-4E48-960A-A91098250732.jpeg

So looking forward to getting involved with some bigger stuff. Albeit the boilers just blown up and we have found several problems with the house as part of our loft extension. So the bill has risen significantly!
 

RustyMojo

Bon Jovi Officianado
ClioSport Club Member
I suppose I had better update this, though it’s another boring one I’m afraid...in fact I’m boring myself just writing it. Apologies!

So the house build work continues albeit its now coming to an end...this has been somewhat limiting for the clio project. Financially I’m ruined and the garage space/tool access is non existent. Since I had owned the car the sound quality of the stereo system has been woeful. I don’t have the best of hearing and the sound of the Ktec exhaust system has meant I couldn’t hear anything unless it was cranked right up. Even then it sounded awful. I took my 11 year old lad out for a spin in the car and he pointed out that the sound was only coming out from one side (honestly my hearing is that shocking) I soon discovered:

52E5CF88-0038-4CD3-AA18-C875AF95FDE7.jpeg

thats right, someone had silicones the speaker in and the cables on! The otherside someone had modified the speaker cables and the join had corroded to a point I had to replace the whole section. Whilst doing this, I thought I had better finally check behind the rear door cards...something I had been putting off!

I was pleasantly surprised with what I found. The passenger side was very clean with only mild surface corrosion, the drivers side was much worse but still salvageable. Biggest issue being the drain hole in the sill was blocked.
176DC1EC-66B4-491B-BD16-C57810692DC3.jpeg
369DED03-FEC8-411B-BF8A-AE21FEEEB442.jpeg


I set about grinding all of the rust out before treating and over coating and finally protecting with wax oil.
170C945B-91A4-40CD-B3E6-31FD0002B22D.jpeg

EBA81B26-A3B2-4F65-A741-127DA3C530CD.jpeg


replaced broken trim clips in an ever losing battle to stop the wanker from rattling

85D172D7-0A1F-4DDB-A611-E041FB8EC8CC.jpeg

Incidentally whilst I was working on this in the absolute deluge of rain, I notice water is getting in through the side strip attachments. So quick question for you guys in the know. Should I be dealing this somehow? Looks like I should be whacking in a load of silicone sealant?

In a break from the rain...actually I’m talking s**t I did this whilst it was hammering down, obviously my spirits needed dampening further, I finally fitted my engine under tray. I have had this for months, but couldn’t fit until I could be arsed enough to Jack the car up high enough to fit some rivnuts to attach it. Job done, this will obviously help fix the leaking selector seal on the gear box....
3780ADDA-4EBF-40F8-AB85-C0748EDC7141.jpeg

finally, whilst trying to patch back together the remains of my drivers side arch liner (this thing has had more plastic remedial work than Vorderman, I noticed this:
5931C695-32EE-488C-951D-BED2763AEE6F.jpeg

that’s right the carbon canister hose had been running the bottom pulley, which possibly explains the faint smell of fuel, luckily it didn’t catch the belt in an awkward way. I set about looking to remove the carbon canister, albeit I didn’t like that solution. Luckily Alex from AWM suggested sleeving the join! I had completely over complicated the solution, a section of 8mm fuel hose is the perfect size to cover the broken line, I even made a new hose clip to make sure there is no risk of
84916317-6355-43B9-A5B7-16CF4ABCC728.jpeg


Think that brings me up to date for now. Next big job is to drop the fuel tank and rear beam....oh joy! I have a refurbished beam to fit , so hopefully won’t be too much of a task. Once that’s done I can start on some more exciting jobs. Oh and book her in somewhere to do the belts, which are due in November.

Tomorrow will be the first time for the Clio at Caffeine and Machine for their FWD Wednesday evening event. More rain is forecast so it’s likely to be a washout...typical
 

Mr Underhill

ClioSport Club Member
The rear beam isn't too bad, although mine has gone rusty in less than 6 months. I've got a spare so i'm going to refurbish that one myself, to ensure it lasts a bit longer. I assume you're planning on doing some anti-corrosion work under the tank?
 

RustyMojo

Bon Jovi Officianado
ClioSport Club Member
The rear beam isn't too bad, although mine has gone rusty in less than 6 months. I've got a spare so i'm going to refurbish that one myself, to ensure it lasts a bit longer. I assume you're planning on doing some anti-corrosion work under the tank?
Exactly that, I don’t know what it’s like under the tank as yet but I have seen enough to know there are places where corrosion are becoming a potential issue. Given I’ll have the exhaust, beam and brackets off it makes sense to sort whilst I’m under the car
 
  Clio 182 FF
Looking good buddy, glad the inner sills weren't too bad! As you say, definitely worth dropping the tank whilst you are under there replacing the beam.

That silicone'd speaker cable... what the hell were they thinking?!
 
Ive certainly noticed water getting in via my side bump strips when ive had the rear door cards off too. I think that is just the design to be honest and what the drain holes in the door and rear arch\sill area are for. There has never been any standing water so I assume the drains are doing their job.
 

RustyMojo

Bon Jovi Officianado
ClioSport Club Member
Looking good buddy, glad the inner sills weren't too bad! As you say, definitely worth dropping the tank whilst you are under there replacing the beam.

That silicone'd speaker cable... what the hell were they thinking?!
Goodness knows, things like that always worry me. As bodges are not usually isolated to one incident
 

ajracer

ClioSport Club Member
Being a builder who is currently tearing my very stressed clients house apart to install an external lift for their elderly in-laws I can understand why lying under a car in the pouring rain can give you therapy......
 

frayz

ClioSport Club Member
Yeah i think the holes for the rubbing strips weep a little water in heavy rain, again its what the drains are there for. Just give it a all a solid covering of Waxoyl or Dynax and make sure those drains are clear and it will be fine. This is the reason i kept those apertures clear when doing all my sound deadening as i knew a small amount of moisture would find its way in there .


Top