
ajracer
ClioSport Club Member
Just caught up. Stunning job mate!
Great work Steve! I’m currently refurbishing my Arctic blue 182, but the efforts you have gone to make mine look poor! HahaThought I would have a go at this V-logging malarky whilst we have all have all the time in the world..and thanks to Cliosport, I followed this guide on HOW TO REMOVE YOUR DOOR PANEL and removed the drivers door panel as the drivers door lock doesn't seem to be working.
View attachment 1460426
When I whipped the door panel off I found the solenoid was unplugged so figured that was the only issue and plugged it in, unfortunately there does seem to be more of an issue with the lock, so I whipped it out. Whilst I was messing around with the door, I figured now was the right time to replace the window seal for a new one I came across, that hasn't got any rust or distortion. Hope you enjoy the video!
I then fitted a set of new rear axle bolts inside the car whilst I had access to the inside:
View attachment 1460431
Then I spent a bit of time figuring out where the coolant hoses go!
View attachment 1460432
She's coming along nicely now!!
Thanks for reading/watching!")

Keep up the good work, and can I ask, is that Goonzquad’s YouTube music playing in the timeframe videos?

Wow, just wow! Fantastic!
Why didn't you clean and polish the wiper assembly?")
I did this the other week as the Cup...
Must be so satisfying to know its all pretty much corrosion free and sealed now!

Beautiful underseal job Steve. How far did you go at the front of the car?
Where did you mask it to?
Perfect.Thank you @frayz
I stopped at the jacking points. The previous owner had under sealed the front arches, but as you saw from one of my posts, there was some rust that wasn’t treated properly so was lurking underneath.
The front subframe is all clear of underseal.
Perfect.
Did you find one tin of Dinitrol was enough to do the whole underside?


Just finished that job on my 182, very satisfying finally putting it all back together. Also happy I caught it before it became an issue. Mine looked exactly the same level of rust as yours.
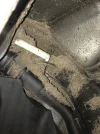
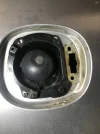
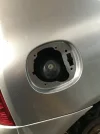
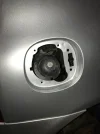
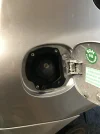
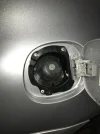
As you can see the back of the fuel filler was full of s**t. I have since cleaned the arch, repaired any localised surface rust and covered in stone chip. Will be under sealing at some point as well. I didn’t take a picture of the paint removed. But basically mine had gone (you can just see) around the bottom of the filler cup as well. Once I started taking the paint off to get to bare metal I basically had to clean up around the whole opening. I used a drill with sanding wheel to get back to proper sound metal and then treated, primed and overcoated both sides.
Great work sir!! Was it just a quick rattle can job for the paintwork, or did you get it done professionally??


