
ClioSport.net
-
When you purchase through links on our site, we may earn an affiliate commission. Read more here.
You are using an out of date browser. It may not display this or other websites correctly.
You should upgrade or use an alternative browser.
You should upgrade or use an alternative browser.
Fred and James’ Clio 182 Racecar Project
- Thread starter FrogJam Motorsport
- Start date
-
- Tags
- 182 race racecar track track build
FrogJam Motorsport
ClioSport Trader
Thanks a lot Colin.Incredible skill, knowledge, time and patience to create this monster!! Lovely write up and who doesn't love freshly painted or custom engineered parts being fitted. Top work.
FrogJam Motorsport
ClioSport Trader
Cheers Jamie.What a great build. Some lovely attention to detail.
How did you find the HPA wiring course was thinking about it myself as want to build a loom for my PH1 race car. Maybe this year of season doesn’t start soon!
The HPA course was good. I found it really useful for the actual physical construction of the loom (such as joints, template, materials, order of construction etc). I had done some wiring design and building before so was confident in designing the wiring diagram but less so with the construction of it, hence why I used the HPA course.
I think if I was to do the loom again I would spend some more time on it and try to use concentric twisting.
Their ecu tuning course was great, pretty much followed it and got ours going with very few issues.
Jamie86
ClioSport Club Member
RS175,595,205gti,172
That’s good to know think I’ll use one of the many vouchers they keep sending me.
Be great to have a nice basic loom rather than the mess that Renault have.
Although mine will be a bit more basic than the electronics you’re running. Currently just on SCS Delta 400 and possibly an Aim dash soon
Be great to have a nice basic loom rather than the mess that Renault have.
Although mine will be a bit more basic than the electronics you’re running. Currently just on SCS Delta 400 and possibly an Aim dash soon
FrogJam Motorsport
ClioSport Trader
Post number 19.
Done a few bits since the last post.
Went for a radium coolant tank and catch can. With a straight and 90 degree AN fitting the hose fittings were in the exact same place as the standard coolant tank so the existing coolant hoses were perfect. Catch can was connected to the inlet hose using a self sealing fitting. No real reason we picked these ones apart from they look great.


Next was a bit of a change in plan, decided to change to Laguna uprights as the lower part of the laguna upright is a much better/stronger design for attaching to the ball joint/roll centre pin. Found a set of Laguna uprights from Lithuania as Nick at Pure Motorsport hasn’t been able to get any from his usual sources. For reference he is planning on designing and manufacturing his own replacement uprights but we didn’t want to wait for them but certainly an option for the future. The only trouble is that you need to change the shocks to 65mm spacing.


Last person to change the wheel bearing had a shocker with getting the inner bearing race off the hub so decided to get new hubs since new bearings were going in too.

Some machining/grinding is required to give clearance to the shock mounting plates, did this with a combo of a die grinder and flap disc.


Then it was time to cut up a perfectly good set of AST5100s.


Done a few bits since the last post.
- Coolant tank and catch can.
- Laguna uprights and PMS roll centre kit.
- Windows and windscreen.
- Temporary brake ducts.
- Corner weight scale levelling pads.
Went for a radium coolant tank and catch can. With a straight and 90 degree AN fitting the hose fittings were in the exact same place as the standard coolant tank so the existing coolant hoses were perfect. Catch can was connected to the inlet hose using a self sealing fitting. No real reason we picked these ones apart from they look great.
Next was a bit of a change in plan, decided to change to Laguna uprights as the lower part of the laguna upright is a much better/stronger design for attaching to the ball joint/roll centre pin. Found a set of Laguna uprights from Lithuania as Nick at Pure Motorsport hasn’t been able to get any from his usual sources. For reference he is planning on designing and manufacturing his own replacement uprights but we didn’t want to wait for them but certainly an option for the future. The only trouble is that you need to change the shocks to 65mm spacing.
Last person to change the wheel bearing had a shocker with getting the inner bearing race off the hub so decided to get new hubs since new bearings were going in too.
Some machining/grinding is required to give clearance to the shock mounting plates, did this with a combo of a die grinder and flap disc.
Then it was time to cut up a perfectly good set of AST5100s.
FrogJam Motorsport
ClioSport Trader
Post number 19 continued.
Was planning on getting the uprights zinc coated but basically was impatient so just spray painted the parts when it was baltic in the garage so got the heater out.


Whilst doing the uprights also sorted out new wheel speed sensors. Went for some universal Hall effect sensors. Got slightly caught out as these required a 12v supply but I had wired them to a 5v, so had to do a little rewrite behind the ADU.


With the standard ABS rings the wheel speed sensor were not working, from the data sheet the abs ring teeth were too close together so some more machining/grinding with the die grinder and ground down every other tooth and then they worked perfectly.


Was planning on getting the uprights zinc coated but basically was impatient so just spray painted the parts when it was baltic in the garage so got the heater out.
Whilst doing the uprights also sorted out new wheel speed sensors. Went for some universal Hall effect sensors. Got slightly caught out as these required a 12v supply but I had wired them to a 5v, so had to do a little rewrite behind the ADU.
With the standard ABS rings the wheel speed sensor were not working, from the data sheet the abs ring teeth were too close together so some more machining/grinding with the die grinder and ground down every other tooth and then they worked perfectly.
Mr Underhill
ClioSport Club Member
Looking good fellas. Oh and those hubs and bearings are working lovely on the daily 
FrogJam Motorsport
ClioSport Trader
Post number 19.
And then a job I was not looking forward to, the windows and windscreen.
Went for the plastic4performance polycarbonate window kit with a pro slider and a heated Ricky evans windscreen. Both of which all fitted perfectly and looked great so initial feedback is spot on.
Putting the adhesive off I did the doors first. Nothing new here, I copied exactly how tomotek did his door windows. Rivnuts along the top edge of the door, with two holes drilled into the window for bolts on the outside to hold the window up and the 3 rivnuts in the middle of the door to hold the window against the outer seal of the door.


Didn’t get any pictures during the install of the other windows, probably a combo of concentration and a small amount of panic about how they were going to turn out. For the rear quarters, cleaned the body seam/bond area with dinitrol 520 then painted with dinitrol 530. Then used a lot of sikaflex for the windows. Needed 1.5 tubes per rear quarter windows.
Top tip!! Make sure your doors can shut without touching the windows before the adhesive goes off. Luckily noticed and a quick push back of the window and were back in business.


Windscreen was a very similar procedure but also sealed the edge of the windscreen and painted the glass area to be bonded.


Regarding the heated screen wiring. The Clio mk2 screen has two separate heater elements. They recommend two 25 amps connections, so hooked it up to two 25amps PMU outputs. A really helpful guy at Ricky evans motorsport said they should draw between 15 and 16 amps each and sure enough it was drawing about 15 amps.

We aren’t sure what we will end up with brake wise. AP Racing 5000r kit? If so I plan to make a proper brake duct to fed a centre cooled disc. However the current brembo discs are fed from the outside so decided to use something quick and easy until we decide the way forward so used a pair of corvette brake ducts which happen to fit perfectly and even the existing bolt on the body lines up perfectly.


And then a job I was not looking forward to, the windows and windscreen.
Went for the plastic4performance polycarbonate window kit with a pro slider and a heated Ricky evans windscreen. Both of which all fitted perfectly and looked great so initial feedback is spot on.
Putting the adhesive off I did the doors first. Nothing new here, I copied exactly how tomotek did his door windows. Rivnuts along the top edge of the door, with two holes drilled into the window for bolts on the outside to hold the window up and the 3 rivnuts in the middle of the door to hold the window against the outer seal of the door.
Didn’t get any pictures during the install of the other windows, probably a combo of concentration and a small amount of panic about how they were going to turn out. For the rear quarters, cleaned the body seam/bond area with dinitrol 520 then painted with dinitrol 530. Then used a lot of sikaflex for the windows. Needed 1.5 tubes per rear quarter windows.
Top tip!! Make sure your doors can shut without touching the windows before the adhesive goes off. Luckily noticed and a quick push back of the window and were back in business.
Windscreen was a very similar procedure but also sealed the edge of the windscreen and painted the glass area to be bonded.
Regarding the heated screen wiring. The Clio mk2 screen has two separate heater elements. They recommend two 25 amps connections, so hooked it up to two 25amps PMU outputs. A really helpful guy at Ricky evans motorsport said they should draw between 15 and 16 amps each and sure enough it was drawing about 15 amps.
We aren’t sure what we will end up with brake wise. AP Racing 5000r kit? If so I plan to make a proper brake duct to fed a centre cooled disc. However the current brembo discs are fed from the outside so decided to use something quick and easy until we decide the way forward so used a pair of corvette brake ducts which happen to fit perfectly and even the existing bolt on the body lines up perfectly.
FrogJam Motorsport
ClioSport Trader
Post number 19 continued.
Last part of the post. We bought a set of Proform scales. Didn’t want to spend a fortune on a set so bought these from the USA, worked out to be £760. Went with the wired scales as the wireless ones seem to get a bad review.
Then didn’t want to spend a fortune on a set of levelling pads and turn plates so decided to have a go at making our own. No idea how well they will work yet but will update you with how we get on aligning the car.
Last edited:
Ph2 172, R34 Skyline
Great project. How do you find the Proform scales? I'd heard they weren't the most accurate but I've not tried them myself, as you say the cost of these vs others is a big gap.
Also the Corvette brake ducts are a brilliant addition, would you be offended if I blatantly copied that idea on my own car?
Also the Corvette brake ducts are a brilliant addition, would you be offended if I blatantly copied that idea on my own car?
FrogJam Motorsport
ClioSport Trader
Thanks.Great project. How do you find the Proform scales? I'd heard they weren't the most accurate but I've not tried them myself, as you say the cost of these vs others is a big gap.
Also the Corvette brake ducts are a brilliant addition, would you be offended if I blatantly copied that idea on my own car?
I’ve only put the clio on them once so can’t really give much of an opinion on them yet but from my first use on them they seem spot on. I weighed myself using bathroom scales, 79.7kg. Then weighed myself on the Proform scales, 2 said 79.5, 1 said 80.0 and the other couldnt make its mind up between 79.5 and 80. So for me that’s pretty good. Obviously could be a little more out when weighing the car but even if it’s a few kg out with the whole car, does it really matter?
For us we couldn’t justify the extra £500 for the basic intercomp ones or £800 extra for the longacre ones without giving these ago first.
Absolutely not, quite the opposite. I don’t understand people not wanting others to copy them, personally I think it’s great when others want to copy what you’ve done. Mind you, I couldn’t really say other wise as I’ve copied lots too. Think the best thing would be for someone to copy you, then find a better way of doing it whilst copying then sharing the better/different way.
FrogJam Motorsport
ClioSport Trader
Cheers Jon. Glad you’re pleased with the uprights.Looking good fellas. Oh and those hubs and bearings are working lovely on the daily
FrogJam Motorsport
ClioSport Trader
Post number 20.
Alignment and corner weighting.
Should be a shorter post this time as I’m up to date with the posts, this is the work I did over Easter weekend.
I showed the scale pads I made in the last post and was keen to give them a go. Started setting them out and adjusting the height with the 6 feet on each pad with the help of a spirit level and laser level which I had previously used for measuring the roll cage.

To make it easier to get the car onto the pads I spray painted round each of the feet to mark the position so I could move them out the way, roll the car back into the garage and then jack the car up side by side and place the pad back into position.

First I was keen to see how well the turn/slip plates work. I polished the surface and used PTFE lube on both sides of the PTFE sheet (shown in the previous post). Got the car on and could instantly tell they where working as the plates moved out slightly as the suspension settled. Sure enough turning the wheel was very easy too.

Not sure the video does it justice but will just have to take my word for it that there is hardly any resistance. Can easily turn the wheel by turning the tyre itself. And can actually shift the entire car side to side by giving the wheel (not steering wheel) a sharp yanked. So I was pleased with how they turned out, and a bargain compared to the price of proper levelling pads and turn/slip plates.

So the first weigh and the car was 962.5kg (just noticed now that is minus bumper) And the corner weight was a fair way off bearing in mind thats minus driver.

I checked castor before doing the corner weight and needed to add a fair amount. Please feel free to comment as I am no expert on alignment setup, but from some reading I was aiming for a few degrees of camber and around 8 degrees of castor. Is this the right way to go? No idea but it seems sensible to start with. I didn’t get a picture of it but bought a used longarce camber/castor gauge. Had to turn the wheels 15 degrees to measure the castor which was a bit of guess work so need to think of a way to measure the steering angle accurately but for the moment it will be fine as it should be similar left to right.
So after some playing with the front left and rear right ride height I got the corner weight to 50.2% with myself sitting to the car. Now what I am unsure about is how much of a difference the side to side weight distribution makes? 53.7% vs 46.3% of the left.

I had made a couple of fixtures to hold the string alignment poles a couple months back (in a previous post) which attach directly to the car which makes it nice and easy whilst jacking the car up to make adjustments. Some brick line off Amazon for a couple of quid with some bolts attached to the other ends did the job for the string itself.


I maxed out the front adjustment for camber and adjusted the steering arms. And these are the numbers i finished up with. The camber numbers are obviously negative too. Front toe slightly different based on having the steering wheel straight. Obviously will need a little play after the first drive.

So the rear needs some work. I worked out that 1mm of toe is equivalent to 0.132 degrees, so to get the right hand side as close to neutral as possible I would need a 0.73 degree shim (obviously doesnt exist) so to the closest 10 minutes is 40 minutes to have slight toe in or 50 minutes for slight toe out. Does this sound about right to you or have I cocked something up here? And for the left hand side with the same logic would be 10 minute shim for slight toe in or 20 minute shim for slight toe out.
Would be interested in peoples own experience with their setups. Keep in mind this is purely for track use.
Haven’t got an awful lot left to do now. Mapping is booked in with RRR Engineering for May so not too much longer left until it will be up and running.
Alignment and corner weighting.
Should be a shorter post this time as I’m up to date with the posts, this is the work I did over Easter weekend.
I showed the scale pads I made in the last post and was keen to give them a go. Started setting them out and adjusting the height with the 6 feet on each pad with the help of a spirit level and laser level which I had previously used for measuring the roll cage.
To make it easier to get the car onto the pads I spray painted round each of the feet to mark the position so I could move them out the way, roll the car back into the garage and then jack the car up side by side and place the pad back into position.
First I was keen to see how well the turn/slip plates work. I polished the surface and used PTFE lube on both sides of the PTFE sheet (shown in the previous post). Got the car on and could instantly tell they where working as the plates moved out slightly as the suspension settled. Sure enough turning the wheel was very easy too.
Not sure the video does it justice but will just have to take my word for it that there is hardly any resistance. Can easily turn the wheel by turning the tyre itself. And can actually shift the entire car side to side by giving the wheel (not steering wheel) a sharp yanked. So I was pleased with how they turned out, and a bargain compared to the price of proper levelling pads and turn/slip plates.
So the first weigh and the car was 962.5kg (just noticed now that is minus bumper) And the corner weight was a fair way off bearing in mind thats minus driver.
I checked castor before doing the corner weight and needed to add a fair amount. Please feel free to comment as I am no expert on alignment setup, but from some reading I was aiming for a few degrees of camber and around 8 degrees of castor. Is this the right way to go? No idea but it seems sensible to start with. I didn’t get a picture of it but bought a used longarce camber/castor gauge. Had to turn the wheels 15 degrees to measure the castor which was a bit of guess work so need to think of a way to measure the steering angle accurately but for the moment it will be fine as it should be similar left to right.
So after some playing with the front left and rear right ride height I got the corner weight to 50.2% with myself sitting to the car. Now what I am unsure about is how much of a difference the side to side weight distribution makes? 53.7% vs 46.3% of the left.
I had made a couple of fixtures to hold the string alignment poles a couple months back (in a previous post) which attach directly to the car which makes it nice and easy whilst jacking the car up to make adjustments. Some brick line off Amazon for a couple of quid with some bolts attached to the other ends did the job for the string itself.
I maxed out the front adjustment for camber and adjusted the steering arms. And these are the numbers i finished up with. The camber numbers are obviously negative too. Front toe slightly different based on having the steering wheel straight. Obviously will need a little play after the first drive.
So the rear needs some work. I worked out that 1mm of toe is equivalent to 0.132 degrees, so to get the right hand side as close to neutral as possible I would need a 0.73 degree shim (obviously doesnt exist) so to the closest 10 minutes is 40 minutes to have slight toe in or 50 minutes for slight toe out. Does this sound about right to you or have I cocked something up here? And for the left hand side with the same logic would be 10 minute shim for slight toe in or 20 minute shim for slight toe out.
Would be interested in peoples own experience with their setups. Keep in mind this is purely for track use.
Haven’t got an awful lot left to do now. Mapping is booked in with RRR Engineering for May so not too much longer left until it will be up and running.
I went for 6 mins toe in per side and 2⁰ camber, im gonna probably push the camber up some more as it still wears really hard on the outer edge of the tyre (this is on cup shocks and Cooksports so ideally need coilovers)
As for the rear toe, try and slacken the beam and move it around as there's a lot of adjustment to be had from them just from the bolt holes alone
As for the rear toe, try and slacken the beam and move it around as there's a lot of adjustment to be had from them just from the bolt holes alone
FrogJam Motorsport
ClioSport Trader
Can’t remember off the top of my head. Will make a note of it when I next measure it.How much camber is on each wheel when you turn one way?
FrogJam Motorsport
ClioSport Trader
Thanks for that. Think I will change to a bit of toe in at the front to start with to be on the safe side and then have a play from there.I went for 6 mins toe in per side and 2⁰ camber, im gonna probably push the camber up some more as it still wears really hard on the outer edge of the tyre (this is on cup shocks and Cooksports so ideally need coilovers)
As for the rear toe, try and slacken the beam and move it around as there's a lot of adjustment to be had from them just from the bolt holes alone
Will give shifting the beam around a go. Couldn’t remember if it had any slack in it but it probably doesn’t need to move much to even it up left to right.
clio 172
Hi fred what pieces did you use for the u bend ? I need to do the same to bypassPost number 11.
Been too long since doing a post but been busy with the car at least. Had the engine running last weekend so need to update the last months work so I can do the start up post, only had a few problems.
Next job was to get the engine in but decided to add some DEI reflective heat shield to the tunnel before I did so. Nice easy job which made a change.
View attachment 1492892
Hopefully this will be the final time putting the engine in before the car is running, got the knack of getting the engine in and out now, just need to get engine tilted in the right way and it’s a doddle, having the right kit does also help a lot.
View attachment 1492893
Coolant hoses worked a treat. Used a standard 182 set from MTC and to bypass the heater matrix used a u bend piece. Even with the different radiator and orientation the hoses worked pretty much perfectly. My plan is to have an aluminium coolant tank and catch can but the standard one will do for the time being.
View attachment 1492894
View attachment 1492895
I have already done the fuel hard lines so needed to sort the tank and rail flexi lines. I decided to get Atec to crimp the OEM fittings to their dash 6 400 series hose. So sent Atec the hoses cut to length and the OEM fittings, they came back perfect so glad I did it.
View attachment 1492897
Since I had the flexi lines back meant I could fit the fuel tank, so added some more reflective heat shield material for where the exhaust gets close and got the tank in. Fuel hose worked perfectly with the right angled fitting from the tank, hose coils round and then used a 30 degree fitting to the bulkhead fitting of the hardline.
View attachment 1492906
View attachment 1492907
Same as the fuel lines, the brake hard lines had been done but needed to do the flexi lines. The Atec fittings and 600 series hose are really nice and relatively straight forward to do. Just make sure to buy the mandrel tool, made splaying the braided part of the hose away from the inner tube nice and easy. Used stainless steel adaptors to convert the an-3 hose fitting to M10x1.0 calliper.
View attachment 1492908
View attachment 1492909
View attachment 1492910
Was then getting very close to getting some electrics in the car.
Touring_Rob
ClioSport Club Member
I went for 6 mins toe in per side and 2⁰ camber, im gonna probably push the camber up some more as it still wears really hard on the outer edge of the tyre (this is on cup shocks and Cooksports so ideally need coilovers)
As for the rear toe, try and slacken the beam and move it around as there's a lot of adjustment to be had from them just from the bolt holes alone
Are you sure your toe in at the front? These should be toe out front. Under braking or as the front dives they will go more tow in I think....
Last edited:
Touring_Rob
ClioSport Club Member
Post number 20.
Alignment and corner weighting.
Should be a shorter post this time as I’m up to date with the posts, this is the work I did over Easter weekend.
I showed the scale pads I made in the last post and was keen to give them a go. Started setting them out and adjusting the height with the 6 feet on each pad with the help of a spirit level and laser level which I had previously used for measuring the roll cage.
View attachment 1531485
To make it easier to get the car onto the pads I spray painted round each of the feet to mark the position so I could move them out the way, roll the car back into the garage and then jack the car up side by side and place the pad back into position.
View attachment 1531489
First I was keen to see how well the turn/slip plates work. I polished the surface and used PTFE lube on both sides of the PTFE sheet (shown in the previous post). Got the car on and could instantly tell they where working as the plates moved out slightly as the suspension settled. Sure enough turning the wheel was very easy too.
View attachment 1531491
View attachment 1531492
Not sure the video does it justice but will just have to take my word for it that there is hardly any resistance. Can easily turn the wheel by turning the tyre itself. And can actually shift the entire car side to side by giving the wheel (not steering wheel) a sharp yanked. So I was pleased with how they turned out, and a bargain compared to the price of proper levelling pads and turn/slip plates.
View attachment 1531493
So the first weigh and the car was 962.5kg (just noticed now that is minus bumper) And the corner weight was a fair way off bearing in mind thats minus driver.
View attachment 1531494
I checked castor before doing the corner weight and needed to add a fair amount. Please feel free to comment as I am no expert on alignment setup, but from some reading I was aiming for a few degrees of camber and around 8 degrees of castor. Is this the right way to go? No idea but it seems sensible to start with. I didn’t get a picture of it but bought a used longarce camber/castor gauge. Had to turn the wheels 15 degrees to measure the castor which was a bit of guess work so need to think of a way to measure the steering angle accurately but for the moment it will be fine as it should be similar left to right.
So after some playing with the front left and rear right ride height I got the corner weight to 50.2% with myself sitting to the car. Now what I am unsure about is how much of a difference the side to side weight distribution makes? 53.7% vs 46.3% of the left.
View attachment 1531496
I had made a couple of fixtures to hold the string alignment poles a couple months back (in a previous post) which attach directly to the car which makes it nice and easy whilst jacking the car up to make adjustments. Some brick line off Amazon for a couple of quid with some bolts attached to the other ends did the job for the string itself.
View attachment 1531497
View attachment 1531498
I maxed out the front adjustment for camber and adjusted the steering arms. And these are the numbers i finished up with. The camber numbers are obviously negative too. Front toe slightly different based on having the steering wheel straight. Obviously will need a little play after the first drive.
View attachment 1531499
So the rear needs some work. I worked out that 1mm of toe is equivalent to 0.132 degrees, so to get the right hand side as close to neutral as possible I would need a 0.73 degree shim (obviously doesnt exist) so to the closest 10 minutes is 40 minutes to have slight toe in or 50 minutes for slight toe out. Does this sound about right to you or have I cocked something up here? And for the left hand side with the same logic would be 10 minute shim for slight toe in or 20 minute shim for slight toe out.
Would be interested in peoples own experience with their setups. Keep in mind this is purely for track use.
Haven’t got an awful lot left to do now. Mapping is booked in with RRR Engineering for May so not too much longer left until it will be up and running.
Finding it a bit hard to believe your rear right toe.
But either way - I've dyno'd a number of track/race cars in the past and they are a dick head for walking all over the rollers due to wild tracking and or camber so you end up strapping them down harder than is ideal. For the tune I would suggest you run close to standard figures and scrap/hard tyres then switch to track geo setup and tyres after. Like maybe just go for 0 toe 1 deg camber for the dyno....
Nice setup too, your plates looks great!
FrogJam Motorsport
ClioSport Trader
Used a set of the MTC hoses then cut the one from the heat matrix in half.Hi fred what pieces did you use for the u bend ? I need to do the same to bypass
Then you need two extra bits a 19mm ID silicone hose 180 degree u bend elbow and a 19mm joiner. There’s a few different brands and colours to choose from for the u bend but what ever takes you’re fancy on eBay.
I trimmed the u bend down to be abit shorter as the one we got was pretty long.
Touring_Rob
ClioSport Club Member
And also.... how the hell did you discover those Corvette brake ducts? Look absolutely perfect for the job!
FrogJam Motorsport
ClioSport Trader
Cheers Rob.Finding it a bit hard to believe your rear right toe.
But either way - I've dyno'd a number of track/race cars in the past and they are a dick head for walking all over the rollers due to wild tracking and or camber so you end up strapping them down harder than is ideal. For the tune I would suggest you run close to standard figures and scrap/hard tyres then switch to track geo setup and tyres after. Like maybe just go for 0 toe 1 deg camber for the dyno....
Nice setup too, your plates looks great!
It does seem a fair way off doesn’t it. But I have hacked the rear beam to bits and welded the stiffener kit on so would have put a fair bit of heat into it, plus if i can even the toe up left to right with a bit of a wiggle of the body mounts like @Yorkshire Pudding said then it would make more sense.
Someone please correct me if I am wrong but I believe the dyno RRR have is a hub mounted one so assuming won’t have issues due to the alignment?
And also.... how the hell did you discover those Corvette brake ducts? Look absolutely perfect for the job!
Haha, saw someone using them in Australia or New Zealand, can‘t remember which, on a gt86 build thought they looked like a decent option assuming the size was about right so decided to take a complete punt on them and paid off.
frayz
ClioSport Club Member
Wonderful talent and fantastic attention to detail.
Did you buy the Z06 ducts over here or did you buy direct from the US? Also may i ash what you have used to connect them to the foglight apertures. I think id like to do the same, providing you have no tyre fouling on full lock.
Thank you")
Did you buy the Z06 ducts over here or did you buy direct from the US? Also may i ash what you have used to connect them to the foglight apertures. I think id like to do the same, providing you have no tyre fouling on full lock.
Thank you
Touring_Rob
ClioSport Club Member
Cheers Rob.
It does seem a fair way off doesn’t it. But I have hacked the rear beam to bits and welded the stiffener kit on so would have put a fair bit of heat into it, plus if i can even the toe up left to right with a bit of a wiggle of the body mounts like @Yorkshire Pudding said then it would make more sense.
Someone please correct me if I am wrong but I believe the dyno RRR have is a hub mounted one so assuming won’t have issues due to the alignment?
Haha, saw someone using them in Australia or New Zealand, can‘t remember which, on a gt86 build thought they looked like a decent option assuming the size was about right so decided to take a complete punt on them and paid off.
Ahhh if they have a hub dyno then just go straight for -5 camber and 2 degs toe out hahaha. I never had a chance to use a hub dyno but they do solve a lot of problems!
Good work on the ducts.
Wonder if you could elongate the mounting plate holes a little, might let you even up each side as long as you don't end up moving the RR wheel back too far and doing something else weird!
If you have any measurements for the hub, wheel offset and any spacers you are running I don't mind plonking it into solidworks - its an easy way to check your 1mm per 0.17deg figure if you want some validation.
Last edited:
Touring_Rob
ClioSport Club Member
Also in case it helps at all, my father has had this set for years which I borrow fairly often, its simple but works really well.
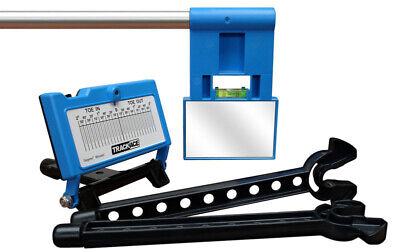
Trackace Laser Wheel Alignment System Tracking Gauges Toe in / Out Tool Tracker | eBay
Works on most vehicles, up to 22” wheels and requires just 10cm ground clearance. These countries include, but aren't exclusive to, Switzerland, Norway, Malta, Canary Islands and the Greek Islands. Supplied in a plastic storage box, approx 75 x 19 x 4cm.
www.ebay.co.uk
FrogJam Motorsport
ClioSport Trader
Thank you very much!Wonderful talent and fantastic attention to detail.
Did you buy the Z06 ducts over here or did you buy direct from the US? Also may i ash what you have used to connect them to the foglight apertures. I think id like to do the same, providing you have no tyre fouling on full lock.
Thank you
Bought them in the USA on eBay. This is the link to the ones we bought.
https://www.ebay.co.uk/itm/281605705202
At the moment I haven’t done anything to attached them, I have made the bumper quick release so I am not keen on having them attached to the bumper really if I can avoid it. I bought a set of 3D printed ducts which clip into the fog light holes which are meant for a hose to attached to but the corvette ducts are pretty much a tight fit up against the back of the fog lights so not sure it needs anything yet. Only time will tell when I get it on track. If it does need to be attached somewhere then I plan on making a bit of a bracket off the front bumper beam to fix them in place better.
So with my setup at the moment there is no fouling at full lock. That’s no spacer but Laguna uprights, the Laguna uprights I believe give a slight track width increase so assuming it would be the same as standard upright with a small spacer. But there seems to be plenty of room.
frayz
ClioSport Club Member
Thank you very much!
Bought them in the USA on eBay. This is the link to the ones we bought.
https://www.ebay.co.uk/itm/281605705202
At the moment I haven’t done anything to attached them, I have made the bumper quick release so I am not keen on having them attached to the bumper really if I can avoid it. I bought a set of 3D printed ducts which clip into the fog light holes which are meant for a hose to attached to but the corvette ducts are pretty much a tight fit up against the back of the fog lights so not sure it needs anything yet. Only time will tell when I get it on track. If it does need to be attached somewhere then I plan on making a bit of a bracket off the front bumper beam to fix them in place better.
So with my setup at the moment there is no fouling at full lock. That’s no spacer but Laguna uprights, the Laguna uprights I believe give a slight track width increase so assuming it would be the same as standard upright with a small spacer. But there seems to be plenty of room.
Thanks for that, im running the Northloop RCK hubs and only a 5mm spacer up front so should be okay for lock.
I thought buying direct from Uncle Sam might be the case, i'll just get bummed for soem VAT & duty lol
Ph2 172, R34 Skyline
Thanks for that, im running the Northloop RCK hubs and only a 5mm spacer up front so should be okay for lock.
I thought buying direct from Uncle Sam might be the case, i'll just get bummed for soem VAT & duty lol
Sorry to butt in, but if it helps, I ordered those ones above and the EBay Global Shipping Program gives a total shipped price inclusive of duties etc. Streamlines the process a bit and stops any nasty surprises on arrival.
Edited because the link doesn't need posting twice lol
FrogJam Motorsport
ClioSport Trader
Completely agree. The global eBay system works a treat. Bought a few things from the usa through eBay recently and haven’t had any bother.Sorry to butt in, but if it helps, I ordered those ones above and the EBay Global Shipping Program gives a total shipped price inclusive of duties etc. Streamlines the process a bit and stops any nasty surprises on arrival.
Edited because the link doesn't need posting twice lol
clio 172
Need to copy this intake set up , looks good fred. Whats the details on the carbon box ?Post Number 18 continued.
Since the wiring seemed like it was all working ok it was time to give the wiring a tidy up inside. Used braided sleeve for a lot of the wiring on the bulkhead so it would be nice and easy to add or modify any of the wiring at a later date.
View attachment 1519174
View attachment 1519175
View attachment 1519176
The wiring on the bulkhead isn’t as tidy as I would have liked it to be but functional is better than it just looking tidy I suppose. Hopefully it won’t be noticed once driving. Seems to be hidden a bit more from the drivers eye.
View attachment 1519177
Added the cage padding and checked on head room with my helmet on. Very close but just about manageable. Can gain 5mm with different seat bars, MSA/FIA says 35mm seat rails are ok but I ended up using 40mm so that could gain some room. Can move the seat down one notch on the side mounts too. The plan is for me to remove the seat cushion to drive and James can add the cushion in which will give us the different driving positions we need. May look at a resin seat bag instead of just the cushion difference if needed.
View attachment 1519178
Air intake was next. Thought of the different options for this but kept coming back to the same design as what Scott has done on his car (tomtek / pro-am racing) so I am afraid this is just a copy of what they have done. Revotec intake duct, ASH hoses and a carbon filter air box. Gives the best combination of ram air feed and cold air feed. Added stainless hose clamps and seems solid even without a mount for the carbon air box.
View attachment 1519179
View attachment 1519180
I gave the inside a good clean when tidying the wiring up, so finally decided to buy a car cover, Halfords outdoor car cover for £40. Extra small and fits the Clio perfectly.
View attachment 1519181
FrogJam Motorsport
ClioSport Trader
Nice!Need to copy this intake set up , looks good fred. Whats the details on the carbon box ? View attachment 1531517
Its one of these:
https://www.forgemotorsport.co.uk/P..._with_76mm_OD_InletOutlets--product--951.html
Forge Motorsport carbon air filter.
Assuming you’ve got the rest of the other bits sorted?
clio 172
Not yet fred , i just couldnt see any detail on that. Assuming the other bits are available online ?Nice!
Its one of these:
https://www.forgemotorsport.co.uk/P..._with_76mm_OD_InletOutlets--product--951.html
Forge Motorsport carbon air filter.
Assuming you’ve got the rest of the other bits sorted?
FrogJam Motorsport
ClioSport Trader
Yes, got the ASH hoses on eBay and revotec duct from eBay too I think.Not yet fred , i just couldnt see any detail on that. Assuming the other bits are available online ?
clio 172
They look like the ash ones i did have in blue which i sold apart from they were 2 90 degrees. Will get them ordered with the 180 i need. Thanks for info fred , thats one hell of a clio build !Yes, got the ASH hoses on eBay and revotec duct from eBay too I think.
FrogJam Motorsport
ClioSport Trader
Not a problem. Cheers mate.They look like the ash ones i did have in blue which i sold apart from they were 2 90 degrees. Will get them ordered with the 180 i need. Thanks for info fred , thats one hell of a clio build !
It will depend on whats been setup on the bump steer adjustment. A bit of toe out is more desirable on dive as you probably wont be able to get zero bump steer.Are you sure your toe in at the front? These should be toe out front. Under braking or as the front dives they will go more tow in I think....